Background
I’ve been looking for a way to allow another user to create rooms for my existing project using templates I’d created with consistent instance, tile, and background layers.
After my experiment with source control ended in disaster, I decided to shelf that for the time being and try a simpler approach:
Procedure
- On PC1, I Exported the as-is project as a .yyz file (File > Export Project > YYZ) and then saved the file to a network share.
- On PC2, I downloaded the [MyProjectName].yyz file and Imported it (File > Import Project > Path\To\.yyz file).
- I updated the project on PC2 by creating a new room, and then I saved the project.
- I opened File Explorer on PC2 and browsed to the project’s rooms subfolder (i.e., C:\>Users\[MyUsername]\Documents\GameMakerStudio2\[MyProjectName]\rooms).
- I located the corresponding folder to the new room I’d created, then copied the room2.yy file back to the network share.
- Back on PC1, I created a subfolder in my project with an identical folder name and then copied the room2.yy file to that location.
- I opened GameMaker Studio 2, right-clicked in the Asset Browser, and selected “Add Existing“. After navigating to the room subfolder from the previous step, I selected the .yy file and clicked “Open.” Nothing happened!
At this point, the rooms list didn’t update with the new asset, nor did I receive an error.
The Missing Step
After opening the game’s project file (.yyp) in a text editor, I could see a list of resources, including rooms, along with their relative paths:
"resources": [
{"id":{"name":"room1","path":"rooms/room1/room1.yy",},},
],
What I did not see was an entry for the new room I created, so I simply appended the list with the new room:
"resources": [
{"id":{"name":"room1","path":"rooms/room1/room1.yy",},},
{"id":{"name":"room2","path":"rooms/room2/room2.yy",},},
],
Towards the bottom of the list is the room order, which I also appended:
 "RoomOrderNodes": [
{"roomId":{"name":"room1","path":"rooms/room1/room1.yy",},},
{"roomId":{"name":"room2","path":"rooms/room2/room2.yy",},},
After saving and closing the text editor, I fired GMS2 back up, opened the project, and after an agonizing minute or so of loading, the project opened without error!
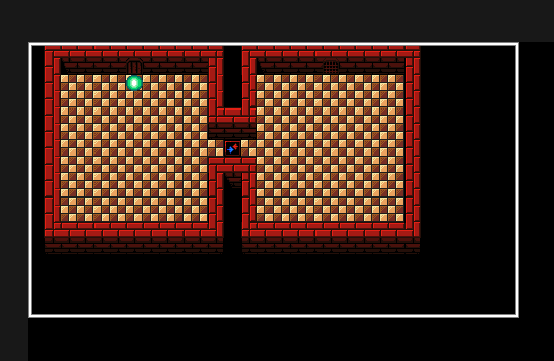
To my delight, there sat the imported room in the asset browser. I double-clicked it, and there it was:
Alternatives Considered
Someone on the official forums had suggested having Eric submit asset packs – I have no idea what that means exactly, but he seemed to suggest this was less than ideal.
Eric’s original levels were created in Tiled, and then I’d manually recreate them in GMS2, which was inefficient and very time-consuming; however, I’d heard that there were tools that could convert a Tiled map to a GMS2 .yy room resource file but couldn’t get it to work properly with my project. This is because our maps utilize multiple tile layers sandwiched between an instance layer (where the objects live) and the background layer. Most of these tools assume you are working for a single tile layer to another single tile layer, and none of the address how to get the room.yy file back into your project.
Caveats and Disclaimers
- In order for this to work, all of the resources used in the room (i.e., objects, sprites, tilesets, etc.) must be present and unchanged in both the source and destination projects
- GMS2 is known to not play nice with Cloud-synced project folders, so make neither system