Staying the Course[work]

In my last post, I began working my way through the free video lessons on www.gameprogrammingcourse.com and it’s associated YouTube channel.

It’s important to note that the YouTube channel is supplementary to the website, not the other way around; as such, if you arrive at the YouTube channel first (as I did) you might find yourself scratching your head when you get to the playlists, particularly where to start

If you’re looking for Level 01, that’s on his website here. There isn’t a video for this as you’re just downloading and installing GMS, the videos begin at Level 02.

###

It’s hard to believe that it’s only been 2 days since I started these courses, and I just finished Level 04, which wasn’t a lesson series, but rather a series of challenges designed to utilize all the skills I’d acquired in Levels 02 and 03.

Random Solutions

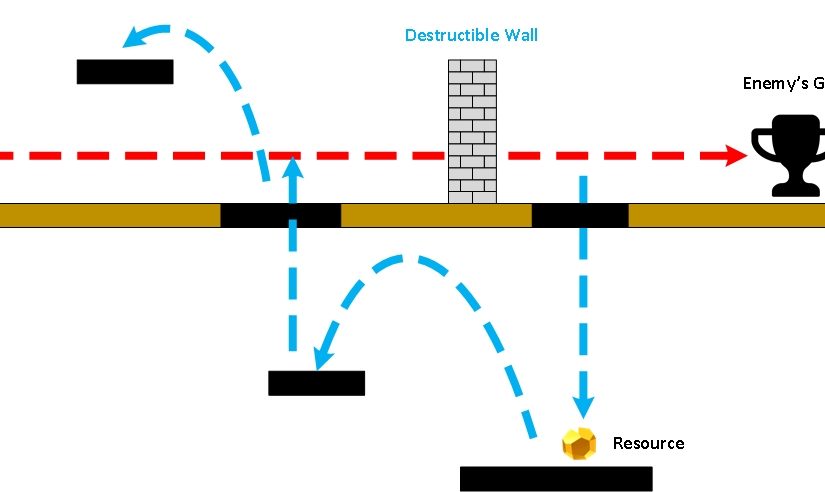
One of the problems we’d be wrestling with is game speed and it’s effect on action timing. Suppose you plant a brick wall in front a horde of advancing peasants.

Event > Collision > Obj_Peasant > Obj_BrickWall

//subtracts 1 hitpoint from the brick wall upon collision
with other {
hp=hp-1
}

Assuming you’ve given the Obj_BrickWall an instance variable called “hp” (i.e. hitpoints) and assigned a numeric value to it (e.g. 100), it would take one peasant about 3.2 seconds or so to break it down as he’s colliding with it 30 times a second, dealing 1 damage each time.

My solution to this was simple, but lacking – give the wall more hitpoints, say 1000 for instance. This isn’t a very elegant way to handle this, but it worked, and it took a peasant about 32 seconds or so to break down the wall, which is what I was looking for.

Then I completed Level 03, and in the process of doing so, learned about irandom_range (#,#). What this does is allow you to replace any integer with randomized range of numbers. For example, you could have the peasant do a savings throw (much like a tabletop RPG) to determine whether or not he landed a successful blow. That would look something like this:

//Utilizes a random number to determine whether or not a hit is scored,
//subtracts 1 hitpoint from the brick wall upon successful roll.


savingsthrow=irandom_range(0,100)

If savingsthrow=1 {
with other {

hp=hp-1
}
}

As such, the peasant has ~30 chances a second to hit the wall, dealing 1 point of damage on every successful hit. Towards the end of Level 03, and a few times in Level 04, this method was used as a makeshift timer of sorts to throttle the speed of an event by adjusting the range (i.e. bigger range = more time, smaller range = less time).

Looking ahead toward Level 05, I suspect that this will be replaced with a far more precise way of handling timing.

Stepping Stones and a Clear Path Forward

Building on an Unstable Foundation

As we draw closer to a working prototype, it’s become increasingly more apparent that there are some fundamentally flawed issues with the way we’re going about implementation.

Eric is new to both programming in general (save for some college level coursework a few years ago), and GML. All in all, he’s got about 4 or 5 weeks worth of experience in total, but no formal training. As such, he doesn’t have a solid foundation of knowledge to build on, forcing him to seek out tutorials (usually YouTube videos) which give him ideas as to how a thing can be done.

The most popular videos are more akin to “Let’s Plays” with little (if any) structure, and even fewer explanations as to why the developer elected to go about doing things a certain way.

This forced Eric to look at what the other developer did, attempt reproduce it, then reverse engineer it without understanding what each piece’s purpose – trying different arrangements and configurations until it worked (or at least appeared to).

What troubled me was that sometimes I’d ask for a seemingly trivial feature only to find that he was unable to work out how to program it, and compromised with an implementation that wasn’t up to spec.

For example, instead of using keys 1-6 to toggle a different weapon type, and Ctrl to fire,  he mapped weapon type 1 to key 1 because from a logic standpoint, he had no idea how that would work, let alone how to frame the problem so that he could look it up.

Another example was the breakable wall from my prototype specifications in the last post. What I asked for was for wall, when placed, to take damage when it collided with the enemy, and update it’s animation frames to show progressively more damage before being destroyed.

Because he didn’t understand how variables worked, the wall was killing the enemy rather than the other way around – my suspicion was that he didn’t use the “with other” construct to indicate that it was the wall taking damage, not the enemy as they both had an instance variable called “hp” (i.e. hitpoints).

After a few more hours of working on it, he came back and this time the walls were taking damage, but being destroyed after only a second or two. This was because he was using the image_index property to advance the frames of damage to the wall sprite, destroying the object when it reached the end of the animation, foregoing hitpoints altogether.

Since the room speed was set to 30 (i.e. 30 cycles/second), the enemy was colliding with the wall 30 times a second, causing the wall to cycle through each frame of its sprite sheet within a fraction of a second. While this “appeared” to work, it in fact did not follow my design specifications (no hitpoint system) and was therefore not fit for purpose.

I suggested how this could be solved in pseudo code, but he insisted he tried that and it didn’t work – again, probably because of which object he was calling the variables from, but I didn’t know that either at the time.

So where could we go from here?

You Don’t Know What You Don’t Know…

The root of the issue was that while I understood the basic logic I wanted to use, I didn’t have the syntax for it, and neither did Eric. We needed to take a step back and learn the basics before trying to implement big, hairy, complicated features.

So again, I took to YouTube – we’d watched several of the Let’s Learn GameMaker: Studio channel’s videos, lots good information covering what was available and what options there were for each feature, but there was no practical application of those lessons; at at the end of the lesson, there was no example of a typical use case for that feature in your game

A Clear Path Forward

Just when I was about to give up, I managed to stumble upon another channel aptly named, Gamemaker Game Programming Course.  The channel is a bit confusing (the playlists in particular) until you work out that it’s actually just a video repository for his website:

www.gameprogrammingcourse.com

Start there, download the resource packs and project files, then start with the playlist labeled: Level 02 [ GameMaker Basics Sprites Objects Events ].

The site and videos were created by computer programming teacher named John Janetka for his high school’s computer science program. The quality of the content and structure of the lessons are the best I’ve come across on YouTube thus far.

By the end of Level 02, I was able to solve both of the programming issues Eric was struggling with above, and created two games in the process. Simple as they were, the experience was valuable.

I’d asked Eric to place his programming efforts on hold to go through this course with me. I asked him to try not to think of this as a step backward, but rather rather a stepping stone forward toward better, more stable code. He agreed, and will continue to check in every day or so to share what we’ve learned.

###

Image Credit: “Martyn B

Disclaimer: I have no affiliation with any of the websites, applications or YouTube channels referenced above.

Finding a Direction

I hope the Holidays are going well for everyone!

As I mentioned in my previous post, Eric and I are working on our first game. We, like many other beginners, set out with a vague and nebulous concept of the feeling of the game we wanted to make.

So, I went off and worked on creating artwork with some very general design specifications:

  • 2D side perspective
  • 32×32 pixel character sprites
  • 16×16 pixel tiles (orthogonal)
  • Variable length traps (divisible by 16px)
  • 16 color EGA palette (CGA backwards compatibility)
  • Medieval/Fantasy Theme

Eric went away and started working on the programming:

  • Basic keyboard movement (left, right, jump)
  • Basic enemy movement (chase the player when in range)
  • A simple scenario where a specific enemy type (Torch wielding peasant) triggered an flammable barrel that exploded a bridge tile when he got near it
  • A water obstacle that enemies and the player fell through

The astute reader will pick up on the obvious item we missed: designing the game. What wasn’t immediately apparent to us was that we weren’t really building a game because we hadn’t defined what the game was – not even the basic object (i.e. how you win or lose) let alone the rules and mechanics…We were diving into polish (animations, effects etc.) before we even agreed on the scope of a working prototype!

###

Why this happened…

It’s a common mistake for beginners like us to go into too much elaboration too quickly because it feels good to see a result that resembles a finished (read: polished) product. What we were doing wasn’t play testing because there wasn’t a game to play – instead, we were simply validating pieces of code.

The fact is, a game doesn’t need fancy graphics, particle effects, sound effects and background music to be a game (e.g. Pong).

What we did next…

At this point, I halted work and called for a meeting with Eric to hammer out the game mechanics, then create a working prototype.

Eric comes from a creative writing background and isn’t troubled by ambiguity; he never questioned why or how the exploding barrel would get to the bridge, and what tactical or strategic purpose destroy a bridge would serve in the context of the game. Instead, the novelty of this scenario was self-evident to him and required no explanation.

When I asked him to describe the game to me, and what I got, while interesting from a story/scenario perspective, was conspicuously lacking a clear definition of what the game was.

So I took stab at it instead:

Beaster’s Dungeon (my working title for the game) is a 2D platforming game where the player must stop oncoming hordes of peasants and heroes from reaching your treasure by collecting resources and plans needed to create and place deadly traps and obstructions in their path.

That’s a pitch – it tells you everything you need to know about how the game fundamentally works, and Eric agreed. From that pitch, we can distill this into a basic objective:

The player “wins” by destroying all enemies before they reach the treasure, and advances to the next level. The player “loses” by either dying (taking too much enemy or environmental damage) or one enemy reaches the treasure.

So, from that would derive several essential components:

  • Obj_Beaster: We needed an object to control the player character on screen. The object must be able to navigate in a 2D environment (move left, right, jump, collide with other objects).
  • Obj_[EnemyName]: We needed at least one test enemy that followed a set path to the treasure, stopping only to attack obstructions that got in it’s way. For pacing reasons, enemies would need to give the player a 90 second head-start to collect resources and place obstructions/traps.
  • Obj_Wall_Destructible: This was an afterthought, but seemed like a good way to allow the player to control the pace of the enemy horde(s) to give traps more time to kill them. The wall would take x# of hits before crumbling and allowing the enemy to continue on it’s path.
  • Obj_[TrapName]: We needed at least one trap that damaged an enemy that collided with it. The player would be able to place traps when he had collected both the trap’s “plan” (recipe) and a sufficient number of resources to build said trap.
  • Obj_[ResourcesName]: We need at least one resource object that, when collected, adds +1 to a resource counter. When a trap that utilizes that resource is placed, it adds -1 to the counter.
  • Obj_[PlanName]: In order to create a specific type of trap, the player must first possess the “plan” for that trap.  This object would update the player’s inventory to establish whether or not the player is able to place said trap.
  • Rm_TestLevel1: GameMaker studio utilizes “Rooms” to create environments where objects, backgrounds and tiles exist. You can think of these as the “level” where all of action is taking place. The level would need to have a clear path from point A (the origin of the enemies) to point B (the treasure) with enough room for the player to set up his gauntlet. It would need at least 1 trap plan, and be populated with sufficient resources to construct enough traps to kill all incoming enemies.

Once these components were present and behaving as described, we would have a prototype to test the basic functionality of the game.

Notes, Influences, Theories and Rationale

Looking at the game above, what we have described is essentially a “Metroidvania”, Lemmings in Reverse tower defense game. Sound extraneous? Perhaps, but that’s what the Prototype is intended to test. Let’s break that down into phases and game play:

Metroidvania refers to 2D platform exploration. This is where resources and plans come into play; they are placed in such a way as to encourage the player to get off the beaten path and explore to sprawling dungeon. Since the game happens in real-time (not turn-based), the player has to manage the tasks of collecting resources and placing traps while the enemy is slowly advancing toward the treasure.

Note: The game has gravity (i.e. not a top down 2D game, such as Legend of Zelda) so the player falls when moving off of a platform.

To keep the player from getting into an unwinnable/unloseable game, the enemies would have to follow a set path while allowing the player freedom of movement the enemy doesn’t have. To that effect, the player and move left, right, jump up onto platforms to get to areas above the enemy, and drop down from specific platforms to those below the enemy (think Contra).

Lemmings in Reverse is the notion that it was more fun to deliberately kill the Lemmings than steer them to safety, and is key to bridging the gap between a classic 2D platformer and a pure tower defense game.

If the enemies were left to freely roam the dungeon looking for the player or the treasure, it becomes possible for them to wander into a place they can’t get out of, rendering the level unwinnable (and unloseable).

Tower Defense is the most ubiquitous description for the idea of using “traps” or turrets to destroy oncoming enemies. We felt that this genre had been done to death, and wanted to introduce the exploration component as a way to add challenge and depth to an otherwise dull experience.

###

Predictions? Too early to tell, but once we have a working prototype, we can determine how pacing will work. From early “play tests” we’ve done, I can already tell that we will have to have some kind of mini-map or other visual indicators to let the player know that the enemy is attacking and where. It’s too easy to get lost in the labyrinth of the resource floors (i.e. platforms outside of the enemy path) and not know where the enemy is and if you are in danger of losing the level.

There’s got to be balance between the exploration and trap setup portions so that the player has to do both and will be rewarded for good time/space management.

Hello World…Again: A Fresh Start

V-Toad Lives!

After a long hiatus, we’re finally back with a long post, TL;DR be damned, dammit!

I say ‘we’ rather than ‘me’ because I’m now working with an old and dear friend of mine, Eric. I’ve since moved my old posts from veritastoad.wordpress.com to my own web server, and custom URL.

Eric and I have been friends for nearly two decades, and had collaborated on several projects dating back to my first attempts at video game development some 14 years ago. Dissatisfied, over-educated and unemployed, both of us were looking for a way out of grind. Never has there been a better time for indie game developers to jump in and make great games – we are hoping to follow in the footsteps of the likes of Derek YuScott Cawthon, and Locomalito.

###

Division of Labor

As I’ve lamented previously, I am simply not a “triple threat”, which is to say that I while I am a mediocre artist and a decent composer, I am not a programmer. That’s where Eric comes in – with a degree in Electronic Engineering, Eric has had a lot of exposure to programming (or at least more than I have), and volunteered to try.

We still needed a game engine, and since GameSalad dropped it’s free-to-use model, we sought out other alternatives, eventually settling on GameMaker Studio.

###


False Starts, New and Colorful Beginnings

We had a brief false start around June of 2016. Creating graphics confounded me for reasons I couldn’t explain at the time, but now better understand (more on that later). My first attempts at pixel art were terrible, and I simply didn’t know how to go about creating a sprite sheet. While looking for free-to-use artwork to help me get started, I stumbled upon Locomalito’s sprite sheet for l’Abbaye des Morts on OpenGameArt.org, and through that, the game itself.

This lead to us trying out our hands at an unofficial sequel of l’Abbaye des Morts nominally entitled, Monk’s Revenge.Within about 2 weeks, we had a complete design document created, a few level iterations using the original sprites and some modified graphics.

The objective wasn’t to make money but to practice and learn.

Unfortunately, this project was interrupted by my relocation back to the US, and between that and Eric’s workload for his Master’s degree classwork, our progress was mired. When we picked things back up about a month ago, our mutual interest in creating Monk’s Revenge had since diminished in favor creating an original title. We’d learned all we needed to from it, and it didn’t seem worthwhile to move ahead knowing that it would always be shackled by licensing requirements as derivative work.

Instead, we hashed out a new game idea and Eric got to work on the new design document while I delved further into the alchemy of pixel art.

I studied tiles from my favorite 8-bit games growing up, and read up on old graphics modes for IBM Compatible PC’s (what I grew up with) and their limitations. One of Pyxel Edit’s built-in palette sets is “EGA 16” (which is actually the color set used for CGA backwards compatibility):

EGA 16-color palette

Having a limited set of options forced me to think about how the colors fit together, giving the art a genuine “retro” aesthetic. I started with a simple 16×16 pixel block (enlarged to 64×64 to show detail):

From there, I tried different color combinations and variations:

16-color tileset

The building blocks of the world(s) we will go on to create were starting to take shape, and my confident in my ability to create pixel art was starting to grow.

Just as important to our new game’s visuals would be the game’s sound and background music. Using only 4 channels and the original NES pulses, noise, triangle and PCM voices, I could some great sounding 8-bit accompaniment for the action:


So there you have it!

So what’s next? Expect more updates as we wrestle with new challenges creating our first game, Beaster’s Dungeon!