Pick a target point to the left, right, above, or below your current position
Move the player object toward the target point
Stop when the player object’s x,y coordinates = the target point’s x,y position
When I first tackled this, I tried using an instance variable to set the target point, something like this:
/* If 'A' is pressed, set the targetx to be the player's x-32 pixels,then move towards that targetx...*/
if keyboard_check(ord("A")) {
targetx=x-32;
move_towards_point(targetx,y,4);
}
/*When targetx is reached, stop.*/
if x=targetx {
speed=0;
}
When I tried this, I discovered that the player would keep moving to the right indefinitely. This is because (as written) targetx would always be 32 pixels ahead of the player’s x coordinate and because the player object’s x would never equal targetx, he’d never fulfill the condition to stop (i.e., if x=targetx {speed=0}).
A Novel Solution
My solution was simple, but flawed. Instead of using the player’s x,y coordinates, I could use a separate “target” object instead. Something like this:
A target object (the red square above) is created in the direction you’re trying to move (e.g., left).
The player object then moves toward the x,y coordinates of the target.
The target object is destroyed when the two collide, and the player’s speed is set to zero.
You can find code examples here and here. This works fine (in isolation), but when you add a second (and third, and fourth…) object, the cracks begin to show…
Limitations and Drawbacks
Looking at the original code, you’ll see that I used a Collision Event with the target object (o_target):
//Destroy the o_target object on collision
with other {
instance_destroy()
}

//Stop the player
speed=0
The problem is that one object might collide with another object’s target block, knocking it off course, causing it to continue on its last heading with nothing to stop it.
So then I substituted out o_target for an instance of it, i.e.:
target=instance_create_layer(x-32,y,o_target)
I scrapped the Collision Event and instead used the place_meeting function in the End Step Event:
if place_meeting(x,y,target) {
    if instance_exists(target){
        speed=0;
        moving=0;
    instance_destroy(target);
}
While this worked, it also added a lot of [needless] complexity. Although players would never notice (or care) how complicated my code is/was, I knew this wasn’t well implemented, which caused a slew of difficult-to-track-down issues and many troubleshooting headaches.
Back to Basics
As I sat down to work on our next game, this problem still bothered me, so I decided to try something new on a whim. I’ve been aware of local variables since Level 9 of the GPC, but didn’t clearly understand when or why to use them.
Re-reading the GameMaker online Manual, it says,
“A local variable is one that we create for a specific event or function only and then discard when the event or function has finished.”
My instincts (even back then) were correct; the target should have been stored in a variable, but I needed to capture the value somehow, and then decouple it from the player’s coordinates.
Pass the variable, Bob!
That’s when it hit me: why not use a local variable to capture the target coordinate? If placed in a function, it would define that variable once and discard it when the function ended. To use it, we’d have to pass that value along to an instance variable to hold on to it. Here’s what I came up with:
/*==========================Objectless Grid Movement!™==========================
Variables:
dist = sprite_width-pspeed
pspeed = the speed (in pixels) the object is traveling
targetx = the local variable of the x coordinate we want to go to, used when moving horizontally. Set using var _left or var _right.
targety = the local variable of the y coordinate we want to go to, used when moving vertically. Set using var _up or var _down.
*/// Accept input, then move towards the target coordinate
if keyboard_check(ord("A")) and moving=0 {
moving=1;
var _left=x-dist;
targetx=_left;
move_towards_point(targetx,y,pspeed)
}
if keyboard_check(ord("D")) and moving=0 {
moving=1;
var _right=x+dist;
targetx=_right;
move_towards_point(targetx,y,pspeed)
}
if keyboard_check(ord("W")) and moving=0 {
moving=1;
var _up=y-dist;
targety=_up;
move_towards_point(x,targety,pspeed)
}
if keyboard_check(ord("S")) and moving=0 {
moving=1;
var _down=y+dist;
targety=_down;
move_towards_point(x,targety,pspeed)
}
// Stop the player once he reaches his target coordinate
if x=targetx {
moving=0;
}
if y=targety {
moving=0;
}
This worked perfectly and will save me a Metric Crappe Tonne™ of time and aggravation later.
Further Improvement
I want to implement custom key binds that support keyboard and gamepad input. I’m reasonably sure I can accomplish the former, but I’m still researching the latter. More to come!
Back in September ’23, I announced that Eric and I were working together again after a 7-year hiatus. We’d agreed to start small, and after some initial discussion, Eric committed to taking on the roles of Game Designer and Level Designer. I would do the programming, artwork, sound effects, and music.
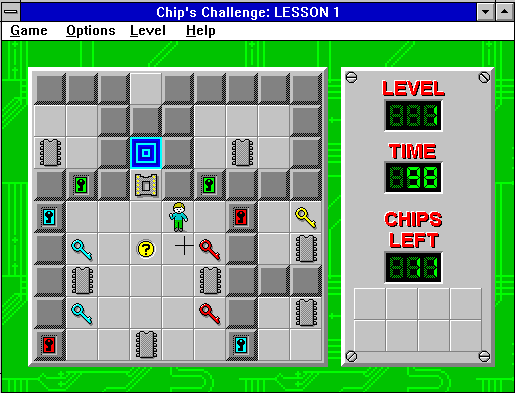
When we initially brainstormed game ideas, Eric fondly recalled the time he’d spent playing Chip’s Challenge on an old Windows 3.11 system and suggested we create something like that, starting with the core mechanic of pushing blocks into slots.
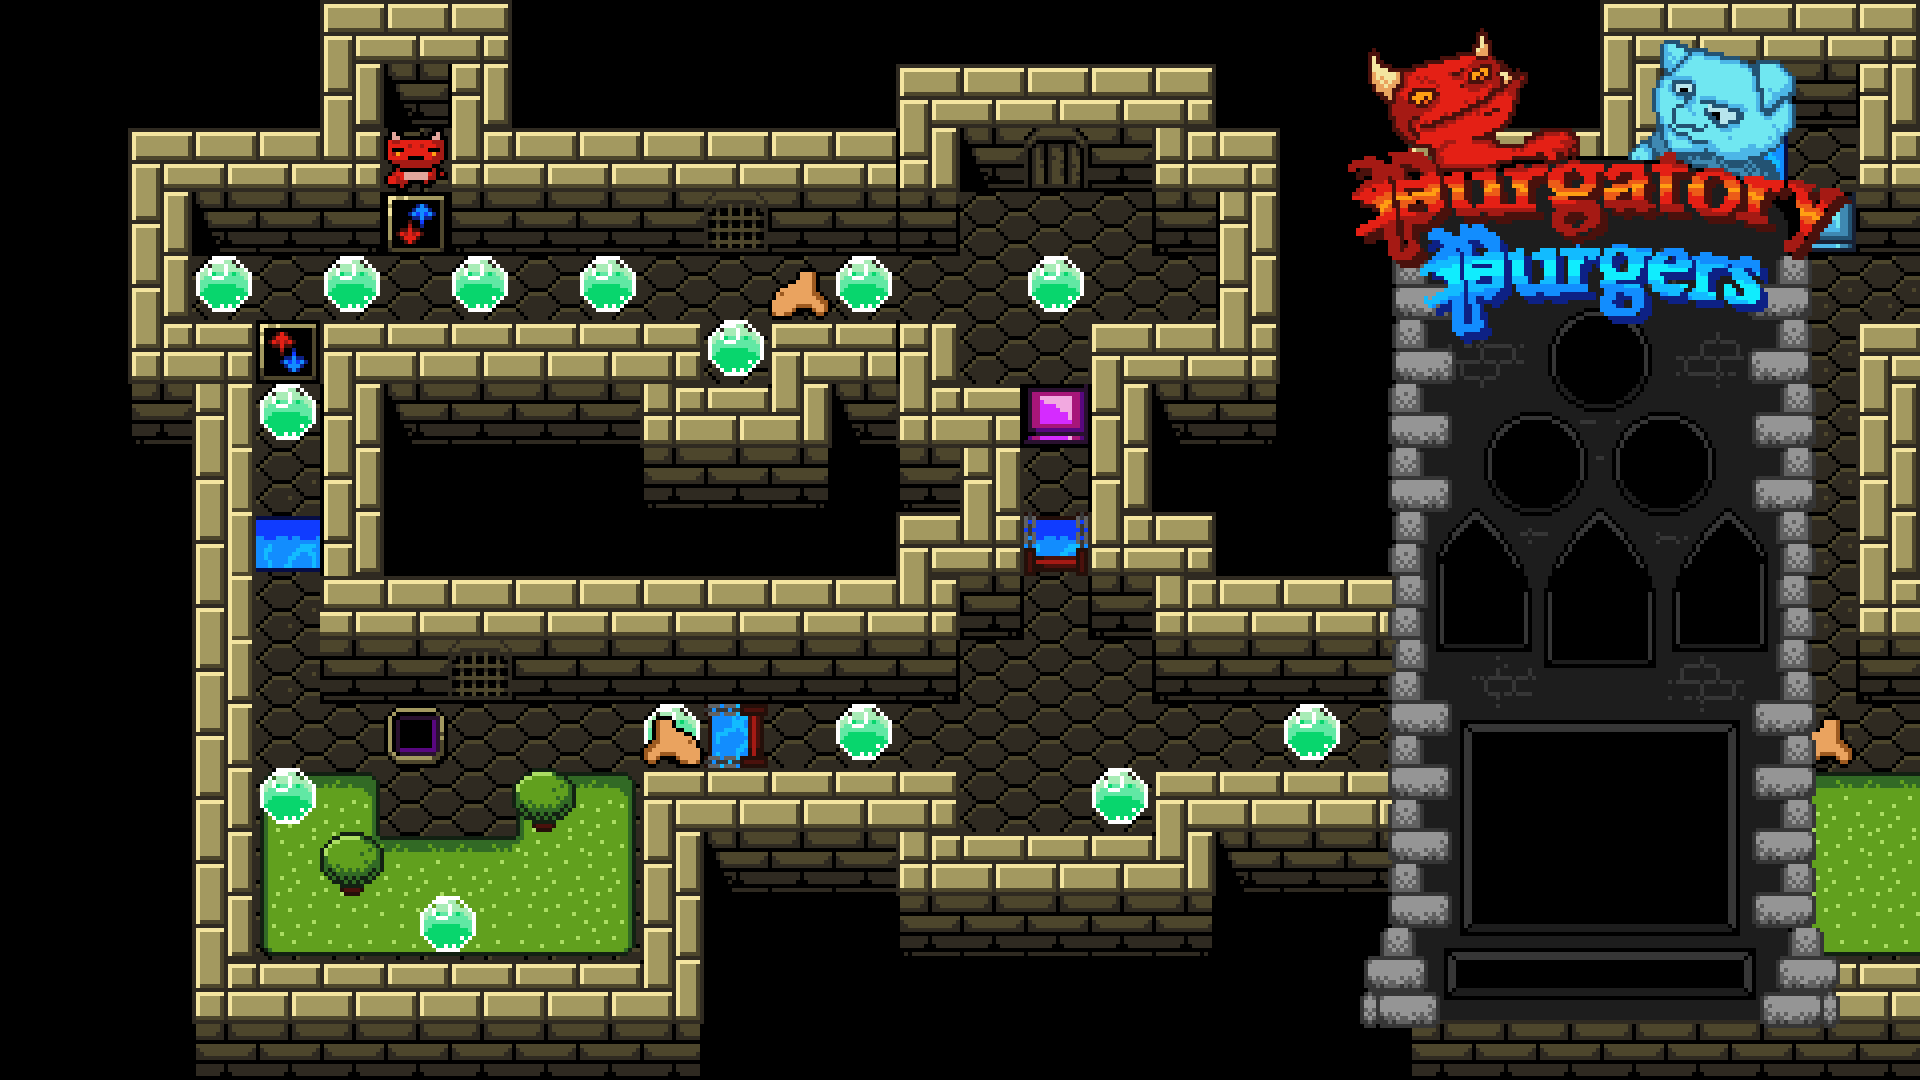
After some discussion, we settled on a Purgatory theme. Eric proposed two characters, an angel and a demon, each with their own unique abilities. The ‘demon’ (Imp) could push blocks, and the ‘angel’ (cherub) could fly over obstacles (e.g., water).
Eric didn’t remember any of the specifics of Chip’s Challenge, so I watched some gameplay videos and got a very rudimentary idea of how the game worked, focusing first on orthogonal, tile-based movement and then the “Sokoban” mechanic of pushing blocks into designated places.
I didn’t have a clear vision of the art style and started out with the intent of creating 32x32px tiles and character sprites. Here’s an early rendition of Bob:
Although he looks pretty good, the bigger the sprite, the more detailed it needs to be and the more time it would take to create. In addition to the player character, there are also the enemy sprites and tile sheets to consider.
Early sprite sheet designs were 32x32px tiles and single-height, meaning that the tops of the walls were on the same plane. This was simpler but didn’t look very good.
I eventually scrapped this all in favor of simpler, 16×16 tiles with fewer animation frames, akin to something you might see on the NES, albeit a slightly larger color palette (64 colors instead of 52, and support for alpha channel, which wasn’t something the NES could do).
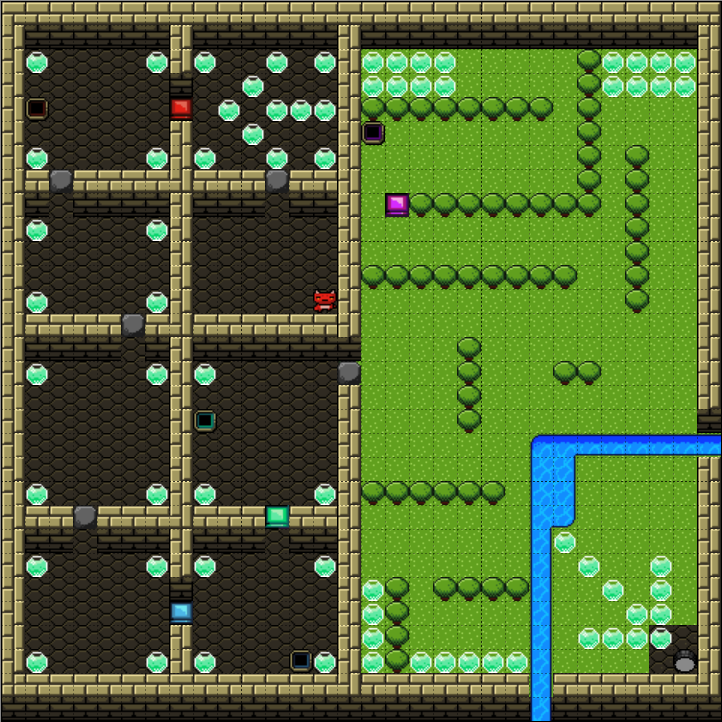
In an effort to work in parallel, I’d asked Eric to block out level designs with primitive tiles that we could later replace as the finalized tile sheets were created.
This worked well initially, but as the tile sheet began to take shape, we encountered two issues that set us back:
Eric’s designs were more complex than what my simple tile sheet was capable of, and absent the correct tiles, Eric would ‘wing it’ with the ones he had.
The levels Eric created assumed features we hadn’t previously discussed. I was still working on the core mechanics and did not even have a working prototype of the basic gameplay yet.
In order to get this under control, I knew that I needed a playable game, and by mid-September ’23, I had one. I asked Eric to build a simple test level so that we could playthe game. Here’s what that looked like:
The First Prototype
Having a working prototype can teach you a lot about your game. Is it fun? Does the core gameplay loop (i.e., the thing the player does in the game) work the way you expected? Is it complete?
I watched the Extra Credits video series on Making Your First Game. I’d watched dozens of GDC videos on game design. I knew that our focus needed to be getting the game to a playable prototype so that we could see what worked and what didn’t. I knew this – Eric did not…
How could he? He’s never made a game before. To him, game design meant thinking up cool ideas. That’s only natural, as that’s how a writer might approach the problem. A game designer needs to be able to articulate, in great detail, the logical systems that make up a game, the rules, for instance, and how to resolve problems you might encounter.
Take the angel for example. In our original discussions, we wanted the angel to be able to fly over water, so I focused on getting that mechanic working without thinking about why. In order to facilitate this, I had to create a test level and realized that simply moving to areas the demon couldn’t get to on his own wasn’t all that interesting – then it hit me…what about a bridge? What if the angel could lower bridges, allowing the demon and a block to reach places he couldn’t previously access?
This would not have occurred to me without actually playing the game.
Iterative Refinements
Initially, the movement system I created moved the character one space per key press. This worked fine on small levels, but with big, expansive ones like the test level he’d created, it was very fatiguing. To address this, we opted for continuous movement.
The more I played, the more I realized that half the fun of the game was exploration and collecting the souls, and the other half was the puzzles, but you had to have both. You can read more about Purgatory Purgers’ level design philosophy here.
As we talked through new features, I tried to corral Eric’s ideas into building on existing mechanics to create more value, using the example of secret rooms and passageways. The mechanic behind this reuses the water tile in a novel way. Eric suggested “hiding” the secret room, but there wasn’t an obvious way to do this due to the ‘skybox’ background we were using at the time.
By scrapping the sky tiles in favor of a plain black background, we could use an opaque black rectangle that’s destroyed on contact with the player to reveal the secret area. This was both easy to implement and highly reusable!
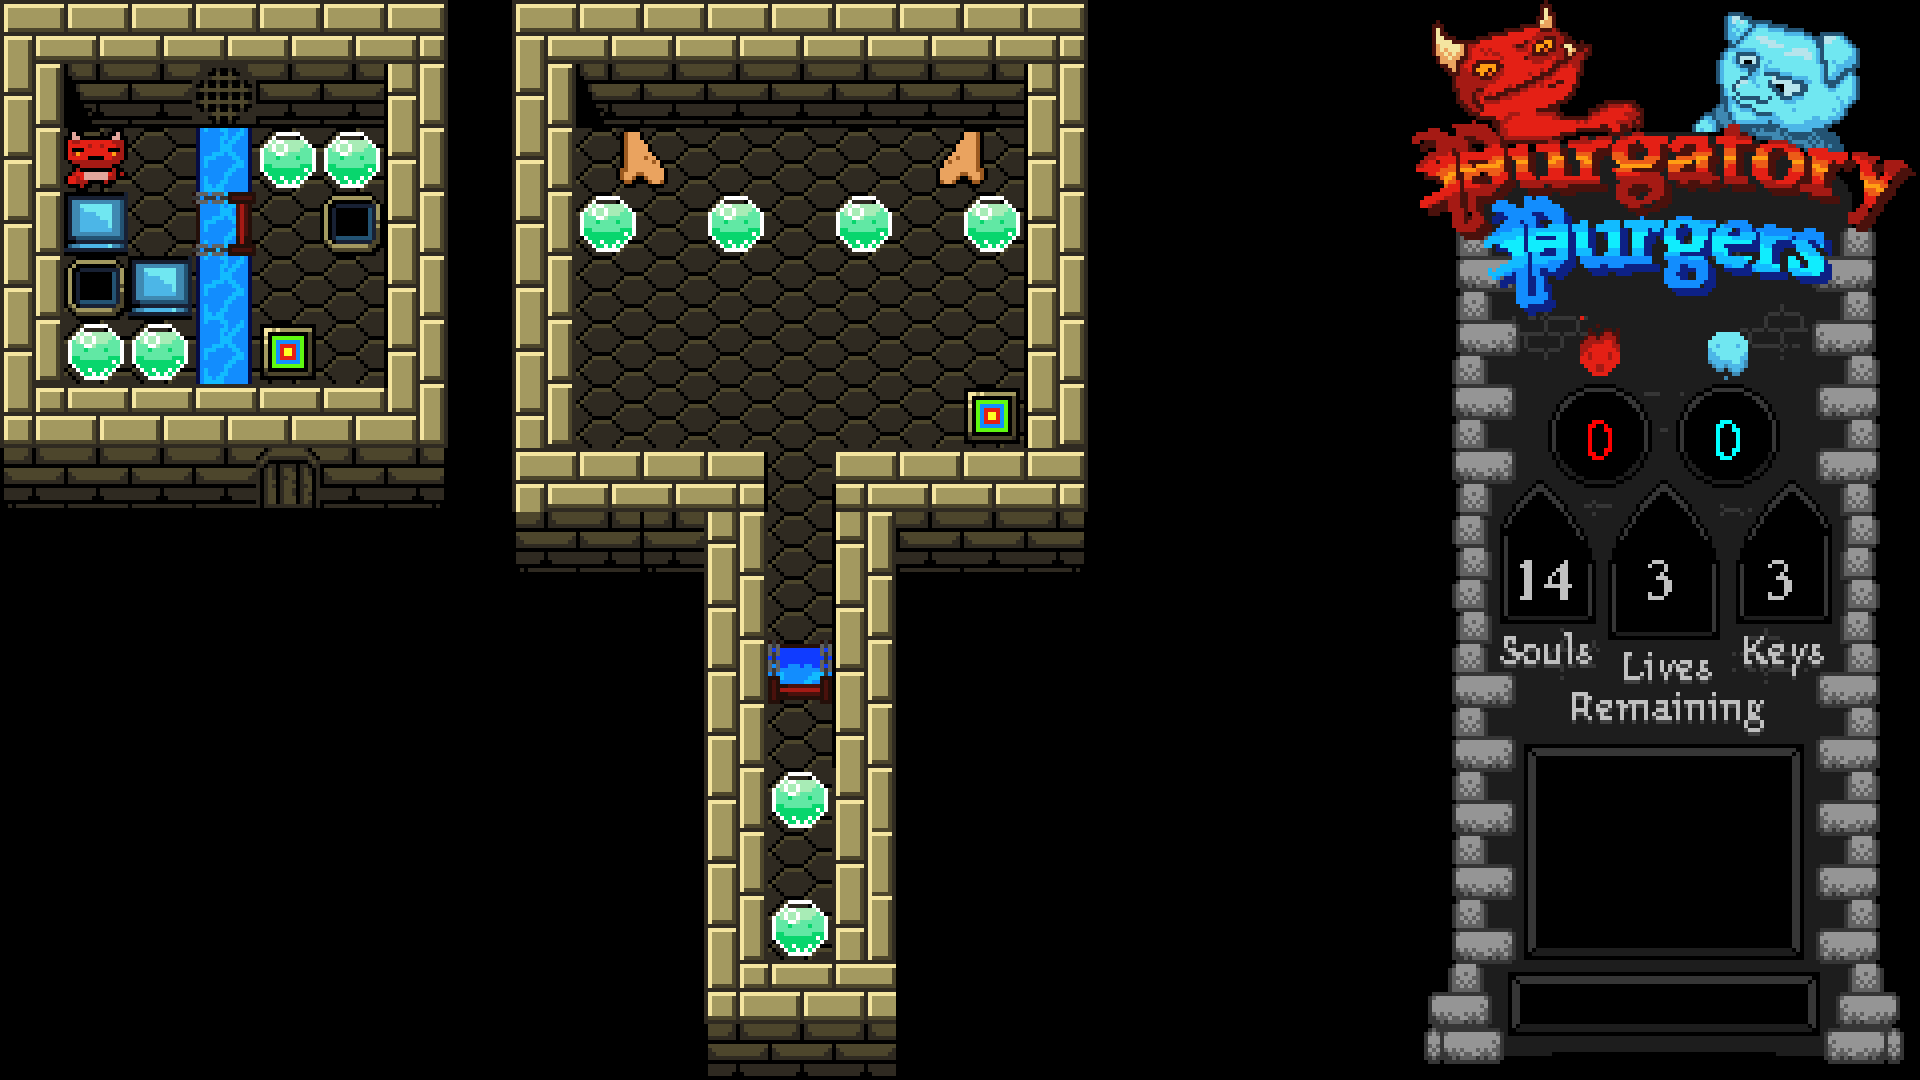
Creating the UI
We knew that we were going to need a UI for the game, so we discussed what should be in it, and Eric went to work on a simple mockup. Here’s what he came up with:
We initially discussed a scoring system in which the player earned points based on souls collected, gems slotted, completing a level, and number of moves made. Our game resolution was 480px wide by 270 pixels tall (1/4 scale of a target screen resolution of 1920×1080 in a 16:9 aspect ratio).
I found that even using the smallest font I could find (~5x5px per character), it would be impossible to cram all that information into such a small area. To get a sense of proportionality, I started with a simple shape and put it on the playfield:
As I began to play with designs, I arrived at something closer to the final one but found that placing it over the playable map didn’t look (or feel) good:
Moving it 16px to the right and adding a black background seemed to do the trick, but I also modified the camera (which was set to follow the player) to include a buffer equal to half the width of the level to keep the player centered on the screen – this would prevent the player from getting behind the black border (128px or approximately 8 tiles):
With the general layout done, I had to figure out how to populate the information it contained… More tweaking! I scraped the score (we didn’t have a solid design, and it felt a bit arbitrary), making more room for other elements. I also decided to stretch the UI a bit vertically to make more room for label text:
Finally, I added the animated ‘judged soul’ graphics, which brought it all together:
I noticed there wasn’t much room for the soul counters, so I incorporated some additional code to change the font once it reached the triple digits, but that came much later…
Mid-Development Hell
By October ’23, the core of the game was finished, save for creating a menu system, secret levels (and a system for accessing them), and additional levels to flesh everything out. Eric and I argued frequently.
We could not agree on a shared vision for the game, what a level should look like, or even the definition of Game Design!
For example, Eric spent what might have been several hours creating a very faithful rendition of the Pacman maze. While very well done (for what it is), it did not fit the theme of our game (not to mention possible copyright infringement).
Purgatory Purgers II: Copyright Infringement!
Then there were the logistical obstacles… I had Eric create the levels in Tiled, and then I’d recreate them by hand in GMS2. This meticulous process took hours because each level comprised several tile layers (e.g., Walls and floors, decorations, water, object instances, etc.).
As the month came to a close, I was nearing my deadline for completing a very difficult certification Exam for work, so I put my development efforts on hold for the next 2 months to focus on that.
The Last Mile
At the end of December, I passed my Exam and was ready to resume work on Purgatory Purgers. Over the next few weeks, I started investigating ways we could improve our workflow and allow Eric to create levels directly in GameMaker.
My first thought was to try to implement source control, but not knowing what I was doing almost ended in disaster. I kept at it and was eventually able to work out how to import room resource files.
Although we’d overcome the technical hurdles, Eric wasn’t used to using GameMaker as all of his previous work was mocked up in Tiled, and then (re)created by me. Naturally, Eric did not create levels as quickly as he could in Tiled, nor were they of sufficient detail to meet the current standard. This isn’t to say that my levels were perfect either, and in fact, after playing through the game over and over again, I ended up redoing my first level and making significant cuts to other levels I felt were too bloated.
“…[sometimes], You must kill your darlings.” – William Faulkner
I came to the grim realization that Eric and I had fundamental disagreements that wouldn’t get resolved in this project. Eric had lots of ideas, but the concept of testing them and killing off the ones that didn’t make the cut was abhorrent to him. He placed alot of value on his individual ideas as well as his ability to generate them. Still, he did not understand that the idea itself represented a tiny fraction of the overall effort required to execute it. Our imaginations are limitless; my time and abilities are finite. Sometimes, you must kill your darlings!
The only way forward was to create the remaining levels myself, along with the endings, menu system, and artwork, which I spent the next few weeks working on. By the middle of February ’24, I was done!
I took a few days to recover, then went back again to finalize it for release.
Publishing Purgatory
I originally intended to publish on GameJolt and Itch.io and advertise in the official GameMaker forums.
Unfortunately, I couldn’t edit the content on my GameJolt Developer page without encountering an “ERR_TOO_MANY_REDIRECTS” browser error. The platform is covered in ads, which suggests it’s either dead (or dying), so I decided to abandon it and move on to Itch.io.
Itch.io turned out to be a good choice. It is simple, easy to use, and straightforward. I captured a few screenshots and then spent about an hour creating a YouTube video to promote it. I spent a couple of days creating an old-school-style instruction manual and packaged it with the game.
Posts in the “Made with GameMaker” thread on the official forums require moderator approval. What confused me was that my post was initially visible to me and then disappeared later, leading me to believe it had been deleted. Thankfully, after reaching out to the moderators, I was assured that hadn’t happened, and a short while later, my post went live.
Reception and Payout
The only people who played and/or bought the game were a handful of personal friends, acquaintances, and a couple of kind folks from the Official GMS Forums. Jason D., John J., and others pointed out bugs and potential exploits, and I fixed what I could.
Overall, I spent about 480 hours on this project over 8 months. The proceeds were around ~4.2¢/hour (gross, 3¢/hour net).
Lessons Learned
Communication was a constant problem for Eric and me. Because we had different schedules, we could only speak in real time once per week. Between our weekly calls, I’d try to share my thoughts on progress with Eric through Discord messages. My DMs to him were too verbose, and his responses were too succinct.
It was difficult to discuss complex design topics this way. Often, a conversation would begin with, “Would it be possible to do [insert_feature_here]?”
I read somewhere about ‘Mu,’ the third answer to a Yes or No question, and it can be interpreted as “Your question cannot be answered because it depends on incorrect assumptions.”
A lot of what Eric was asking about sounded simple and straightforward, but it usually lacked sufficient elaboration to explain exactly how it would fit into the game. When I asked Eric if the juice was worth the squeeze, I was trying to convey to him whether he wanted me to pause work on implementing core game features for the one-off feature he was asking about.
From my perspective, Eric’s question was lazy and uninformed, and from Eric’s perspective, I was dismissive and impersonal. While we eventually talked it out, it took a lot of heated arguments to get to that point.
For me, Purgatory Purgers was never intended to be my magnum opus; instead, it was one more step towards learning how to be a game developer. Eric had more faith in the project than I did, but as far as I can see, that faith was more wishful thinking than anything else. Would I be upset if Purgatory Purgers was a runaway success? Absolutely not, but I also understand that some games, charming though they are, don’t have mass appeal and never will.
I guess the biggest takeaway is that my next game ought to be more memeable :).
This would stop all previously playing audio and start the new music track, looping it until the next room was created.
Functionally, this works fine, but I wanted a more centralizedway of handling this so that if I wanted to make a change, I didn’t have to do it N number of places, equal to the number of rooms I created.
How It Works
I created an object called “obj_sound” and placed it in the first room, then I flagged it as ‘Persistent’ so that it would carry forward from room to room.
I added a Room Start event with the following code:
if room==rm_level1 {
audio_play_sound(snd_lvl1,100,true);
}

if room==rm_level2 {
audio_play_sound(snd_lvl2,100,true);
}
At the start of the room, it checks to see if the name of the room matches “rm_level1” (the name of the first room/level), and if it does, it plays the sound “snd_lvl1” at a priority of “100”, and sets looping to “true.”
Once that was working, we needed to be able to stop the previous music track before loading the next one. This can be done using a Room End event:
audio_stop_all();
This stops all audio before the next room is loaded, preventing tracks from playing over each other.
Conclusions
There are other ways this could be handled, however…
It works for what I need it to do (starts a looping music track that’s definable by room name).
It’s centrally controlled.
It does this in the simplest way I know of, and more importantly, I understand it!
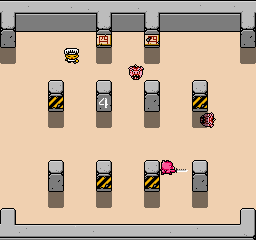
When I last left off, I managed to get the trap placement mechanic working as designed. Of the core mechanics I needed to get working, the last one remaining was enemy platform pathfinding…
Platform Pathfinding Challenges
As previously stated, the game’s object is to ward off hoards of enemies trying to navigate their way to your treasure vault by placing traps and barriers in their way.
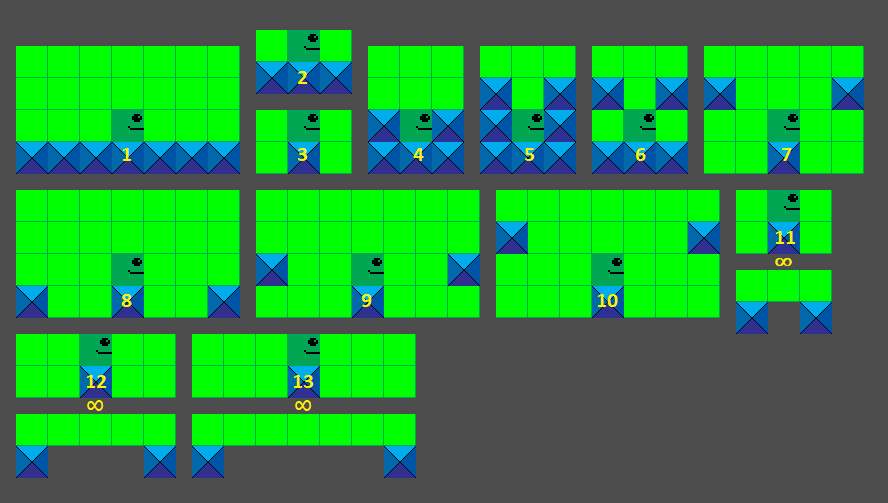
The player can navigate the environment by moving left, right, jumping, and falling. I wanted to give the enemy a similar capability:
In this scenario, an enemy character can walk left or right and can clear obstacles up to two squares (32x32px tiles) high and three across. Each scenario is numbered and represents the following:
All possible ‘jump’/walk movements from a platform (1-3 across, 2 up)
Walk left or right 1 square
Drop down left or right
Jump up left or right 1 square
Jump up left or right 2 squares
Jump up left or right 2 squares, illustrating that the platform might be floating (i.e. allows free movement beneath it)
Jump across left or right 1 square and up 2 squares
Jump across 2 squares (same height)
Jump across 2 squares and up 1 square
Jump across 2 squares and up 2 squares
Dropdown 1 square left or right from any height to a platform below (this is implied in 3, but I wanted to illustrate it explicitly)
Drop down to a platform of any height, 1 square left or right across
Drop down to a platform of any height, 2 squares left or right across
While I found a couple of examples of this working/implemented in GML using a modified version of the A* Search Algorithm, I could never get them to work within my project. I discussed the problem with my friend Jason, who created a working prototype for me that met all of the design specifications. But not fully understanding how the code worked, I failed to integrate it.
Now that I have the time to troubleshoot it, I’m reluctant to do as I fear that I don’t understand it well enough to support it. Instead, it might be better to build something simpler…
Possible Solutions
Thinking through the problem, there are many other ways I could have solved this. Wrecking Crew for the NES comes to mind:
Enemies (and the player) in Wrecking Crew use ladders to navigate up and down platform levels. Why couldn’t I implement a similar feature?
Ladders
For example, instead of trying to make the enemy AI smart enough to navigate obstacles with a preset of constraints/scenarios, I could have them wander left and right across vertical planes, moving up or down when they reach a ladder, depending on whether the vault was above or below them.
Alternately, rather than placing ladders in fixed places, perhaps some enemy types could create erect them?
Stairs
Another option would be to use teleportation in the form of background staircases:
In this example, the enemies could access specific floors using “staircase” objects that would move them from point A to B and B to C, and vice versa.
Either scenario would necessitate creating two extra animation frames for each enemy sprite. Not a deal breaker, but something to consider…
About ten years ago, I distilled video game development into three core skillsets (i.e., the triple threat):
Art
Music (and sound effects)
Programming
I’ve always been interested in art (drawing, sculpting, and to a lesser extent, painting). I taught myself how to play simple melodies on a cheap Casio keyboard in my teens. I learned to use, repair and maintain personal computers in the early 90s out of necessity (I didn’t have much money, so my choices were to fix it or do without).
Eventually, I started entertaining the idea of combining my love of art, music, and computers to try my hand at making video games instead of just playing them. Thus began my journey of self-discovery.
Art
I’d always been able to draw relatively well by hand. I lightly scribbled rough shapes, then fleshed them out with strong lines. As technology became more accessible, I’d digitize my art using a flatbed scanner.
I even purchased a digital camera and some clay in the early 2000s to sculpt models and photograph them from different angles in much the same fashion as Adrian Carmack did for DOOM. I could never get the hang of 3D modeling or translate these analog skills into digital media. In time, I abandoned that track in favor of pixel art.
At first, I was terrible at it. But by studying examples, watching tutorials, and practicing, I developed proficiency using Pyxel Edit. I started with a 16-color EGA palette, then later expanded this to the 52-color NES palette.
This has become my niche and primary medium for artwork creation. Tile sheets are relatively quick to make, which is important when you’re a one-man operation. There are 40 years of examples to draw upon for inspiration.
Music
I’ve been writing music for almost 30 years on the Amega Module format, beginning with tunes written on Fast Tracker II using samples ripped from other people’s files. Later, I sampled some high-quality instruments – these were used in the publication of my first album.
Unfortunately, the songs and samples used were lost to time, but I still have a 20-year backlog of my previous work, dating as far back as 1997, all written for games that existed only in my imagination.
These days, I use a Windows port called “Skale Tracker.” It’s based on FT2, can export to .WAV and .OGG formats, and supports up to 64 tracks (although I rarely need more than eight these days and write chip tunes with half that). I’ve mixed and mastered my exported works in Audacity and have been very satisfied with the results.
Programming
Programming has always been my biggest weakness. I’ve never been the kind of person who can read a book on a subject and put that knowledge into practice. At best, I can look at examples, then adapt those to my needs once I understand how.
Someone once told me that DOOM was programmed in C++ and that I could do likewise. I remember seeing a boxed copy of Borland Turbo C++ at the local Best Buy, retailing for $300. I remember thinking then that if only I had the money to buy it, I’d have everything I needed to program my own version of DOOM. I was woefully ignorant back then…
Many times over the years, I’d hoped to get around my limitations by using a game creation engine, my first exposure to this was around 1995. I’d gotten ahold of the Pie in the Sky Software’s 3D Game Creation System for MSDOS.
It was a 2.5D game engine capable of creating games slightly beyond Wolfenstein 3D (floor and ceiling textures, angled walls) but fell short of DOOM (no height variable). While I had limited success designing very simple levels, I didn’t understand its limitations or advanced features and gave it up in frustration.
In my late teens to early 20s, I experimented with 3D Game Studio.
I could create primitive shapes, texture them, and use those objects as building blocks to create a castle out of modular pieces. I could render the map and fly through it, but I had no idea how to use its scripting language. I continued to toy with it for a couple of years, but again, I got discouraged as my imagination outpaced my ability.
In 2014, I picked up GameSalad, and created this website. I had no idea what I wanted to create, so I groped around aimlessly in the dark, bumping into bugs and lacking support.
At the time, GameSalad was primarily marketed to Mac users, and the Windows version lacked many core functions. By the time it caught up to the Mac version, they had stopped offering the Standard Edition for free and switched to a subscription model. I didn’t feel comfortable paying for something I wasn’t entirely sure I could learn to use, so I abandoned it and moved on.
I discovered Game Maker Studio in the spring of 2016. I teamed up with my old friend Eric, and we set out to learn the engine. Eric volunteered to do the programming, I would do everything else (artwork, music, design, documentation, project management).
In the early days, YouTube tutorials were our primary source of GMS programming information. Later, I would compare these to “let’s play” videos rather than proper lessons. Thankfully, I eventually discovered John Janetka’s Game Programming Course (GPC). This was a game changer for us (well, me anyway). While the second half of the lessons became disjointed, it was enough to see me through the creation and publishing of my first game.
Unfortunately, I’d run out of time (and money) and had to start working again. Work became all-consuming, and after spending 10-12 hours of skull sweat a day on technical matters, I didn’t have the energy or drive to devote to game programming when I got home. On the weekends, all I wanted to do was sleep.
I tried to pick it back up several times but couldn’t get back into the habit…
When Stars Align
That all changed this year. I have…
Started a new job with a pension, so now I have a future and retirement to look forward to.
Rid myself of $117,000 of student debt.
Nearly paid off my mortgage (8 months to go).
Lost 43 lbs. of excess weight through diet and exercise, and I am on track to be back to my ideal weight by the end of the year.
I’ve finally reached a point in my life where I can resume my pursuit of game development now that I have the time, energy, and resources to do so.
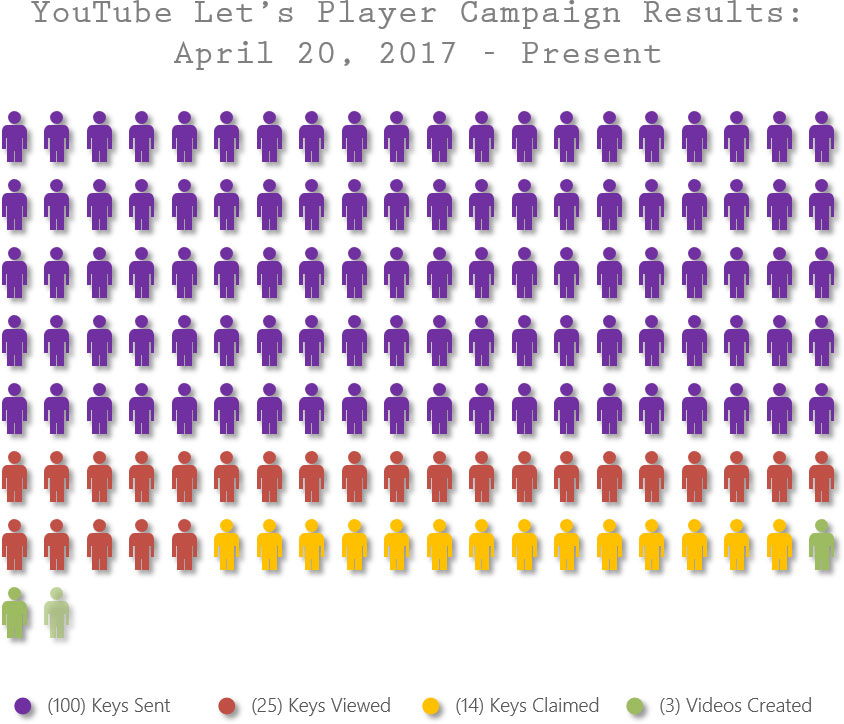
In the wake a half dozen or so key requests on WeaselZone.com which yielded no Let’s Play videos, I decided to do a post-mortem on my advertising campaign to evaluate what went right and what went wrong.
###
It’d been a little over a year since I programmed Porker: The Quest for Tastiness. That little game was never intended to be a serious endeavor, but rather a means to get some experience creating and publishing a game.
All of that changed on on February 12, when I’d noticed a couple of kids had:
They did this all on their own, without any prompting, incentive or instruction.
I was so inspired and encouraged by their Let’s Play that I decided go ahead and expand the game significantly into a fully-featured game.
It took about 2 months to finish the game, and I was very proud of the result. We started looking at ways to advertise and I’d settled on engaging the YouTube Let’s Players community. After all, that’s where it all began, right? What follows is how I went about it and what I learned from the experience in hopes that this may help another fledgling game developer…
###
The Popularity Paradox
Although I did not coin the term, “Popularity Paradox,” as far as I am aware (as evidenced by the entire 2 minutes of Google Fu I spent looking) I’m the only person who has applied to the term to this context:
…many indie games become popular because they receive a lot of YouTube coverage from Let’s Players, but Let’s Players tend to only review games that are already popular…
Therein lies the rub! While I sent keys to the usual 1M+ subscriber Let’s Players, I doubted any of them would ever see, let alone play my game. My research seemed to indicate that their backlog of Let’s Play games was dictated by their audiences, usually by popular request via Reddit or some other medium.
So instead, I focused on smaller to medium sized channels, who I hoped would be willing to do a fellow small-fry a solid. Here are the numbers…
I started with the [now defunct] YouTuber Gaming Megalist, a spreadsheet of over 5,000 YouTubers and their demographic information. As I went through the list, I was able to prequalify about 100 or so potential YouTubers, spending about 5 minutes each on their channels to answer the following questions:
Do they post frequently (at least once a week)?
Do they cover small indie games, or just the ones everyone else is playing?
Does their ‘about’ page encourage developers to contact them, or state that they play indie/random/rage games?
Do they have an email address?
If I could answer, “Yes!” to all of these questions, they received a..
Personalized message, tailored specifically to them (no mass-mailing)
Game key for Porker to use for a Let’s Play video
Let’s Player’s guide (PDF)
Of those original 100 or so emails sent out, 25 clicked the link to view their key, and of those, 14 claimed their key. Of those, only 3 went on to make Let’s Play videos.
So how do those figures stack up? Well according to Mail Chimp’s Email Marketing Benchmarks*, the Games industry average was a 19.71% open rate, and a 3.19% click through rate.
Since I emailed my recipients by hand, one message at a time, I can’t really say how many of the 100 odd that I emailed a key to actually opened the message, so instead I’m going to consider “key views” to be my open rate and “key claims” to be my click through rate.
Using those metrics, my open rate is 21%higher than the industry average, and my click through rate is nearly 4.5xgreater than what I should reasonably expect.
I suppose that a 21% conversion rate (i.e. ~ 1 out of every 5 people who claimed a key made a video). That’s not terrible, but that was result of about 80 hours of work on my part…
I don’t have a full-time PR person, and have no way of distinguishing between people who are serious about exchanging services by helping each other grow versus dishonest scammers who just want something for nothing.
Going forward, if I do hand out keys, I will use a service like distribute() to do it.
As mentioned in a previous post, Level 4 of the GPC was not a lesson, but rather a series of challenges meant to reinforce what was taught in Level’s 2 and 3. This time, I elected to create a new game rather than modify an existing one.
I settled on a top down shooter/adventure game and added features and flourishes as I went along. I used my earlier conceived true grid movement code, but this time, I used a switch statement instead of a series of if statements (or at least fewer of them):
switch (keyboard_key)
 {
  case vk_left:
  case ord("A"):
     sprite_index=spr_player_walk_left;
     if moving=0 {
       moving=1
       instance_destroy(obj_target)
       target=instance_create(x-64,y,obj_target)
       move_towards_point(target.x,target.y,4)
      }
      break;
 case vk_right:
 case ord("D"):
    sprite_index=spr_player_walk_right;
    if moving=0 {
      moving=1
      instance_destroy(obj_target)
      target=instance_create(x+64,y,obj_target)
      move_towards_point(target.x,target.y,4)
     }
     break;
 case vk_up:
 case ord("W"):
    sprite_index=spr_player_walk_up;
    if moving=0 {
      moving=1
      instance_destroy(obj_target)
      target=instance_create(x,y-64,obj_target)
      move_towards_point(target.x,target.y,4)
    }
    break;
 case vk_down:
 case ord("S"):
    sprite_index=spr_player_walk_down;
    if moving=0 {
      moving=1
      instance_destroy(obj_target)
      target=instance_create(x,y+64,obj_target)
      move_towards_point(target.x,target.y,4)
     }
     break;
 }
While trying to figure out line of sight, I came a new function:
That was my first time using the collision_line, which I don’t think is covered at all in the GPC, though it might be included in his how-to’s somewhere…I came across it after watching a tutorial video by “GM Wolf” on YouTube:
This would have solved a lot of issues for me…for instance, in a previous project, I had an idea to create a trap comprised of two moving blocks which collided into and bounced off of each other. While everything worked fine, it would occasionally cause the block to get stuck in a wall. This happened because it’s movement caused it to overlap before it detected the collision, thereby getting stuck inside the wall, unable to go anywhere.
I solved this before using the place_meeting function, but was never introduced to the End Step Event, which would have been the right way to do it. Nevertheless, I can think of other uses for collision_line and am glad I learned of it!
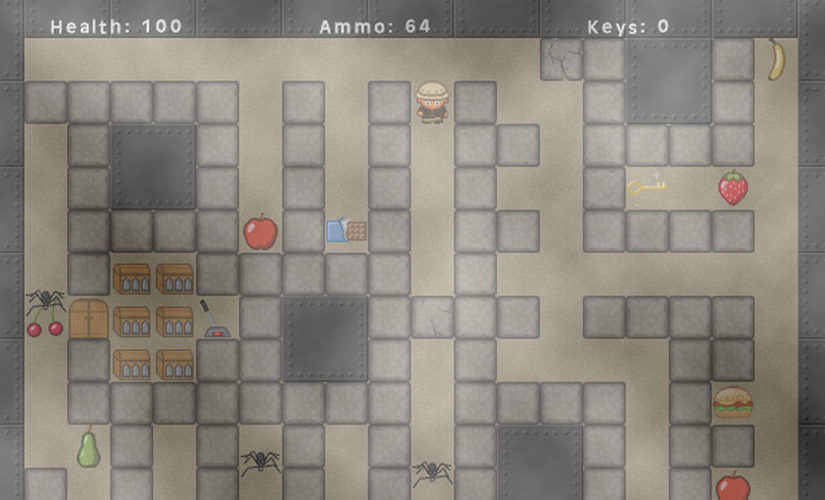
All in all, I spent about 2 days (most of the weekend) working on this little mini-game, and here are some of the features I included:
Destructible walls that advance in damage by manipulating the image_index
Enemies that can navigate mazes (using John Janeka’s code from Level 12)
Line of Sight for enemies with projectiles
Health, ammunition and keys global variables that persistent between rooms
Lock and key mechanism
A switch that reveals the exit when touched
Randomized muzzle flare and smoke when firing bullets
Randomized impact splatters when an enemy is hit
Different sounds for each impact
Randomized health power up sprites to add variety using a single object
Exits that allow you to advance to the next room
Capped health at 100%
What I not did include were:
Fail condition/game over when you run out of hitpoints
Start screen
Game Over screen
All in all, it’s a neat little game though unfinished, and good practice for more serious projects to come!
With my files recovered, I’m free to concentrate on getting back to my second run through the GPC. I’m back to Level 3, and bits and pieces of the GML syntax are coming back to me.
For instance, when calculating variables, the course suggests something like this:
hitpoints = hitpoints + 1
This works of course, but he also suggests that hitpoints = +1 does not work, which is true, however, if you reverse that (e.g. hitpoints +=1), it does the same thing with fewer characters to type. A small, but useful time saver.
###
A Hamburger That Fires Bananas (Improved)
In GPC 3-03-A, he introduces a function that randomizes an integer:
irandom_range(0,100)
This allows you use a random number generator (RNG) to decide the outcome of a particular variable within a specified range (i.e. 0 to 100 in the code above). This is used to manipulate the direction that a hamburger fires bananas, and the speed at which they are fired.
I took this a step further by adding the following step event (pun very much intended) to obj_banana:
image_angle+=speed*10
This (in my most humble opinion) makes the bananas far more interesting/exciting to watch as it causes them to spin through the air at a speed consistent with their velocity – i.e. a fast traveling banana rotates faster than a slower moving banana.
Try it yourself!
Aside:I couldn’t help but giggle at the silliness of this lesson – you wouldn’t think a burger that shoots bananas would be so amusing but you’d be wrong! Very entertaining stuff 🙂
Switching Things Up
In Level 3, “Challenge 2 – Random Generation,” the student is required to write a series of if statements to randomly move the player character in one of 4 orthogonal directions.
In my first time around, I recall touching on Switch statements, which can be a good way to handle this very scenario. Here’s how that would look:
Instead of this:
num=irandom_range(1,4)

if num=1 {
direction=0
speed=4
}

if num=2 {
direction=90
speed=4
}

if num=3 {
direction=180
speed=4
}

if num=4 {
direction=270
speed=4
}
You could do something like this:
speed=4
switch (irandom_range(1,4)) {
 case 1: direction=90;
 break;
 case 2: direction=0;
 break;
 case 3: direction=270;
 break;
 case 4: direction=180;
 break;
}
This seems like a far more efficient and cleaner way to handle multiple (more than 3+) consecutive if statements, but is cheating at this stage as Switch isn’t covered in the GPC until much, much later*…
So why mention it now? Because I want to get in the habit of making my code clean and efficient.
And with that, on to Level 4!
*I can’t quite recall exactly when this was introduced… For all I know, it may not have even been in the GPC, but if I do come across it later, I will update this post with where you can find it.
I just finished Level 12 out of 17 of the GPC. The momentum I built up going into Level 5 has been slowing to a crawl as I stumbled over structural incongruities, weak examples, bugs, and project file configuration issues.
The Groove (or Rhythm or Flow…)
I am most productive when I find my ‘groove’. This happens when I’ve overcome my learning curve, have developed a pattern of work, then get into a rhythm where I can knock out task after task by reusing the same steps.
Jimmy Diresta explains that first time you try something is the most difficult; you ‘go to school’ on the first one, and get progressively better and better – by time you finish, you’re an expert.
Matthew Inman made an incredible post on this subject, describing the agony and joy of creation…a few non sequiturs aside, he eventually gets to the meat of issue – how great and wonderful things can result from sweating over tasks that are often tedious and frustrating in and of themselves.
My problem is that I’m a perfectionist. If I encounter something that isn’t working to my satisfaction, I can’t ignore it – I have to ‘fix’ it. Maybe this is a characteristic of a good programmer, but it’s utterly frustrating when I’m working on it, and enormously satisfying when I get something to work properly…
The trouble, it seems, is that the content is getting thinner and thinner, and the issues referenced above that are breaking my ‘flow’ are getting more and more numerous. At a guess, I’d say that these last few videos were produced at a busier time than the others, and as a result, he simply didn’t have the time required to carefully plan and produce them as well as he’d like.
Whatever the reason, I have to remind myself that no matter how annoyed I get with this course, it’s still free of charge, and of far superior quality to any other GML ‘tutorials’ on YouTube. More importantly, distractions, bugs and problem solving (especially when the problem is more complex than it first appeared) are all part of programming – so I’d best get used to them 🙂 .
That said, on with the lessons…
###
Levels 9-11 (Doesn’t that look ominous?)
Level 9 was more or less a rehash of Level 7, focusing on instance IDs, along with another ‘cheat sheet’ from the resource folder. The two share a lot of parallels, and might be better off merged into one big lesson rather than two disjointed ones. There was even a loop snuck into one of the project files to create more enemies, but that wasn’t covered as part of the lesson.
Level 10 was one of the shortest lessons so far, and anyone who attempted to include a sound as suggested in Challenge 10-01 part C will discover that they’ll need to enable the New Audio Engine (Global Game Settings > General > Use New Audio Engine) before they’ll hear anything.
Level 11 was a letdown. I was really looking forward to Lists, but the only output method covered was the number of total items in the list (e.g. the ds_list_size function). The examples in the lessons didn’t really fit my concept of ‘inventory’ – that is, being able to output all the values in the list, or how many of each unique value there were (e.g. 2 Burgers, 2 Apples etc.). I suspect that this will be covered later in Level 13 (Loops).
###
This brings us up to…
Level 12: Grid Game Concepts
Grid games can cover everything from board games (checkers, chess etc.) to turn-based and real-time strategy games to classic video games like Namco’s Pac-Man.
In all cases, movement in a grid game is fixed rather than free form. GPC 12-01-A covers movement, and attempts to tackle the issue of getting hung on on corners due to the collision geometry.
The Lesson’s Solution:
Make the sprites equally sized (32×32 pixels in this case) and use a collision mask of 32×32 to ensure that they stay within the confines of the maze corridors. That’s a good start.
Next, he introduces how to manually code keyboard and collision events inside a Step event like so:
if keyboard_check(vk_right)=true and place_meeting(x+4,y,o_block)=false {
 x=x+4
 }

if keyboard_check(vk_left)=true and place_meeting(x-4,y,o_block)=false {
 x=x-4
 }

if keyboard_check(vk_up)=true and place_meeting(x,y-4,o_block)=false {
 y=y-4
 }

if keyboard_check(vk_down)=true and place_meeting(x,y+4,o_block)=false {
 y=y+4
 }
What the code is actually doing is checking to see if the player object will collide with a wall object (o_block), and if not (false), advance the player 4 pixels in the direction given.
Why this is an unsatisfactory approach:
Since are moving the player 4 pixels at a time, you have to manually tap back and forth until you are perfectly aligned or you will still get hung up on corners. This isn’t much of a problem when moving around 90 degree turns, becomes an issue when trying to get through ‘four-way’ and ‘T’ intersections.
How to fix it using only what we’ve covered so far up though Level 12:
When I set out to tackle this, the logic went something like so…
Find a location 32 pixels (one character or tile length) ahead of whatever direction I was going
Move to that location
Stop moving when you reach it
I tried using the move_towards_point function using a variable (e.g. target=o_player.x+32) in conjunction with distance_to_point but found that it target would always be 32 pixels further ahead, so it would never close the gap and would move in that direction infinitely. The solution would have to be something relative to, but external from the player object.
That’s when it hit me; why not use another object? So here’s what I did (coded in the o_player object)…
Press D-Key Event:
//create a new object as a waypoint for the player to move towards//move towards the target's coordinates at a speed of '4'
target=instance_create(x+60, y, o_target)
move_towards_point (target.x,target.y,4)
Collision with o_target Event:
//Destroy the o_target object on collision
with other {
instance_destroy()
}

//Stop the player
speed=0
Some of you may be looking at that code and scratching your heads – why 60 pixels? Well after lots of trial and error, I worked out that in order to move 32 pixels from where you were, you’d have to include the width/height of the player object (+32 pixels), giving you a total of 64.
When I tried 64, I found that I was stopping just short of where I needed to be, and worked out that the collision wasn’t actually detected when the edges of the two object met, but when the player object had overlapped it by the designated speed (4 pixels). So, 64-4=60, which places you at exactly 32 pixels over every time you press the key.
Once I had that working, it was time to clean up the code and put some utility conditions in it to prevent a keystroke from changing direction before you got to your destination, an additional event to stop you when you hit a wall, and to destroy any target objects you can’t reach (i.e. behind a wall) and some additional variables to be able to control the distance (pdist) and speed (pspd).
In the Press D-Key Event:
// check to see if character is moving
if moving=0 {
//set moving to true & destroy the old target
 moving=1
 with o_target {
 instance_destroy()
 }
//move target right by 'pdist' pixels at a speed of 'pspd'
 target=instance_create(x+pdist,y,o_target)
 move_towards_point(target.x,target.y,pspd)
}
Add moving=0 to the end of the o_target and o_block collision events and that’s pretty much it! Now using the Key Press event rather than just the Keyboard event will cause you to take a single step 32 pixels in whatever direction you are heading assuming you adjust the +/- pdist variable depending on whether you are going left (x-pdist), right (x+pdist), up (y-pdist) or down (y+pdist).
So once I got everything working, I swapped the WASD Events over from Key Press back to Keyboard and viola, true grid movement!
Image Credit:Don Quixote, oil on canvas painting by Jean-Baptiste-Camille Corot, 1868.
As we draw closer to a working prototype, it’s become increasingly more apparent that there are some fundamentally flawed issues with the way we’re going about implementation.
Eric is new to both programming in general (save for some college level coursework a few years ago), and GML. All in all, he’s got about 4 or 5 weeks worth of experience in total, but no formal training. As such, he doesn’t have a solid foundation of knowledge to build on, forcing him to seek out tutorials (usually YouTube videos) which give him ideas as to how a thing can be done.
The most popular videos are more akin to “Let’s Plays” with little (if any) structure, and even fewer explanations as to why the developer elected to go about doing things a certain way.
This forced Eric to look at what the other developer did, attempt reproduce it, then reverse engineer it without understanding what each piece’s purpose – trying different arrangements and configurations until it worked (or at least appeared to).
What troubled me was that sometimes I’d ask for a seemingly trivial feature only to find that he was unable to work out how to program it, and compromised with an implementation that wasn’t up to spec.
For example, instead of using keys 1-6 to toggle a different weapon type, and Ctrl to fire, he mapped weapon type 1 to key 1 because from a logic standpoint, he had no idea how that would work, let alone how to frame the problem so that he could look it up.
Another example was the breakable wall from my prototype specifications in the last post. What I asked for was for wall, when placed, to take damage when it collided with the enemy, and update it’s animation frames to show progressively more damage before being destroyed.
Because he didn’t understand how variables worked, the wall was killing the enemy rather than the other way around – my suspicion was that he didn’t use the “with other” construct to indicate that it was the wall taking damage, not the enemy as they both had an instance variable called “hp” (i.e. hitpoints).
After a few more hours of working on it, he came back and this time the walls were taking damage, but being destroyed after only a second or two. This was because he was using the image_index property to advance the frames of damage to the wall sprite, destroying the object when it reached the end of the animation, foregoing hitpoints altogether.
Since the room speed was set to 30 (i.e. 30 cycles/second), the enemy was colliding with the wall 30 times a second, causing the wall to cycle through each frame of its sprite sheet within a fraction of a second. While this “appeared” to work, it in fact did not follow my design specifications (no hitpoint system) and was therefore not fit for purpose.
I suggested how this could be solved in pseudo code, but he insisted he tried that and it didn’t work – again, probably because of which object he was calling the variables from, but I didn’t know that either at the time.
So where could we go from here?
You Don’t Know What You Don’t Know…
The root of the issue was that while I understood the basic logic I wanted to use, I didn’t have the syntax for it, and neither did Eric. We needed to take a step back and learn the basics before trying to implement big, hairy, complicated features.
So again, I took to YouTube – we’d watched several of the Let’s Learn GameMaker: Studio channel’s videos, lots good information covering what was available and what options there were for each feature, but there was no practical application of those lessons; at at the end of the lesson, there was no example of a typical use case for that feature in your game…
A Clear Path Forward
Just when I was about to give up, I managed to stumble upon another channel aptly named, Gamemaker Game Programming Course. The channel is a bit confusing (the playlists in particular) until you work out that it’s actually just a video repository for his website:
The site and videos were created by computer programming teacher named John Janetka for his high school’s computer science program. The quality of the content and structure of the lessons are the best I’ve come across on YouTube thus far.
By the end of Level 02, I was able to solve both of the programming issues Eric was struggling with above, and created two games in the process. Simple as they were, the experience was valuable.
I’d asked Eric to place his programming efforts on hold to go through this course with me. I asked him to try not to think of this as a step backward, but rather rather a stepping stone forward toward better, more stable code. He agreed, and will continue to check in every day or so to share what we’ve learned.