If You Give a Mouse a GPU…

Editor’s Note: For those that didn’t catch the reference, it’s a play on the ‘If You Give a Mouse a Cookie’ story. Essentially, if give a mouse a cookie, he’s going to want some milk to wash it down with… and straw to drink the milk… and and a napkin to wipe his face… and so on…

In the Beginning…

About 3.5 years ago, I replaced my aging GTX 1080 gaming desktops with a couple of 30-series systems. Between inflation, parts availability, and AI demands, the market wasn’t great, and it’s only gotten worse.

At the time, I’d planned to buy another iBUYPOWER system, but due to shipping delays, I had to cancel the order and spend over $500 per system more than I originally budgeted. I usually target the upper end of the previous generation of hardware, I feel I missed the mark this time around…

Not long (perhaps a week or two) after I pulled the trigger on our two PCs, and before they began the build, they’d upgraded the model I’d bought from 12th gen to 13th gen, but did not create a new item in their sales system, so I found about it because subsequent updates to my order read “13700K” and “13600K ” respectively rather than the 12th gen series I actually bought. I did reach out to them to see if I’d get a free upgrade, but that was too much to hope for…

By then, DDR4 (what these systems shipped with) was getting long in the tooth, and DDR5 had been around for at least two years. Beyond that, there were other issues with their packing, resulting in feet being shorn off, and while the system pictured in the ad featured strimmers, it turned out they wanted an extra $120 per system…

I used them once again to purchase a pre-built system to replace Jim’s aging laptop. They weren’t my first go-to (I started with Amazon, but had to abandon that route due to logistical issues), but to their credit, they went out of their way to accommodate shipping to Mexico. Unfortunately, Jim didn’t get much use out of it as he passed 3 weeks later… So far as I can tell, he was happy with the purchase, and the price was right ($~1,100, closer to $1,400 with shipping).

Even so, I wouldn’t make another purchase from them today, nor can I recommend them for reasons I’ll get into later…

Treat Yo’self [sic], as the Young People Say…

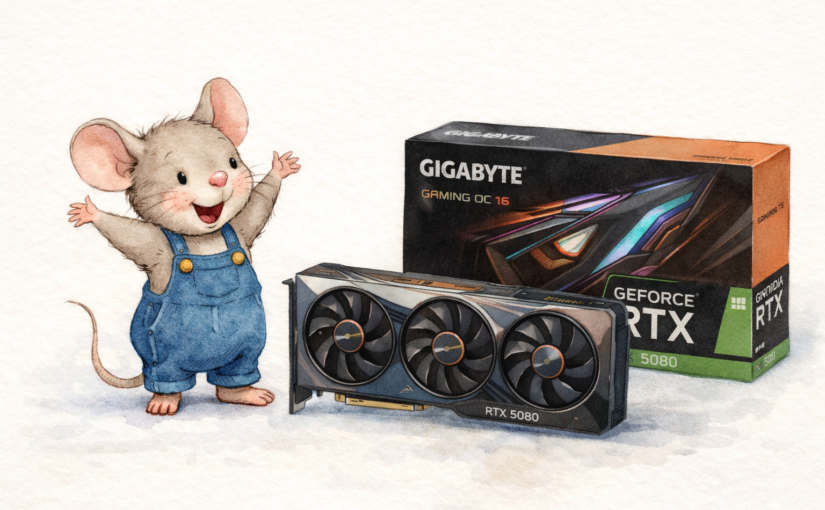
After a long and expensive home renovation, I decided to treat myself to a GPU upgrade (call it a late birthday present ^_^), so I started looking at 5080 series cards. I considered waiting for a 5080 Ti or Super to come out, but my research suggested they weren’t going to hit the shelves anytime soon, or at an attractive price point.

I settled on a GIGABYTE GeForce RTX 5080 Gaming OC 16G, which was a good combination of cost ($1,500 + tax), performance, cooling, and noise. I looked at some more expensive 5080s, but as far as I could tell, the performance was comparable (or even a little worse), and they were asking $200-500 more for slightly cooler/quieter fans.

I figured since I was splurging on a fancy new GPU, I may as well upgrade my RAM as well, but after going down the voltage/timing rabbit hole, I realize things aren’t like they used to be, and I can’t just slap another two identical sticks in the spare sockets and call it a day without risking a hit to performance and/or stability, but not before pulling the trigger on the purchase (another $300), which I’m just went ahead and returned unopened.

What I also failed to realize is that my 850W PSU would be the bare minimum for an RTX 5080 and would need a 12V-2×6 (16-pin) connector instead of the triple 8-pin connectors I’m using now for the RTX 3080… Yes, I could just use the adapter that comes with the GPU, but if I was already spending $1,500 on a GPU, what’s another $180 for some peace of mind… I ended up purchasing another Corsair RM1000x ATX 3.1 (1000W), which should give the card plenty of headroom…

Decisions, Decisions!

At this point, I started thinking about what it would cost to just go ahead and upgrade the motherboard, RAM, and CPU as well. If I were to go that route, and that’s a BIG if, I’d be looking at…

  • $200 for a new Z890 Motherboard
  • $350 for an Intel Core Ultra 7 270K Processor
  • $750+ for 64GB of DDR5 5600 CL28 RAM

In total, about $1,300 + Tax…

Of course, we haven’t even talked about my monitor yet!

I currently have an old Acer Predator XB241H, a 24″ 1080p 144Hz gaming monitor. I bought it in 2018, and it’s served me faithfully for years. Conventional wisdom suggests that lower resolution is better for higher frame rates, which is true, provided your CPU can keep up! My CPU cannot, and so I end up with a huge swing between high and low FPS…

Upping the resolution means the GPU has to work harder, balancing the equation of CPU, GPU, and Resolution. At first, I figured I may as well make the jump to 4K, but after talking it over with a friend, I was convinced to consider 1440p instead. I currently have three monitors on my PC in a TIE Fighter configuration:

While I’m gaming, I can have Discord on one side and a web browser on the other, and look things up as I need to while saving on horizontal space. The trouble is, I don’t have a lot of room on either side, since the triple-monitor stand I’ve had since 2014ish in Saudi Arabia was only intended for 21-24″ monitors, and most 1440p (and 4K) monitors are 27″ and larger.

I considered buying a 27″ 4K Gigabyte OLED monitor for $534 (heavily discounted open box special), but decided not to chance it, and after further consultation with my friend, I decided to go with an AOC Gaming Q27G4ZMN:

It was $300 for the 180Hz version, but I decided to pay an extra $30 and get the 240Hz model. This was a good balance of resolution for the size of the monitor, color range, contrast, refresh rate, and durability (OLEDs can, and do, burn in, and they’re about double the price). Of course, then I needed to spend another $65 on a bigger triple-monitor stand, but I’m sure I’ll find a use for the old one :).

Too Good to Pass Up!

The rest of the build was still nagging at me, and while I argued with myself back and forth, Newegg decided for me:

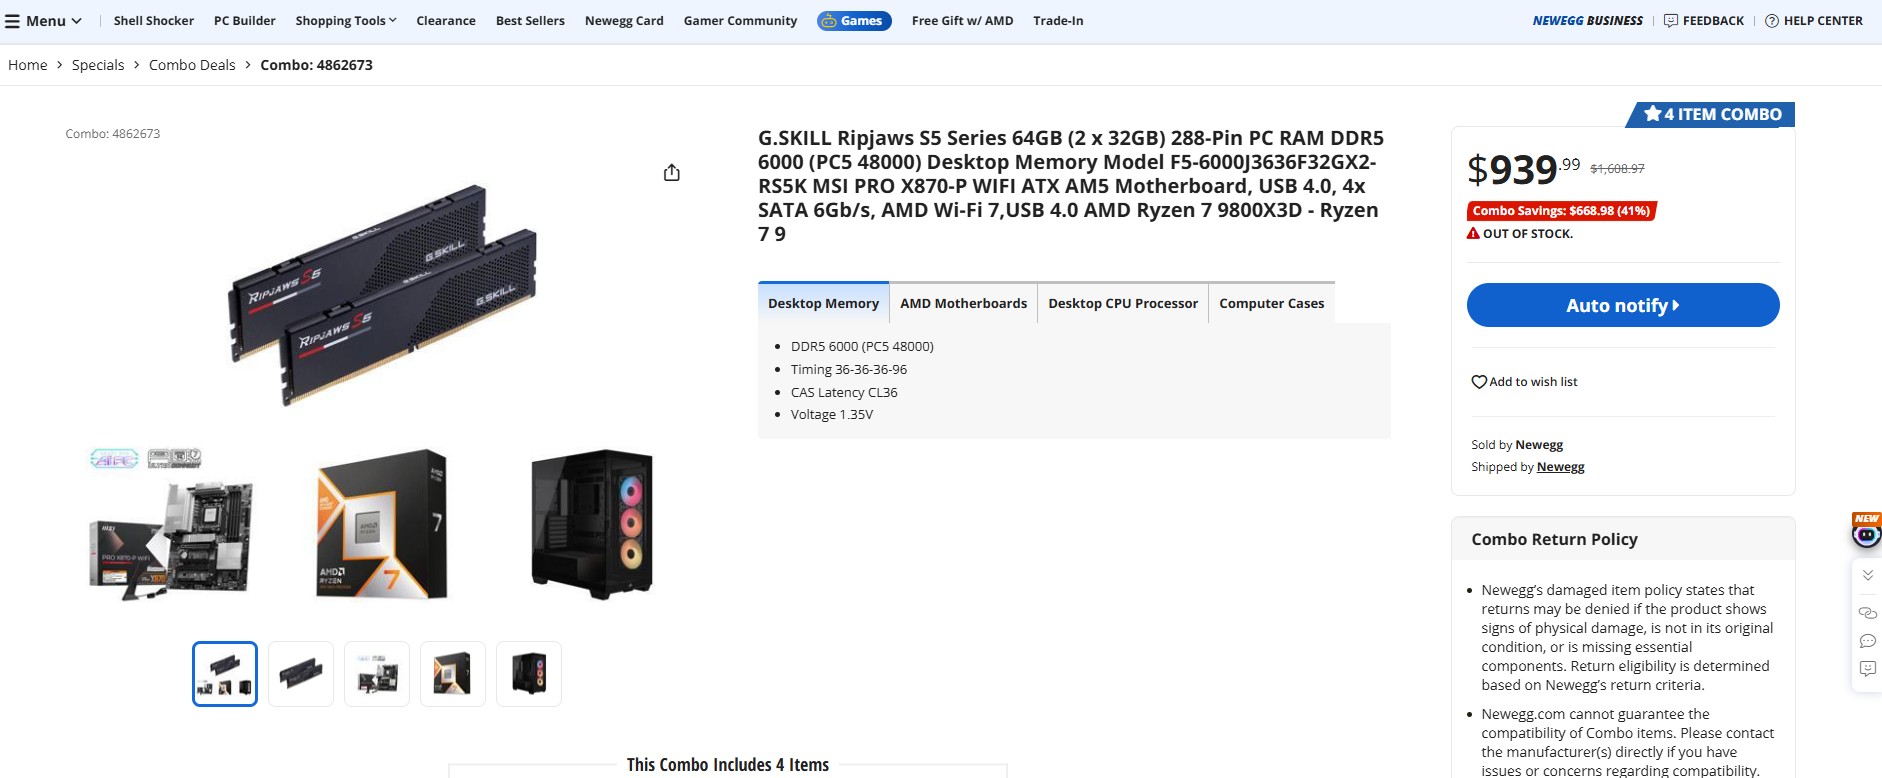
  • G.SKILL Ripjaws S5 series 64GB DDR5-6000 CL36 RAM ($885)
  • MSI PRO X870-P WIFI ATX AM5 Motherboard  ($180 on sale, not the best-in-class, but not bad!)
  • Ryzen 7 9800X3D CPU ($465)
  • Corsair 3500X RS-R ARGB case ($80)
  • MSI MAG Coreliquid A13 240 AIO CPU Radiator/Cooler ($85) – Free gift, not listed in the ad

That’s nearly $1,700 worth of kit for $940? Even Gollum couldn’t say ‘no’ to that!

4/17/2026 – NOTE: The astute among you will notice that the screenshot above shows that this combo is Out of Stock, which it is (at the time of writing), but it was available this morning when I placed my order :).

Aside: Intel versus AMD Processors

Throughout my 20s, I could not afford high-quality computer parts, so I built computers as cheaply as possible. That often meant the least expensive AMD Processors and Radeon graphics cards.

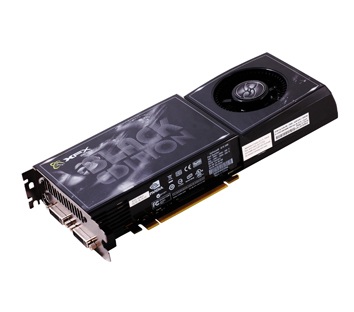
After graduating from college and a year or so into my first ‘big boy’ job, I’d spent some money and upgraded my desktop PC to a Core 2 Duo Q6600 with 6GB of DDR2 RAM and a modest 120GB SSD. I decided to spend $300 (a lot of money in 2008) on an XFX GeForce GTX 260 Black Edition video card. It ran at 75° C (which I was told was normal), and crashed more than I would like, even after two RMAs. This was my first taste of real GPU power! But it was a fickle beast, and even with my Antec 900 case with its ridiculous 200mm exhaust fan, two 120mm front fans, 120mm exhaust fan, and the option 120mm side fan, I STILL couldn’t keep the damn thing cool enough to keep it stable, and begrudgingly went back to a cheap, mid-range AMD GPU (a Radeon HD 5770) a couple of years later before ultimately sticking to Intel/Nvidia going forward.

“2Kliks” Philip Dyer did a great video a few years back that really articulated the history of Intel versus AMD far better than I have here, and it’s well worth the watch. In doing so, it seems to me my biases were justified, at least at the time! But times change, at least on the CPU front…

AMD’s Ryzen series has made a big comeback in the last few years, but nevertheless, I’ve stuck with Intel as my default.  Even when my research seemed to suggest that, for gaming, the Ryzen 7 9800X3D was one of the best processors money could buy, I dismissed this, instead, seeking out my familiar Core i7 equivalent, which I’d pegged as the gold standard for Desktop and Mobile CPUs. Sure, there was eventually a Core i9 series, but that just meant more cores, and I wasn’t even using all of the ones I had now…

I tell myself that more cores = better, and that the Ryzen X3D series isn’t as good as Intel Core Ultra for multitasking and productivity. What if I wanted to host my own LLM GML coding buddy, or spin up a few VMs to test new games on?

“Look, Nattie. That’s called ‘Copium’!”

The plain truth is, if it weren’t for the ridiculous prices of DDR5 RAM, or if there were an equivalent combo deal for an Intel 270K Plus for the same price (despite the Intel processor retailing for $100 less than the AMD 9800X3D), I would have bought that instead…

Fool, though I might be, I know a deal when I see one! Given how quickly these sold out, I feel sure I will end up with a more performant system despite my long-standing biases working against me.

What Are My Plans for the Rest of the Kit?

The existing Corsair iCUE 100i Capellix Elite is still nicer than the MSI one I got with the bundle, however, because I don’t have the box/accessories it came with, I would need a $12 AMD CPU Adapter Bracket and Standoffs so I can reuse it for the 9800X3D. The same goes for the Corsair 3500x case, which is objectively inferior to my Corsair 4000D (more on that below).

Although it will be more work, I figured the best long-term solution would be to put my old Intel System in the new case, which I could keep around as a spare… maybe use it as a server!

What Was the Damage?

All in, this little jaunt has cost me:

  • $1,500 for the RTX 5080 GPU
  • $180 for the 1000W PSU
  • $940 for the CPU, Motherboard, RAM, a spare case, and an AIO CPU cooler
  • $400 for a new monitor and stand

Total: $3,020 ($2,620 without the monitor and stand)

I wanted to get a sense of what this would cost from the builder who put together my current systems, and they were asking $5,198, or about twice what I paid…

To be fair, adding up the parts in their spec sheet came to $4,367.39, or about a 20% mark-up. They did come through for me for Jim’s PC, so I have to give them credit there. In any case, I wouldn’t use them again for myself, and can’t recommend them as a builder given how expensive everything is on its own these days…

No, sir! I’m going back to my roots and building my own from now on…

Coda

Primary System

The parts arrived, and the new CPU, motherboard, and RAM were installed in my old case. I’d purchased an AM5 adapter so I could utilize my old AIO. I also transferred both NVMe drives, and the OS took it like a champ, though I did have to remove some software I no longer needed.

I also took the opportunity to give the old case a thorough cleaning, getting into spots I couldn’t easily reach without a complete disassembly, and cleaned up the cabling. My old Corsair AIO included a Fan/RGB controller, but for whatever reason, I elected not to run all of my case fans through it, splitting them between the controller and the motherboard. This means that controlling fan speeds was also split between the iCUE software (used by the AIO) and Armory Crate. There was plenty of room on the controller, so I can’t imagine why it was done this way, and I won’t guess. In any case (no pun intended), it’s corrected!

I had to enable EXPO in the BIOS to get the RAM to run at 6000 MT/s instead of 4800, and spent several hours tinkering with the new monitor’s HDR settings to keep the brightness from blowing my eyeballs out…

Secondary System

I hadn’t realized how much I missed the fiddling pleasure of assembling a PC until I upgraded my primary system! I couldn’t bear to see my old parts go to waste, especially when I had most of the parts I needed to build a second system, save for a couple of odds and ends…

So I started by mounting my old CPU, motherboard, and RAM in the new Corsair 3500X. This case isn’t something I would have chosen for myself, and it seems to prioritize form over function; it looks nice in photos and is great for showing off your components, at the cost of a few degrees-worth of direct airflow.

The MSI MAG Coreliquid A13 240mm AIO is… fine. It didn’t come with a controller like my old AIO

I have to admit it makes for a handsome presentation, and the removable front panel gave me plenty of room for wiring up the IOs, fans, and RGB.  Power was another story…

I could have used my old PSU and my wife’s old EVGA RTX 3070 FTW3 8GB GPU for this build, but I gifted both to a friend to replace his MSI GeForce GTX 1060 Gaming 6GB GPU and Corsair RM650 650W PSU. He’d offered to give me his old parts, but I declined as they wouldn’t be very useful to me.

Instead, I bought another Corsair RM850 (identical to my old one). The cable management on the 3500X case was nonexistent, leaving me little room for CPU, GPU, and Motherboard power cabling. There was barely enough clearance to slide the PSU into its cubby, but I got there in the end.

###

That still left the GPU question… As a secondary PC, I didn’t want to spend an obscene amount of money on what would essentially be a spare system. So what were my options in the $300-400 range?

  1. Nvidia GeForce RTX 5060 8GB (~$330-360)
  2. AMD Radeon RX 9060 XT 8GB (~$340-380)
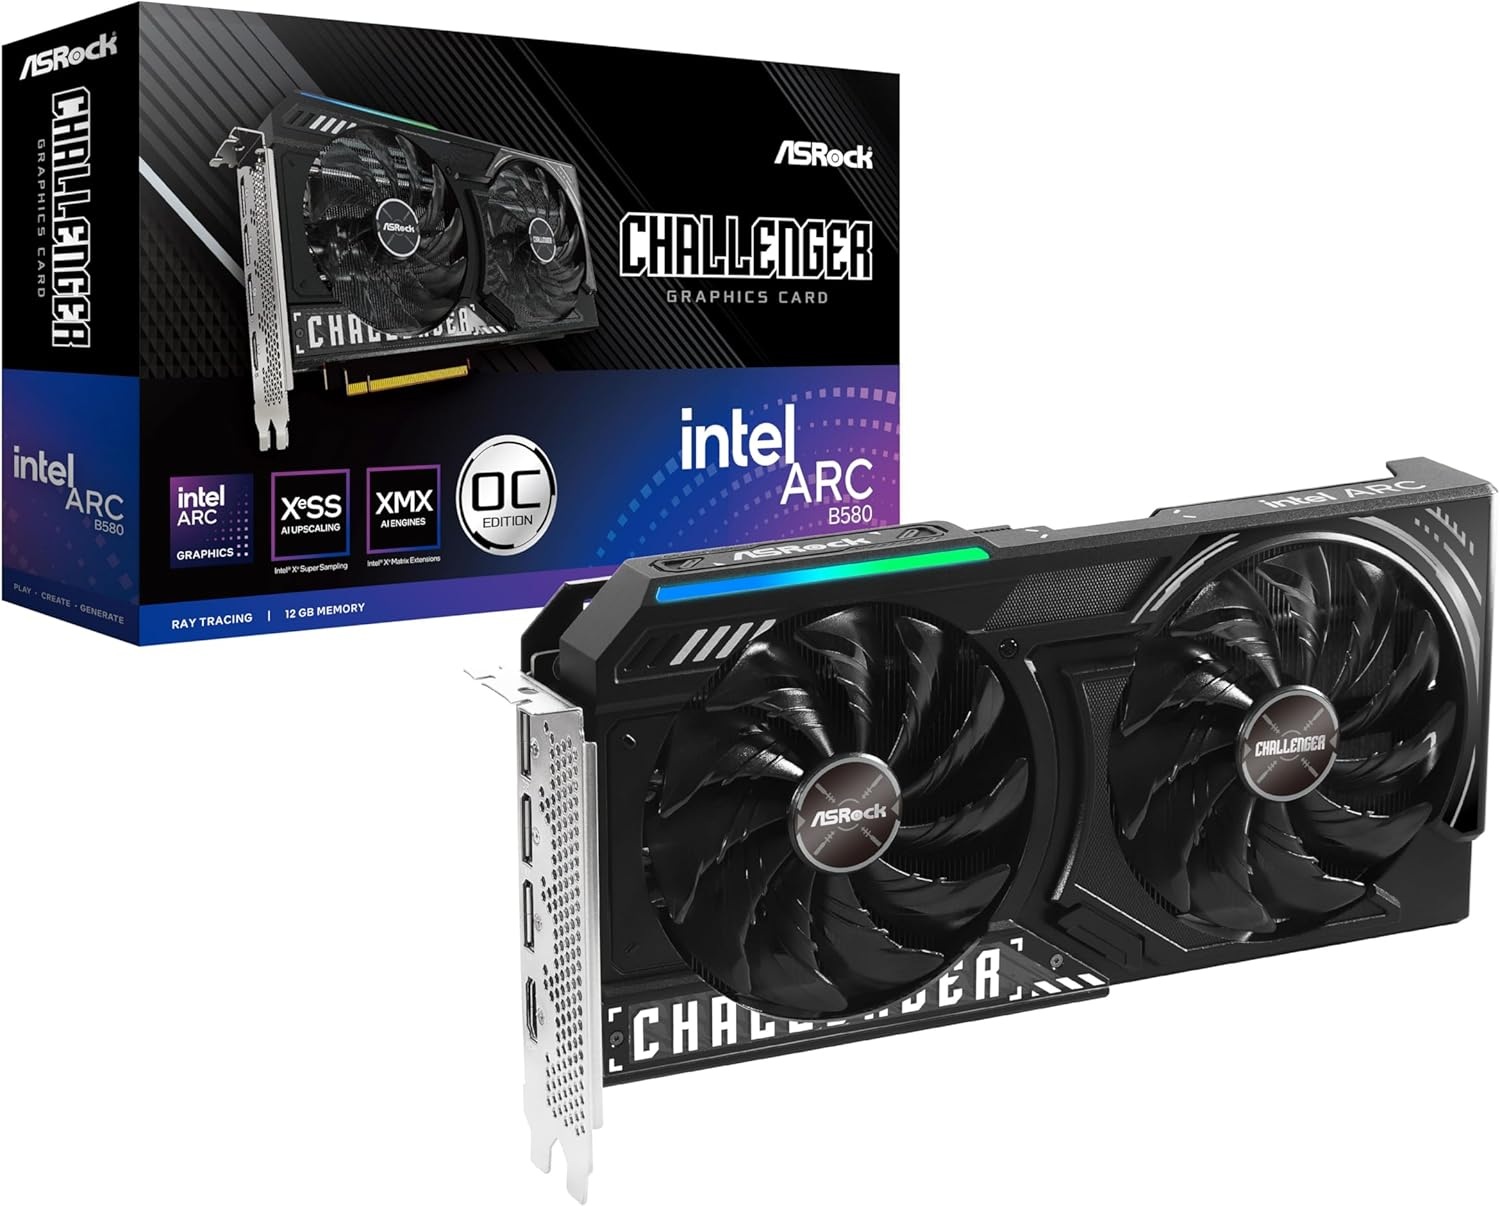
  3. Intel Arc B580 12GB ($310)

Nvidia would be the obvious choice, I would not begrudge spending $50 more for a much better-supported card, but the 8GB of RAM killed that option. PNY had an RTX 5060 Ti 16GB card for $490, but another $140 would get me an RTX 5070, but by then, I’m spending twice as much ($635+).

AMD was worse, slightly more expensive than the 5060, though you can get a 16GB RX 9060 XT for $460. Even so, I’ve had AMDs more of my adult life, and wasn’t going to rush out and buy another one.

Intel was a bit of a dark-horse candidate, and I’ve heard nothing but good things about their cards. I considered a used A770 16GB for $400, but opted for a new ASRock Intel Arc B580 Challenger 12GB OC for $310. Sparkle offers a 3-fan model of the same card, but they wanted $60 for it…

Since both of my NVMe drives were transferred to the new system, I picked up a $160 Kingston 1TB NVMe drive. My old motherboard had a nice NVMe heat sink, but I had to get another $5 thermal pad as the old one was pretty nasty. I got everything put back together, and it fired up just fine! I was able to install the OS, and it works great, but…

~~~

For a display, I was using my quadruple (2×2) HP N246v 24″ LCD 60Hz monitors, which work great for my work-from-home setup, but are atrocious for gaming… I still had my old Acer Predator HB241H 24″ LCD 1080p @144Hz gaming monitor…

My old triple monitor stand (SilverStone Technology ARM31BS)l is about 4″ too wide for my work [from home] desk, but a similar triple monitor stand as I’d bought for my gaming setup would work just fine! I could remove the two monitors from my double monitor stand and do another TIE Fighter configuration for my secondary machine with the 144Hz monitor as the middle/primary display, and keep my quad monitor setup as-is, granting two of the monitors for my work [from home] laptop, and two for the miniPC I bought for my second job, and control them both seamlessly using something like Mouse Without Borders. Yes, I currently have 10 monitors in my office, thanks for asking :).

While I’m at it, I’ll replace the DVI to DisplayPort adapters on my quad monitor setup with DisplayPort to HDMI cables (the quad monitor setup supports VGA, DVI, and HDMI… I told you it was old :), I’ll get an extra 140mm to use as an intake for the bottom of the case, and some cable extenders to pretty things up.

So add to the total…

  • $310 for the GPU
  • $160 for the 1TB NVMe SSD
  • $90 for the 850W modular PSU (renewed)
  • $140 for miscellaneous odds and ends (power cable extensions, second triple monitor stand, 140mm case fan, thermal pad for the NVMe heat sink)

Total: $560 ($700 if you count the optional bits, but some of that’s going to maintenance and long-over cable management 🙂

Worth it? Yes, I’d say so. Until next time!

V-Toad Games Official Merch Store Launched!

Over the last couple of years, I’ve used Print-On-Demand (POD) services to make custom T-shirts, coffee mugs, and other items for friends and family, and I thought that maybe this year, I’d create something V-Toad Games-themed.

Then it occurred to me that if I was going to create some merch, why not make it available to anyone who wanted it? And so I’m excited to announce the launch of our official Merchandise Store, which can be accessed from the link in our website’s main menu or through this URL.

All proceeds will fund hosting costs for www.vtoadgames.com, software licenses, hardware, and other game-development-related expenses. As always, our games will remain free (name your own price with no minimum cost).

Enjoy!

Purgatory Purgers: Version 1.5 Released!

Update Summary

  • Collecting 100% of the souls with Bob (the demon) is now possible!
  • Resolved clipping issues in the levels “Stilted Pond” and “Toad Hall.”
  • Gamepads, including PlayStation, Xbox, and Super Nintendo-style controllers, are now generally supported*. See the notes below for additional information.
  • Updated the Purgatory Purgers Manual to include gamepad button mappings

Special thanks to @ABitNosthalgic for suggesting that we make it possible to collect 100% of the souls with one character or another!

Gamepad/Controller Support Notes

*Most PC-compatible controllers with a Direction Pad (D-Pad), Start and Select buttons, and four face buttons should work. The game has been tested on the following devices:

  • Logitech F310
  • X-Box Elite Series 2 Wireless
  • Megafire 412-NO5 (generic PlayStation 2 Style Controller)
  • 8BitDo SN30 Pro (SNES-style controller)

@ABitNosthalgic reported that the Suily brand NES-style controllers did not work for him. While I haven’t tested this myself, the reviews seem to suggest that problems, particularly with the D-Pad, aren’t that uncommon.

Purgatory Purgers: Version 1.4 Released!

Update Summary

  • Resolved a bug (warning, spoilers!) that would destroy objects unintentionally when two blocks collided
  • Added a spawn/respawn animation and sound effect
  • Reworked the Passphrase mechanic (used to continue to a previously visited level) to display the Passphrase on the pause screen under the main menu as well as the Game Over screen.
  • Updated the Purgatory Purgers Game Manual to better describe the Continue/Passphrase mechanic and other menu features.

Special thanks to @ABitNosthalgic for catching the bug and Jason D for passphrase feedback!


Purgatory Purgers: Playthrough!

I am pleased to share that @BacktothePastABitNostalgic, a new YouTube channel specializing in retro-style content, has started a playthrough series on Purgatory Purgers!

You can access the Playlist here or by clicking the image above.

Thanks again, ABitNostalgic, and I look forward to seeing the rest of the series!

Purgatory Purgers

Here We Go Again!

Back in May, my life was starting to slow down enough to spend some time on game development again. Shortly after, I reached out to my old friend Eric to reconnect.

After a few weeks and several emails back and forth, we decided to start again, this time on a new project.

Game Mechanics

Eric suggested Chip’s Challenge (specifically, the Windows 3.1 version) in brainstorming ideas, which incorporates a few key elements:

  • Collecting McGuffins (computer chips)
  • Pushing things (similar to Sokoban)
  • Avoiding enemies

While Chip’s Challenge is more complex than that, we decided to focus on those 3 design ideas and start there. Eric proposed the idea of the player controlling an angel and a demon trapped in limbo. The two would have to work together to solve puzzles to advance to the next level.

The McGuffin would be souls, which would be set free from limbo to either ascend to heaven if collected by the angel or descend to hell if collected by the demon. Collecting all of the souls would allow the player to exit the stage and move on to the next level.

We incorporated a Sokoban-like push mechanic and decided to give this ability to the demon. Blocks would be used to obstruct enemy movement/line-of-sight and also to solve key/lock puzzles.

But we also needed something for the angel to do, so we decided to include water tiles that only the angel could traverse, using the same key/button that the push mechanic utilized.

After getting these features working, I had the idea to introduce bridges that the angel could lower, allowing the demon (and, by extension, blocks) to traverse areas that would normally be cut off by water.

Next Steps

With most of the core mechanics working, there’s a lot to do insofar as creating assets (art, music, etc.), levels, and the like. Eric is primarily responsible for level design, so I leave it to him to work on cranking those out while I work on polish.

Beaster’s Dungeon Revisited: Part III

When I last left off, I managed to get the trap placement mechanic working as designed. Of the core mechanics I needed to get working, the last one remaining was enemy platform pathfinding…

Platform Pathfinding Challenges

As previously stated, the game’s object is to ward off hoards of enemies trying to navigate their way to your treasure vault by placing traps and barriers in their way.

The player can navigate the environment by moving left, right, jumping, and falling.  I wanted to give the enemy a similar capability:

In this scenario, an enemy character can walk left or right and can clear obstacles up to two squares (32x32px tiles) high and three across. Each scenario is numbered and represents the following:

  1. All possible ‘jump’/walk movements from a platform (1-3 across, 2 up)
  2. Walk left or right 1 square
  3. Drop down left or right
  4. Jump up left or right 1 square
  5. Jump up left or right 2 squares
  6. Jump up left or right 2 squares, illustrating that the platform might be floating (i.e. allows free movement beneath it)
  7. Jump across left or right 1 square and up 2 squares
  8. Jump across 2 squares (same height)
  9. Jump across 2 squares and up 1 square
  10. Jump across 2 squares and up 2 squares
  11. Dropdown 1 square left or right from any height to a platform below (this is implied in 3, but I wanted to illustrate it explicitly)
  12. Drop down to a platform of any height, 1 square left or right across
  13. Drop down to a platform of any height, 2 squares left or right across

While I found a couple of examples of this working/implemented in GML using a modified version of the A* Search Algorithm, I could never get them to work within my project. I discussed the problem with my friend Jason, who created a working prototype for me that met all of the design specifications. But not fully understanding how the code worked, I failed to integrate it.

Now that I have the time to troubleshoot it, I’m reluctant to do as I fear that I don’t understand it well enough to support it. Instead, it might be better to build something simpler…

Possible Solutions

Thinking through the problem, there are many other ways I could have solved this. Wrecking Crew for the NES comes to mind:

Enemies (and the player) in Wrecking Crew use ladders to navigate up and down platform levels. Why couldn’t I implement a similar feature?

Ladders

For example, instead of trying to make the enemy AI smart enough to navigate obstacles with a preset of constraints/scenarios, I could have them wander left and right across vertical planes, moving up or down when they reach a ladder, depending on whether the vault was above or below them.

Alternately, rather than placing ladders in fixed places, perhaps some enemy types could create erect them?

Stairs

Another option would be to use teleportation in the form of background staircases:

In this example, the enemies could access specific floors using “staircase” objects that would move them from point A to B and B to C, and vice versa.

Either scenario would necessitate creating two extra animation frames for each enemy sprite. Not a deal breaker, but something to consider…

Revisiting the Triple Threat

About ten years ago, I distilled video game development into three core skillsets (i.e., the triple threat):

  1. Art
  2. Music (and sound effects)
  3. Programming

I’ve always been interested in art (drawing, sculpting, and to a lesser extent, painting). I taught myself how to play simple melodies on a cheap Casio keyboard in my teens. I learned to use, repair and maintain personal computers in the early 90s out of necessity (I didn’t have much money, so my choices were to fix it or do without).

Eventually, I started entertaining the idea of combining my love of art, music, and computers to try my hand at making video games instead of just playing them. Thus began my journey of self-discovery.

Art

I’d always been able to draw relatively well by hand. I lightly scribbled rough shapes, then fleshed them out with strong lines. As technology became more accessible, I’d digitize my art using a flatbed scanner.

I even purchased a digital camera and some clay in the early 2000s to sculpt models and photograph them from different angles in much the same fashion as Adrian Carmack did for DOOM. I could never get the hang of 3D modeling or translate these analog skills into digital media. In time, I abandoned that track in favor of pixel art.

At first, I was terrible at it. But by studying examples, watching tutorials, and practicing, I developed proficiency using Pyxel Edit. I started with a 16-color EGA palette, then later expanded this to the 52-color NES palette.

This has become my niche and primary medium for artwork creation. Tile sheets are relatively quick to make, which is important when you’re a one-man operation. There are 40 years of examples to draw upon for inspiration.

Music

I’ve been writing music for almost 30 years on the Amega Module format, beginning with tunes written on Fast Tracker II using samples ripped from other people’s files. Later, I sampled some high-quality instruments – these were used in the publication of my first album.

Unfortunately, the songs and samples used were lost to time, but I still have a 20-year backlog of my previous work,  dating as far back as 1997, all written for games that existed only in my imagination.

These days, I use a Windows port called “Skale Tracker.” It’s based on FT2, can export to .WAV and .OGG formats, and supports up to 64 tracks (although I rarely need more than eight these days and write chip tunes with half that). I’ve mixed and mastered my exported works in Audacity and have been very satisfied with the results.

Programming

Programming has always been my biggest weakness. I’ve never been the kind of person who can read a book on a subject and put that knowledge into practice. At best, I can look at examples, then adapt those to my needs once I understand how.

Someone once told me that DOOM was programmed in C++ and that I could do likewise. I remember seeing a boxed copy of Borland Turbo C++ at the local Best Buy, retailing for $300. I remember thinking then that if only I had the money to buy it, I’d have everything I needed to program my own version of DOOM. I was woefully ignorant back then…

Many times over the years, I’d hoped to get around my limitations by using a game creation engine,  my first exposure to this was around 1995. I’d gotten ahold of the Pie in the Sky Software’s 3D Game Creation System for MSDOS.

It was a 2.5D game engine capable of creating games slightly beyond Wolfenstein 3D (floor and ceiling textures, angled walls) but fell short of DOOM (no height variable). While I had limited success designing very simple levels, I didn’t understand its limitations or advanced features and gave it up in frustration.

In my late teens to early 20s, I experimented with 3D Game Studio.

I could create primitive shapes, texture them, and use those objects as building blocks to create a castle out of modular pieces. I could render the map and fly through it, but I had no idea how to use its scripting language. I continued to toy with it for a couple of years, but again, I got discouraged as my imagination outpaced my ability.

In 2014, I picked up GameSalad, and created this website. I had no idea what I wanted to create, so I groped around aimlessly in the dark, bumping into bugs and lacking support.

At the time, GameSalad was primarily marketed to Mac users, and the Windows version lacked many core functions. By the time it caught up to the Mac version, they had stopped offering the Standard Edition for free and switched to a subscription model. I didn’t feel comfortable paying for something I wasn’t entirely sure I could learn to use, so I abandoned it and moved on.

I discovered Game Maker Studio in the spring of 2016. I teamed up with my old friend Eric, and we set out to learn the engine. Eric volunteered to do the programming, I would do everything else (artwork, music, design, documentation, project management).

In the early days, YouTube tutorials were our primary source of GMS programming information. Later, I would compare these to “let’s play” videos rather than proper lessons. Thankfully, I eventually discovered John Janetka’s Game Programming Course (GPC). This was a game changer for us (well, me anyway). While the second half of the lessons became disjointed, it was enough to see me through the creation and publishing of my first game.

Unfortunately, I’d run out of time (and money) and had to start working again. Work became all-consuming, and after spending 10-12 hours of skull sweat a day on technical matters, I didn’t have the energy or drive to devote to game programming when I got home. On the weekends, all I wanted to do was sleep.

I tried to pick it back up several times but couldn’t get back into the habit…

When Stars Align

That all changed this year. I have…

  • Started a new job with a pension, so now I have a future and retirement to look forward to.
  • Rid myself of $117,000 of student debt.
  • Nearly paid off my mortgage (8 months to go).
  • Lost 43 lbs. of excess weight through diet and exercise, and I am on track to be back to my ideal weight by the end of the year.

I’ve finally reached a point in my life where I can resume my pursuit of game development now that I have the time, energy, and resources to do so.

More to come…

Changes

“Time may change me, but I can’t trace time.” – David Bowie

About 8 weeks ago, I celebrated my 1 year anniversary in my new role. A week after that, my manager resigned and I was tapped to take his place. Since then, it’s been a whirlwind of changes and new responsibilities.

By all accounts, this is old hat for me, but the demands on my time have increased significantly, becoming greater and greater as I unravel years of mismanagement and willful neglect.

While I’m very happy in my new position, I am busier than ever, and even less inclined to do anything productive when I get home after 10-12+ hours of skull sweat…

Pressure requires a release valve, and lately, my pressures had been relieved by playing games rather than making them. What’s worse is, these games introduced a whole-new set of pressures and demands on my time – so much so that it felt like a second job, albeit one which I wasn’t being paid to do.

###

While playing games can be fun and interesting, that part fades quickly. What keeps me interested is the social interaction; meeting and spending time with new “friends”. What I found was that for the people I was spending a great deal of time with, the opposite was true – they had no interest in camaraderie, just a person to occupy a seat at the table so they could carry on their game.

Maybe it’s the age gap speaking here, and relationships have given way to instant gratification – maybe I found myself surrounded by the “single serving friends” of Chuck Palahniuk’s Fight Club…

So what did I do? I withdrew…


Credits: featured image, “Butterflies” by M.C. Escher

Transition

“Use a superior development system than your target to develop your game.” – John Romero, Early Id Software Programming Principles

One of the nice things about being employed again was the ability to afford a new computer, something I’ve put off as long as I could.

About 5 years ago, I’d purchased a very high-end mobile workstation to take with me overseas so I’d have something to keep myself entertained on the 26+ hour flights to and from the US:

  • Intel Core i7 3630QM @3.2GHz
  • 32GB of DDR3 RAM @ 1600MHz
  • Nvidia GTX 675MX 4GB of VRAM
  • 120GB SSD Primary Drive
  • 1TB Storage Drive

When I came back home, I found it more convenient to develop on my aging desktop machine with ideas of upgrading it when possible:

  • Intel Core i7 2600K @ 3.4GHz
  • 8GB DDR3 @ 1600MHz
  • AMD HD 5770s 2GB VRAM (x2 in Crossfire)
  • 120 GB SSD Primary Drive
  • 80GB SSD Auxiliary Drive
  • 320GB Storage Drive
  • 1 TB Secondary Storage Drive

A couple of months ago, I built myself a new PC that should last me a good 3-4+ years with minor upgrades:

  • Intel Core i7 7700K @ 4.2 GHz
  • 16GB DDR4 @ 3000MHz
  • Nvidia GTX 1080 8GB of VRAM
  • 240GB SSD Primary Drive
  • 2TB Storage Drive

I’ve been very pleased with it so far, and have been slowly reinstalling my development tools. The next step was to copy down my data so that I could pick up where I left off. To facility this, I purchased an inexpensive but well-made USB 3.0 SATA Hard Drive Docking Station.


What was intended to be a simple task, however, turned out to be anything but…The data I needed was spread across 4 different drives, one of which was BitLocker encrypted. The machine itself belonged to me originally, was lent a friend who in-turn savaged it, replacing several of the drives and the OS. On the actual computer, I’d solved this using Windows Libraries, but didn’t have that luxury when reading the raw drives.

So what did I do? I incorporated a handy application called SpaceSniffer to help me work out [visually] where the files I was looking for were.

This application is very similar to WinDirStat, but performs significantly faster. I still have a few more applications to [re]install, but I can get that done tomorrow at some point as it is now 4:13am, and I should think about getting to bed as I have to be up in 3 hours.