Beaster’s Dungeon Revisited: Part III

When I last left off, I managed to get the trap placement mechanic working as designed. Of the core mechanics I needed to get working, the last one remaining was enemy platform pathfinding…

Platform Pathfinding Challenges

As previously stated, the game’s object is to ward off hoards of enemies trying to navigate their way to your treasure vault by placing traps and barriers in their way.

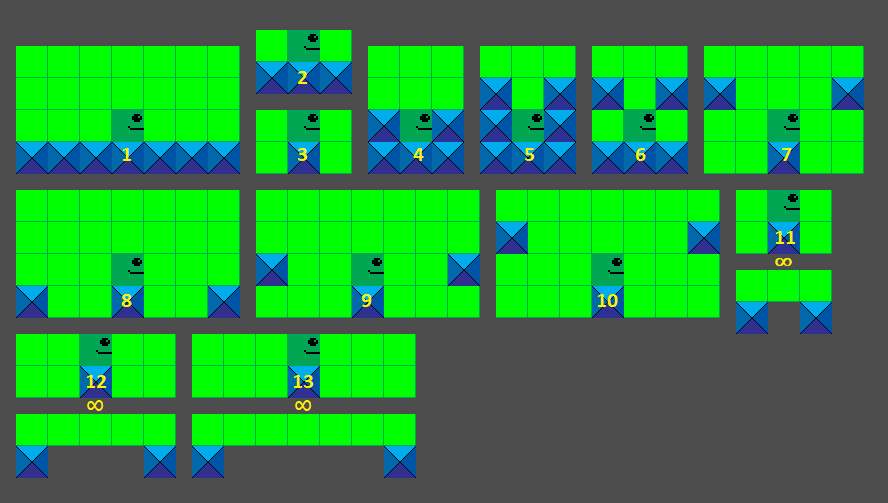
The player can navigate the environment by moving left, right, jumping, and falling.  I wanted to give the enemy a similar capability:

In this scenario, an enemy character can walk left or right and can clear obstacles up to two squares (32x32px tiles) high and three across. Each scenario is numbered and represents the following:

  1. All possible ‘jump’/walk movements from a platform (1-3 across, 2 up)
  2. Walk left or right 1 square
  3. Drop down left or right
  4. Jump up left or right 1 square
  5. Jump up left or right 2 squares
  6. Jump up left or right 2 squares, illustrating that the platform might be floating (i.e. allows free movement beneath it)
  7. Jump across left or right 1 square and up 2 squares
  8. Jump across 2 squares (same height)
  9. Jump across 2 squares and up 1 square
  10. Jump across 2 squares and up 2 squares
  11. Dropdown 1 square left or right from any height to a platform below (this is implied in 3, but I wanted to illustrate it explicitly)
  12. Drop down to a platform of any height, 1 square left or right across
  13. Drop down to a platform of any height, 2 squares left or right across

While I found a couple of examples of this working/implemented in GML using a modified version of the A* Search Algorithm, I could never get them to work within my project. I discussed the problem with my friend Jason, who created a working prototype for me that met all of the design specifications. But not fully understanding how the code worked, I failed to integrate it.

Now that I have the time to troubleshoot it, I’m reluctant to do as I fear that I don’t understand it well enough to support it. Instead, it might be better to build something simpler…

Possible Solutions

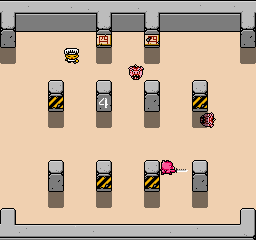
Thinking through the problem, there are many other ways I could have solved this. Wrecking Crew for the NES comes to mind:

Enemies (and the player) in Wrecking Crew use ladders to navigate up and down platform levels. Why couldn’t I implement a similar feature?

Ladders

For example, instead of trying to make the enemy AI smart enough to navigate obstacles with a preset of constraints/scenarios, I could have them wander left and right across vertical planes, moving up or down when they reach a ladder, depending on whether the vault was above or below them.

Alternately, rather than placing ladders in fixed places, perhaps some enemy types could create erect them?

Stairs

Another option would be to use teleportation in the form of background staircases:

In this example, the enemies could access specific floors using “staircase” objects that would move them from point A to B and B to C, and vice versa.

Either scenario would necessitate creating two extra animation frames for each enemy sprite. Not a deal breaker, but something to consider…

Revisiting the Triple Threat

About ten years ago, I distilled video game development into three core skillsets (i.e., the triple threat):

  1. Art
  2. Music (and sound effects)
  3. Programming

I’ve always been interested in art (drawing, sculpting, and to a lesser extent, painting). I taught myself how to play simple melodies on a cheap Casio keyboard in my teens. I learned to use, repair and maintain personal computers in the early 90s out of necessity (I didn’t have much money, so my choices were to fix it or do without).

Eventually, I started entertaining the idea of combining my love of art, music, and computers to try my hand at making video games instead of just playing them. Thus began my journey of self-discovery.

Art

I’d always been able to draw relatively well by hand. I lightly scribbled rough shapes, then fleshed them out with strong lines. As technology became more accessible, I’d digitize my art using a flatbed scanner.

I even purchased a digital camera and some clay in the early 2000s to sculpt models and photograph them from different angles in much the same fashion as Adrian Carmack did for DOOM. I could never get the hang of 3D modeling or translate these analog skills into digital media. In time, I abandoned that track in favor of pixel art.

At first, I was terrible at it. But by studying examples, watching tutorials, and practicing, I developed proficiency using Pyxel Edit. I started with a 16-color EGA palette, then later expanded this to the 52-color NES palette.

This has become my niche and primary medium for artwork creation. Tile sheets are relatively quick to make, which is important when you’re a one-man operation. There are 40 years of examples to draw upon for inspiration.

Music

I’ve been writing music for almost 30 years on the Amega Module format, beginning with tunes written on Fast Tracker II using samples ripped from other people’s files. Later, I sampled some high-quality instruments – these were used in the publication of my first album.

Unfortunately, the songs and samples used were lost to time, but I still have a 20-year backlog of my previous work,  dating as far back as 1997, all written for games that existed only in my imagination.

These days, I use a Windows port called “Skale Tracker.” It’s based on FT2, can export to .WAV and .OGG formats, and supports up to 64 tracks (although I rarely need more than eight these days and write chip tunes with half that). I’ve mixed and mastered my exported works in Audacity and have been very satisfied with the results.

Programming

Programming has always been my biggest weakness. I’ve never been the kind of person who can read a book on a subject and put that knowledge into practice. At best, I can look at examples, then adapt those to my needs once I understand how.

Someone once told me that DOOM was programmed in C++ and that I could do likewise. I remember seeing a boxed copy of Borland Turbo C++ at the local Best Buy, retailing for $300. I remember thinking then that if only I had the money to buy it, I’d have everything I needed to program my own version of DOOM. I was woefully ignorant back then…

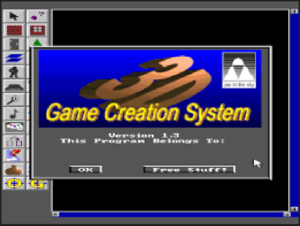
Many times over the years, I’d hoped to get around my limitations by using a game creation engine,  my first exposure to this was around 1995. I’d gotten ahold of the Pie in the Sky Software’s 3D Game Creation System for MSDOS.

It was a 2.5D game engine capable of creating games slightly beyond Wolfenstein 3D (floor and ceiling textures, angled walls) but fell short of DOOM (no height variable). While I had limited success designing very simple levels, I didn’t understand its limitations or advanced features and gave it up in frustration.

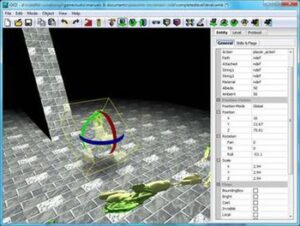
In my late teens to early 20s, I experimented with 3D Game Studio.

I could create primitive shapes, texture them, and use those objects as building blocks to create a castle out of modular pieces. I could render the map and fly through it, but I had no idea how to use its scripting language. I continued to toy with it for a couple of years, but again, I got discouraged as my imagination outpaced my ability.

In 2014, I picked up GameSalad, and created this website. I had no idea what I wanted to create, so I groped around aimlessly in the dark, bumping into bugs and lacking support.

At the time, GameSalad was primarily marketed to Mac users, and the Windows version lacked many core functions. By the time it caught up to the Mac version, they had stopped offering the Standard Edition for free and switched to a subscription model. I didn’t feel comfortable paying for something I wasn’t entirely sure I could learn to use, so I abandoned it and moved on.

I discovered Game Maker Studio in the spring of 2016. I teamed up with my old friend Eric, and we set out to learn the engine. Eric volunteered to do the programming, I would do everything else (artwork, music, design, documentation, project management).

In the early days, YouTube tutorials were our primary source of GMS programming information. Later, I would compare these to “let’s play” videos rather than proper lessons. Thankfully, I eventually discovered John Janetka’s Game Programming Course (GPC). This was a game changer for us (well, me anyway). While the second half of the lessons became disjointed, it was enough to see me through the creation and publishing of my first game.

Unfortunately, I’d run out of time (and money) and had to start working again. Work became all-consuming, and after spending 10-12 hours of skull sweat a day on technical matters, I didn’t have the energy or drive to devote to game programming when I got home. On the weekends, all I wanted to do was sleep.

I tried to pick it back up several times but couldn’t get back into the habit…

When Stars Align

That all changed this year. I have…

  • Started a new job with a pension, so now I have a future and retirement to look forward to.
  • Rid myself of $117,000 of student debt.
  • Nearly paid off my mortgage (8 months to go).
  • Lost 43 lbs. of excess weight through diet and exercise, and I am on track to be back to my ideal weight by the end of the year.

I’ve finally reached a point in my life where I can resume my pursuit of game development now that I have the time, energy, and resources to do so.

More to come…

The Fourth Level

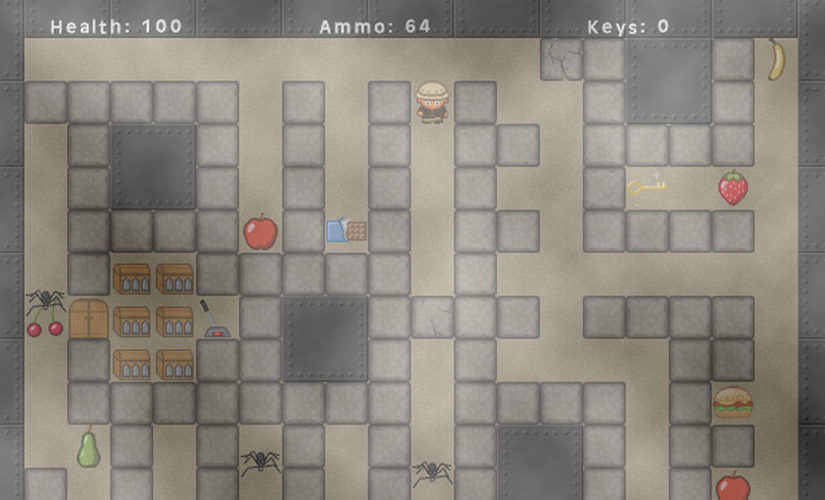
As mentioned in a previous post, Level 4 of the GPC was not a lesson, but rather a series of challenges meant to reinforce what was taught in Level’s 2 and 3. This time, I elected to create a new game rather than modify an existing one.

I settled on a top down shooter/adventure game and added features and flourishes as I went along. I used my earlier conceived true grid movement code, but this time, I used a switch statement instead of a series of if statements (or at least fewer of them):

switch (keyboard_key)
 {
  case vk_left:
  case ord("A"):
     sprite_index=spr_player_walk_left;
     if moving=0 {
       moving=1
       instance_destroy(obj_target) 
       target=instance_create(x-64,y,obj_target)
       move_towards_point(target.x,target.y,4) 
      }
      break; 
 case vk_right:
 case ord("D"):
    sprite_index=spr_player_walk_right;
    if moving=0 {
      moving=1
      instance_destroy(obj_target) 
      target=instance_create(x+64,y,obj_target)
      move_towards_point(target.x,target.y,4) 
     } 
     break;
 case vk_up:
 case ord("W"):
    sprite_index=spr_player_walk_up;
    if moving=0 {
      moving=1
      instance_destroy(obj_target) 
      target=instance_create(x,y-64,obj_target)
      move_towards_point(target.x,target.y,4) 
    } 
    break;
 case vk_down:
 case ord("S"):
    sprite_index=spr_player_walk_down;
    if moving=0 {
      moving=1
      instance_destroy(obj_target) 
      target=instance_create(x,y+64,obj_target)
      move_towards_point(target.x,target.y,4) 
     } 
     break; 
 }

While trying to figure out line of sight, I came a new function:

collision_line(x,y,obj_player.x,obj_player.y,obj_barrier,1,0)

That was my first time using the collision_line, which I don’t think is covered at all in the GPC, though it might be included in his how-to’s somewhere…I came across it after watching a tutorial video by “GM Wolf” on YouTube:

This would have solved a lot of issues for me…for instance, in a previous project, I had an idea to create a trap comprised of two moving blocks which collided into and bounced off of each other. While everything worked fine, it would occasionally cause the block to get stuck in a wall. This happened because it’s movement caused it to overlap before it detected the collision, thereby getting stuck inside the wall, unable to go anywhere.

I solved this before using the place_meeting function, but was never introduced to the End Step Event, which  would have been the right way to do it. Nevertheless, I can think of other uses for collision_line and am glad I learned of it!

All in all, I spent about 2 days (most of the weekend) working on this little mini-game, and here are some of the features I included:

  • Destructible walls that advance in damage by manipulating the image_index
  • Enemies that can navigate mazes (using John Janeka’s code from Level 12)
  • Line of Sight for enemies with projectiles
  • Health, ammunition and keys global variables that persistent between rooms
  • Lock and key mechanism
  • A switch that reveals the exit when touched
  • Randomized muzzle flare and smoke when firing bullets
  • Randomized impact splatters when an enemy is hit
  • Different sounds for each impact
  • Randomized health power up sprites to add variety using a single object
  • Exits that allow you to advance to the next room
  • Capped health at 100%

What I not did include were:

  • Fail condition/game over when you run out of hitpoints
  • Start screen
  • Game Over screen

All in all, it’s a neat little game though unfinished, and good practice for more serious projects to come!

GPC Level 3 Revisited

Shortcuts…

With my files recovered, I’m free to concentrate on getting back to my second run through the GPC. I’m back to Level 3, and bits and pieces of the GML syntax are coming back to me.

For instance, when calculating variables, the course suggests something like this:

hitpoints = hitpoints + 1

This works of course, but he also suggests that hitpoints = +1 does not work, which is true, however, if you reverse that (e.g. hitpoints +=1), it does the same thing with fewer characters to type. A small, but useful time saver.

###

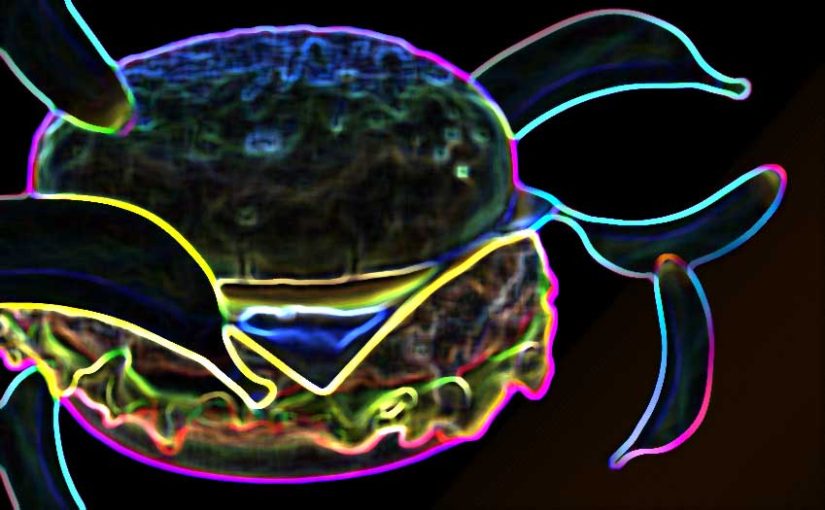
A Hamburger That Fires Bananas (Improved)

In GPC 3-03-A, he introduces a function that randomizes an integer:

irandom_range(0,100)

This allows you use a random number generator (RNG) to decide the outcome of a particular variable within a specified range (i.e. 0 to 100 in the code above). This is used to manipulate the direction that a hamburger fires bananas, and the speed at which they are fired.

I took this a step further by adding the following step event (pun very much intended) to obj_banana:

image_angle+=speed*10

This (in my most humble opinion) makes the bananas far more interesting/exciting to watch as it causes them to spin through the air at a speed consistent with their velocity – i.e. a fast traveling banana rotates faster than a slower moving banana.

Try it yourself!

Aside: I couldn’t help but giggle at the silliness of this lesson – you wouldn’t think a burger that shoots bananas would be so amusing but you’d be wrong! Very entertaining stuff 🙂

Switching Things Up

In Level 3, “Challenge 2 – Random Generation,” the student is required to write a series of if statements to randomly move the player character in one of 4 orthogonal directions.

In my first time around, I recall touching on Switch statements, which can be a good way to handle this very scenario. Here’s how that would look:

Instead of this:

num=irandom_range(1,4)

if num=1 {
direction=0
speed=4
}

if num=2 {
direction=90
speed=4
}

if num=3 {
direction=180
speed=4
}

if num=4 {
direction=270
speed=4
}

You could do something like this:

speed=4
switch (irandom_range(1,4)) { 
 case 1: direction=90; 
 break; 
 case 2: direction=0; 
 break;
 case 3: direction=270; 
 break;
 case 4: direction=180;
 break;
}

This seems like a far more efficient and cleaner way to handle multiple (more than 3+) consecutive if statements, but is cheating at this stage as Switch isn’t covered in the GPC until much, much later*…

So why mention it now? Because I want to get in the habit of making my code clean and efficient.

And with that, on to Level 4!


*I can’t quite recall exactly when this was introduced… For all I know, it may not have even been in the GPC, but if I do come across it later, I will update this post with where you can find it.

Here I Go Again on My Own

It’s been over 6 months since my last post. I’ve settled into my new role, and as the year winds to a close, I’ve been getting the itch to return to game making. Unfortunately, circumstances are such that I’ll be going it alone as Eric has retired from V-Toad Games.

Game programming and design is difficult, frustrating, greatly rewarding -but it’s not for everyone. What I learned from my last go at it was that programming is not painting by the numbers. Being able to complete an exercise no more makes you a programmer than following a recipe makes you a cordon bleu chef. There are core skills you have to master, and to do that, you have to be passionate enough to stick with it.

Eric really tried – I sincerely believe that. Nevertheless, I know all too well that bills must be paid, and can’t blame him for not having the energy to go home and learn something that he just wasn’t passionate about.

So why is being a solo project a problem for me? Many game developers, past and present, were/are one-man shows. I suppose it’s because I like feedback; I like to share what I’ve learned and bounce ideas off of other people because this helps me to reinforce and retain that knowledge.

As a consequence of my hiatus, I’ve all but lost everything I learned about GML, and will need to go through the lessons again to get back in the saddle. This time around should be much quicker, albeit lonelier.

“…Here I go again on my own…” – David Coverdale, Whitesnake

More Missing Pieces… :(

Level 15 begins with an introduction:

“You have learned how to store numbers and text using variables, lists, maps, and grids.  In this level you will learn one final way to store values – Arrays.”
– Level 15 Intro, www.gameprogrammingcourse.com

Variables? Check.

Lists? Check.

Maps? Nope. This would have covered key, value pairs (i.e. Health Potions: 5) . There are about 19 functions that are associated with type of data structure, so it would have been nice to know.

Grids? This isn’t what we talked about in Level 12, but rather 2-dimensional arrays (like a table) for holding strings or real numbers. There are over 3 dozen functions associated with these, and like Maps, they were never mentioned in the previous Levels.

Meanwhile, back at the YouTube Channel…

The playlist for Level 15 was entitled, “Arrays and Matrices,” and while Arrays are covered, Matrices are not. There are 3 videos broken up into parts A, B and C, but C isn’t referenced on the website.

The corresponding project files consist of an empty project (L15_01_.gmx), a starter project for Part A, skipped B and went straight to an all-in-one project, L15_01_ABC.gmx…at least all of the challenge-related files were there this time!


###

So what gives? Well, between hundreds of YouTube videos, a website, GameMaker projects, resource files and his lesson plans, I could see where things might get out of sync…

Nevertheless, as my GPC course comes to a close, I feel that a complete review will be in order. SPOILER ALERT: It’s still the best set of GML lessons out there!


Another Missing Piece…

The title of this post is used in ambivalent mode; it both introduced a missing component that made a simple inventory system possible (Level 13, lessons 2-4) and was missing a project file (14-01-X3-Start.gmk), preventing me getting a crack at the last challenge of Level 14…

I checked the resources folder (there was no sub-folder for Level 14), double checked the projects folder, no dice… 🙁

Off to bed now, and tomorrow, I’ll tackle Arrays!


Losing Steam, Second Wind

I just finished Level 12 out of 17 of the GPC. The momentum I built up going into Level 5 has been slowing to a crawl as I stumbled over structural incongruitiesweak examples, bugs, and project file configuration issues.

The Groove (or Rhythm or Flow…)

I am most productive when I find my ‘groove’. This happens when I’ve overcome my learning curve, have developed a pattern of work,  then get into a rhythm where I can knock out task after task by reusing the same steps.

Jimmy Diresta explains that first time you try something is the most difficult; you ‘go to school’ on the first one, and get progressively better and better – by time you finish, you’re an expert.

Matthew Inman made an incredible post on this subject, describing the agony and joy of creation…a few non sequiturs aside, he eventually gets to the meat of issue – how great and wonderful things can result from sweating over tasks that are often tedious and frustrating in and of themselves.

My problem is that I’m a perfectionist. If I encounter something that isn’t working to my satisfaction, I can’t ignore it – I have to ‘fix’ it. Maybe this is a characteristic of a good programmer, but it’s utterly frustrating when I’m working on it, and enormously satisfying when I get something to work properly…

The trouble, it seems, is that the content is getting thinner and thinner,  and the issues referenced above that are breaking my ‘flow’ are getting more and more numerous. At a guess, I’d say that these last few videos were produced at a busier time than the others, and as a result, he simply didn’t have the time required to carefully plan and produce them as well as he’d like.

Whatever the reason, I have to remind myself that no matter how annoyed I get with this course, it’s still free of charge, and of far superior quality to any other GML ‘tutorials’ on YouTube. More importantly, distractions, bugs and problem solving (especially when the problem is more complex than it first appeared) are all part of programming – so I’d best get used to them 🙂 .

That said, on with the lessons…

###

Levels 9-11 (Doesn’t that look ominous?)

Level 9 was more or less a rehash of Level 7, focusing on instance IDs, along with another ‘cheat sheet’ from the resource folder. The two share a lot of parallels, and might be better off merged into one big lesson rather than two disjointed ones. There was even a loop snuck into one of the project files to create more enemies, but that wasn’t covered as part of the lesson.

Level 10 was one of the shortest lessons so far, and anyone who attempted to include a sound as suggested in Challenge 10-01 part C will discover that they’ll need to enable the New Audio Engine (Global Game Settings > General > Use New Audio Engine) before they’ll hear anything.

Level 11 was a letdown. I was really looking forward to Lists, but the only output method covered was the number of total items in the list (e.g. the ds_list_size function). The examples in the lessons didn’t really fit my concept of ‘inventory’ – that is, being able to output all the values in the list, or how many of each unique value there were (e.g. 2 Burgers, 2 Apples etc.). I suspect that this will be covered later in Level 13 (Loops).

###

This brings us up to…

Level 12: Grid Game Concepts

Grid games can cover everything from board games (checkers, chess etc.) to turn-based and real-time strategy games to classic video games like Namco’s Pac-Man.

In all cases, movement in a grid game is fixed rather than free form. GPC 12-01-A covers movement, and attempts to tackle the issue of getting hung on on corners due to the collision geometry.

The Lesson’s Solution:

Make the sprites equally sized (32×32 pixels in this case) and use a collision mask of 32×32 to ensure that they stay within the confines of the maze corridors. That’s a good start.

Next, he introduces how to manually code keyboard and collision events inside a Step event like so:

if keyboard_check(vk_right)=true and place_meeting(x+4,y,o_block)=false {
 x=x+4
 }
 
if keyboard_check(vk_left)=true and place_meeting(x-4,y,o_block)=false {
 x=x-4 
 }

if keyboard_check(vk_up)=true and place_meeting(x,y-4,o_block)=false {
 y=y-4 
 }

if keyboard_check(vk_down)=true and place_meeting(x,y+4,o_block)=false {
 y=y+4 
 }

What the code is actually doing is checking to see if the player object will collide with a wall object (o_block), and if not (false), advance the player 4 pixels in the direction given.

Why this is an unsatisfactory approach:

Since are moving the player 4 pixels at a time, you have to manually tap back and forth until you are perfectly aligned or you will still get hung up on corners. This isn’t much of a problem when moving around 90 degree turns, becomes an issue when trying to get through ‘four-way’ and ‘T’ intersections.

How to fix it using only what we’ve covered so far up though Level 12:

When I set out to tackle this, the logic went something like so…

  1. Find a location 32 pixels (one character or tile length) ahead of whatever direction I was going
  2. Move to that location
  3. Stop moving when you reach it

I tried using the move_towards_point function using a variable (e.g. target=o_player.x+32) in conjunction with distance_to_point but found that it target would always be 32 pixels further ahead, so it would never close the gap and would move in that direction infinitely. The solution would have to be something relative to, but external from the player object.

That’s when it hit me; why not use another object? So here’s what I did (coded in the o_player object)…

Press D-Key Event:

//create a new object as a waypoint for the player to move towards
//move towards the target's coordinates at a speed of '4'
target=instance_create(x+60, y, o_target)
move_towards_point (target.x,target.y,4)

Collision with o_target Event:

//Destroy the o_target object on collision
with other {
instance_destroy()
}

//Stop the player
speed=0

Some of you may be looking at that code and scratching your heads – why 60 pixels? Well after lots of trial and error, I worked out that in order to move 32 pixels from where you were, you’d have to include the width/height of the player object (+32 pixels), giving you a total of 64.

When I tried 64, I found that I was stopping just short of where I needed to be, and worked out that the collision wasn’t actually detected when the edges of the two object met, but when the player object had overlapped it by the designated speed (4 pixels). So, 64-4=60, which places you at exactly 32 pixels over every time you press the key.

Once I had that working, it was time to clean up the code and put some utility conditions in it to prevent a keystroke from changing direction before you got to your destination, an additional event to stop you when you hit a wall, and to destroy any target objects you can’t reach (i.e. behind a wall) and some additional variables to be able to control the distance (pdist) and speed (pspd).

In the Press D-Key Event:

// check to see if character is moving
if moving=0 {
//set moving to true & destroy the old target
 moving=1
 with o_target {
 instance_destroy()
 }
//move target right by 'pdist' pixels at a speed of 'pspd'
 target=instance_create(x+pdist,y,o_target)
 move_towards_point(target.x,target.y,pspd)
}

Add moving=0 to the end of the o_target and o_block collision events and that’s pretty much it! Now using the Key Press event rather than just the Keyboard event will cause you to take a single step 32 pixels in whatever direction you are heading assuming you adjust the +/- pdist variable depending on whether you are going left (x-pdist), right (x+pdist), up (y-pdist) or down (y+pdist).

So once I got everything working, I swapped the WASD Events over from Key Press back to Keyboard and viola, true grid movement!


Image Credit: Don Quixote, oil on canvas painting by Jean-Baptiste-Camille Corot, 1868.
A Challenge Within a Challenge!

I’m up to Level 08, Lesson 03, and was working my way through the challenge that followed.

In playing through the game as-is, there a couple of notable bugs above and beyond what the challenge required:

  1. The collision event for the potion was missing altogether – easy fix
    givePlayerHealth(25)
    with other {
         instance_destroy()
    }


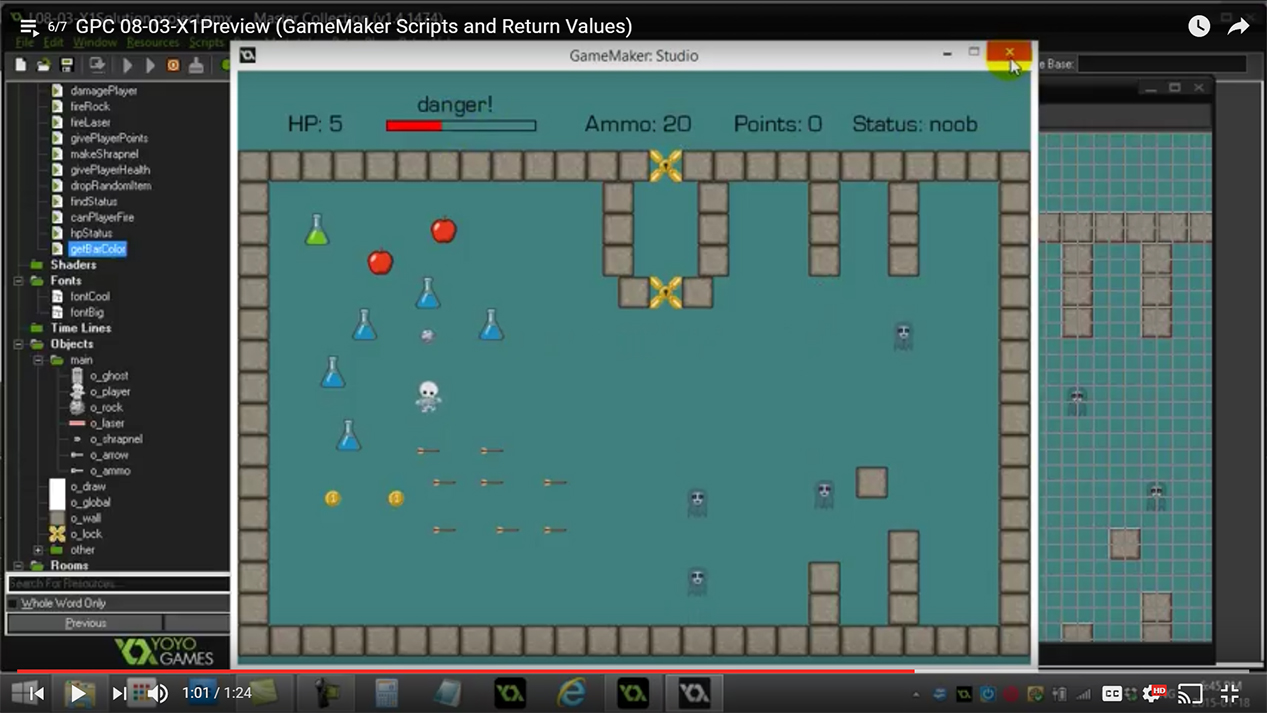
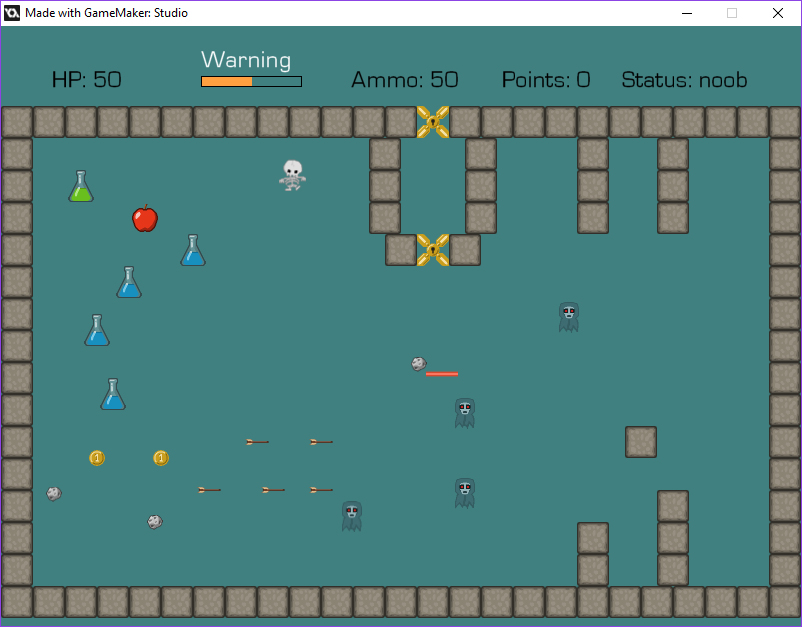
  2. The “health bar” didn’t accurately reflect the current hitpoints! Take a good look at the screen capture from his preview video below:


Look closely and you can clearly see “HP: 5” yet the health bar is nearly 1/3rd full! That doesn’t look right… so what’s wrong with it?

This one was a bit more tricky because neither draw_rectangle nor var have been covered yet…granted, the challenge was to change the color of the rectangle based on the # of hp, not to create a hitpoint bar from scratch – even so, it bothered me that it was broken and I wanted to see if I could troubleshoot and fix it…here’s the original code:

var healthBarWidth=100
var maxHealth=100
draw_set_color (c_white)
draw_rectangle(150,50,200+hp/maxHealth*healthBarWidth, 60, false)
draw_set_color(c_black)
draw_rectangle(150,50,200+healthBarWidth, 60, true)

The syntax for the draw_rectangle function is as follows:

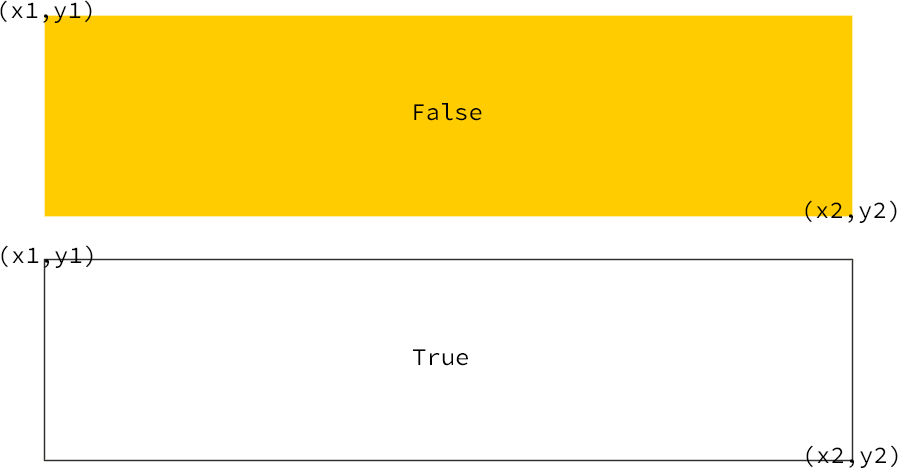
draw_rectangle(x1, y1, x2, y2, true or false) where

x1=the x location of the upper left-hand corner of your rectangle
y1=the y location of the upper left-hand corner of your rectangle
x2=the x location of the lower right-hand corner of your rectangle
y2=the y location of the lower right-hand corner of your rectangle
true=filled with whatever your draw_set_color is
false=empty (transparent) with a 1 pixel border

Confused? Well here’s an illustration I made to visualize it better:

Now lets apply that to the code above. Working through his arithmetic for the filled (false) rectangle, here’s what you get for the x2 values if you substitute the variables for their numbers:

200+0/100*100=200 (0 hp)
200+100/100*100=300
(100 hp)

Expressed in code, it would look like this:

draw_rectangle(150,50,200,60,false)//0 hp
draw_rectangle(150,50,300,60,false)//100 hp

…and output like this (assuming you include the border rectangle):


The left edge (x1) starts at 150 pixels in, and the right edge ends at 300 pixels, giving you an overall length of 150 pixels (300-150=150) along the x axis.

When the player has 0 hp, the left edge is not 150, but 200, leaving you with a 50 pixel (1/3rd) wide rectangle, which is exactly what you see in the screenshot above.

So I dug into the code and came up with the simplest solution. This was the result:

Notice that it says “HP: 50” and the bar is exactly half way!

So how did I fix it?

Simple – move the left edge over by 50 pixels, giving the overall length of both rectangles to be 100 pixels rather than 150, removing the 50 pixel lead:

//health bar draw code - the first rectangle draws the filled color
//the second rectangle draws the border
draw_set_color (getBarColor())
draw_rectangle(200,50,200+hp,60,false)
draw_set_color(c_black)
draw_rectangle(200,50,300,60,true)

It’s no accident that my code is absent the healthBarWidth and maxHealth variables – since my healthbar is 100 pixels in length, the simplest solution was to shorten the bar. The reason those are included is size the fill rectangle proportionately to the amount of hp you have remaining so that you can name the hp bar longer or shorter depending on your needs.

But you can’t use the code from the original project file as-is…

First, you’d need to set minimum left-edge of x2 to match x1 for your filled rectangle. So instead of:

 draw_rectangle(150,50,200+hp/maxHealth*healthBarWidth, 60, false)

You’d replace 200+hp… with 150+hp…:

draw_rectangle(150,50,150+hp/maxHealth*healthBarWidth, 60, false)

Secondly, you’d need to change maxHealth proportionate to the total amount of your hp (100) with respect to the overall length of your rectangle (150). This would give you 100/150 or 2/3rds (66.6% repeating).

Since hp is evenly divisible by the length of the health bar, this presents a problem as putting in var maxHealth=66 is pretty close, but not a pixel perfect fit inside the border rectangle (it’s about 4 or 5 pixels off).

Nevertheless, if I just had to make a health bar bigger or smaller than 100 pixels, I’d try to use something that divides evenly, hide it using depth and alpha channels, or leave off the border altogether. There may be more elegant ways to solve it, but it’s nearly 2am here and I think I’ve learned what I wanted to from this exercise 😐 .

Into the Deep End…

I’ve just finished Levels 06 and 07 of the GPC. Not much to say about the first lessons within Level 06 – they introduced GMS’ built-in image editor – while adequate for what it is, there many better tools available.

Moving on, the one good take-away from Level 06 was learning that image animations don’t start from the first frame by default – instead, they pick up wherever you are within each step.

So if you trigger an action that calls for an animation change (e.g. transitioning from idle to movement), the second animation (movement) will NOT begin on frame 0 by default, instead, it will pick up whether the animation should have been with respect to the current step!

As such, it’s useful to lead with image_index=0 to ensure that the animations start where they are supposed to.

###

Level 07 was short, and lacked the continuity established in the previous lessons. Functions were thrown about in rapid succession without stopping to really explain what they did, instead, an exercise in, “RTM,” though not in so many words 🙂 .

Aside, January 11, 2017: I concede that there are hundreds, if not thousands of built-in GML functions, and not all of them could be covered in even a ~120 hour course. Moreover, some may be too obscure to be useful for most students, and the intent was to get the user familiar with the help file and looking up function syntax when needed.

Fair enough – so why kick up a fuss about it now? Well, to this point (with the exception of Level 04), the course followed a very effective formula:

Introduce a new concept, usually built upon a solid foundation of core skills developed throughout the course. In order for the concept to be useful, it has to be framed in a context that’s meaningful to the student. Absent that, the exercise becomes meaningless and rote; disconnected from other concepts and quickly forgotten.

My recommendation would be to change the name of Level 07 to “Vector Functions and Collision Checking” – I would remove “scripts” because that isn’t really covered until Level 08, and only hinted at in Level 07.

While Level 07 defines what Functions/Methods and Arguments/Parameters are, we’ve been using them since Level 02, and could continue using them blissfully ignorant of what they are called, that is until Level 08 where it really becomes necessary to understand them.

Take that out, and what you are left with are numerous examples, all concerning either Vector or Collision Checking functions (i.e. point_direction, position_empty, point_in_circle, instance_furthest/nearest…), and use examples of games where these are useful or necessary (e.g. tower defense, homing missiles etc.).

Level 08 is more promising thus far, but looking ahead, the good stuff is going to be found in Levels 11-15.