In the Beginning, There was the GPC
About seven and a half years ago, while working on Level 12 of John Janetka’s Game Programming Course (GPC), I developed a novel way to handle orthogonal grid movement. The desired outcome was simple:
- Pick a target point to the left, right, above, or below your current position
- Move the player object toward the target point
- Stop when the player object’s x,y coordinates = the target point’s x,y position
When I first tackled this, I tried using an instance variable to set the target point, something like this:
/*
If 'A' is pressed, set the targetx to be the player's x-32 pixels,
then move towards that targetx...
*/

if keyboard_check(ord("A")) {
    targetx=x-32;
    move_towards_point(targetx,y,4);
}

/*
When targetx is reached, stop.
*/

if x=targetx {
    speed=0;
}
When I tried this, I discovered that the player would keep moving to the right indefinitely. This is because (as written) targetx would always be 32 pixels ahead of the player’s x coordinate and because the player object’s x would never equal targetx, he’d never fulfill the condition to stop (i.e., if x=targetx {speed=0}).
A Novel Solution
My solution was simple, but flawed. Instead of using the player’s x,y coordinates, I could use a separate “target” object instead. Something like this:

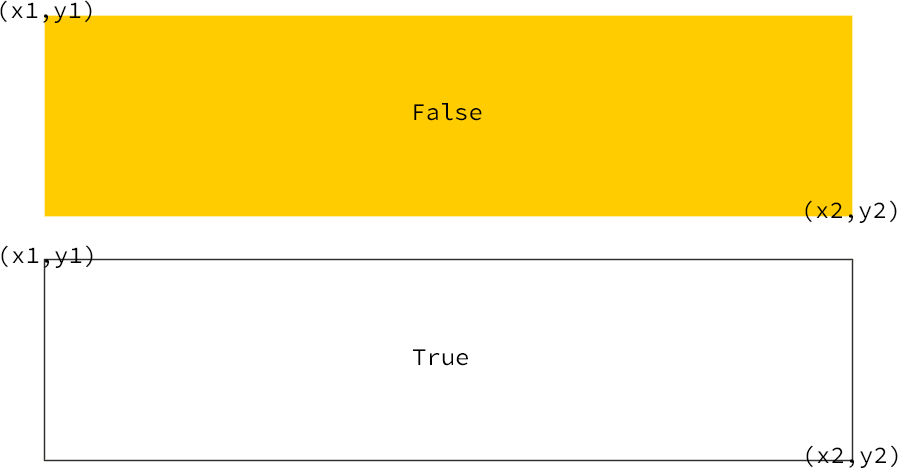
- A target object (the red square above) is created in the direction you’re trying to move (e.g., left).
- The player object then moves toward the x,y coordinates of the target.
- The target object is destroyed when the two collide, and the player’s speed is set to zero.
You can find code examples here and here. This works fine (in isolation), but when you add a second (and third, and fourth…) object, the cracks begin to show…
Limitations and Drawbacks
Looking at the original code, you’ll see that I used a Collision Event with the target object (o_target):
//Destroy the o_target object on collision
with other {
instance_destroy()
}

//Stop the player
speed=0
The problem is that one object might collide with another object’s target block, knocking it off course, causing it to continue on its last heading with nothing to stop it.
So then I substituted out o_target for an instance of it, i.e.:
target=instance_create_layer(x-32,y,o_target)
I scrapped the Collision Event and instead used the place_meeting function in the End Step Event:
if place_meeting(x,y,target) {
    if instance_exists(target){
        speed=0;
        moving=0;
    instance_destroy(target);
}
While this worked, it also added a lot of [needless] complexity. Although players would never notice (or care) how complicated my code is/was, I knew this wasn’t well implemented, which caused a slew of difficult-to-track-down issues and many troubleshooting headaches.
Back to Basics
As I sat down to work on our next game, this problem still bothered me, so I decided to try something new on a whim. I’ve been aware of local variables since Level 9 of the GPC, but didn’t clearly understand when or why to use them.
Re-reading the GameMaker online Manual, it says,
“A local variable is one that we create for a specific event or function only and then discard when the event or function has finished.”
My instincts (even back then) were correct; the target should have been stored in a variable, but I needed to capture the value somehow, and then decouple it from the player’s coordinates.

That’s when it hit me: why not use a local variable to capture the target coordinate? If placed in a function, it would define that variable once and discard it when the function ended. To use it, we’d have to pass that value along to an instance variable to hold on to it. Here’s what I came up with:
/*
==========================
Objectless Grid Movement!™
==========================

Variables:
dist   = sprite_width-pspeed

pspeed = the speed (in pixels) the object is traveling

targetx = the local variable of the x coordinate we want to go to, used when moving horizontally. Set using var _left or var _right.

targety = the local variable of the y coordinate we want to go to, used when moving vertically. Set using var _up or var _down.
*/

// Accept input, then move towards the target coordinate
if keyboard_check(ord("A")) and moving=0 {
    moving=1;
    var _left=x-dist;
    targetx=_left;
    move_towards_point(targetx,y,pspeed)
}

if keyboard_check(ord("D")) and moving=0 {
    moving=1;
    var _right=x+dist;
    targetx=_right;
    move_towards_point(targetx,y,pspeed)
}

if keyboard_check(ord("W")) and moving=0 {
    moving=1;
    var _up=y-dist;
    targety=_up;
    move_towards_point(x,targety,pspeed)
}

if keyboard_check(ord("S")) and moving=0 {
    moving=1;
    var _down=y+dist;
    targety=_down;
    move_towards_point(x,targety,pspeed)
}

// Stop the player once he reaches his target coordinate
if x=targetx {
    moving=0;
}

if y=targety {
    moving=0;
}
This worked perfectly and will save me a Metric Crappe Tonne™ of time and aggravation later.
Further Improvement
I want to implement custom key binds that support keyboard and gamepad input. I’m reasonably sure I can accomplish the former, but I’m still researching the latter. More to come!