Objectless Grid Movement!

In the Beginning, There was the GPC

About seven and a half years ago, while working on Level 12 of John Janetka’s  Game Programming Course (GPC), I developed a novel way to handle orthogonal grid movement. The desired outcome was simple:

  1. Pick a target point to the left, right, above, or below your current position
  2. Move the player object toward the target point
  3. Stop when the player object’s x,y coordinates = the target point’s x,y position

When I first tackled this, I tried using an instance variable to set the target point, something like this:

/* 
If 'A' is pressed, set the targetx to be the player's x-32 pixels,
then move towards that targetx...
*/

if keyboard_check(ord("A")) {
    targetx=x-32;
    move_towards_point(targetx,y,4);
}

/*
When targetx is reached, stop.
*/

if x=targetx {
    speed=0;
}

When I tried this, I discovered that the player would keep moving to the right indefinitely. This is because (as written) targetx would always be 32 pixels ahead of the player’s x coordinate and because the player object’s x would never equal targetx, he’d never fulfill the condition to stop (i.e., if x=targetx {speed=0}).

A Novel Solution

My solution was simple but flawed. Instead of using the player’s x,y coordinates, I could use a separate “target” object and use it instead. Something like this:

  1. A target object (the red square above) is created in the direction you’re trying to move (e.g., left).
  2. The player object then moves toward the x,y coordinates of the target.
  3. The target object is destroyed when the two collide, and the player’s speed is set to zero.

You can find code examples here and here. This works fine (in isolation), but when you add a second (and third, and fourth…) object, the cracks begin to show…

Limitations and Drawbacks

Looking at the original code, you’ll see that I used a Collision Event with the target object (o_target):

//Destroy the o_target object on collision
with other {
instance_destroy()
}

//Stop the player
speed=0

The problem is that one object might collide with another’s target block, knocking it off course and causing the other object to continue without anything to stop it.

So then I substituted out o_target for an instance of it, i.e.:

target=instance_create_layer(x-32,y,o_target)

I scrapped the Collision Event and instead used the place_meeting function in the End Step Event:

if place_meeting(x,y,target) {
    if instance_exists(target){
        speed=0;
        moving=0;
    instance_destroy(target);
}

While this worked, it also added a lot of [needless] complexity. Although players would never notice (or care) how complicated my code is/was, I knew this wasn’t well implemented, which caused a slew of difficult-to-track-down issues and many troubleshooting headaches.

Back to Basics

As I sat down to work on our next game, this problem still bothered me, so I decided to try something new on a whim. I’ve been aware of local variables since Level 9 of the GPC but didn’t clearly understand when or why to use them.

Re-reading the GameMaker online Manual, it says,

“A local variable is one that we create for a specific event or function only and then discard when the event or function has finished.”

My instincts (even back then) were correct; the target should have been stored in a variable, but I needed to capture the value somehow and then decouple it from the player’s coordinates.

Pass the variable, Bob!

That’s when it hit me: why not use a local variable to capture the target coordinate? If placed in a function, it would define that variable once and throw it away when it ended. To use it, we’d have to pass that value along to an instance variable to hold on to it. Here’s what I came up with:

/*
==========================
Objectless Grid Movement!™
==========================

Variables:
dist   = sprite_width-pspeed

pspeed = the speed (in pixels) the object is traveling

targetx = the local variable of the x coordinate we want to go to, used when moving horizontally. Set using var _left or var _right.

targety = the local variable of the y coordinate we want to go to, used when moving vertically. Set using var _up or var _down.
*/

// Accept input, then move towards the target coordinate
if keyboard_check(ord("A")) and moving=0 {
    moving=1;
    var _left=x-dist;
    targetx=_left;
    move_towards_point(targetx,y,pspeed)
}

if keyboard_check(ord("D")) and moving=0 {
    moving=1;
    var _right=x+dist;
    targetx=_right;
    move_towards_point(targetx,y,pspeed)
}

if keyboard_check(ord("W")) and moving=0 {
    moving=1;
    var _up=y-dist;
    targety=_up;
    move_towards_point(x,targety,pspeed)
}

if keyboard_check(ord("S")) and moving=0 {
    moving=1;
    var _down=y+dist;
    targety=_down;
    move_towards_point(x,targety,pspeed)
}

// Stop the player once he reaches his target coordinate
if x=targetx {
    moving=0;
}

if y=targety {
    moving=0;
}

This worked perfectly and will save me a Metric Crappe Tonne™ of time and aggravation later.

Further Improvement

I want to implement custom key binds that support keyboard and gamepad input. I’m pretty sure I can accomplish the former, but I am still researching the latter. More to come!

Purgatory Purgers: Version 1.5 Released!

Update Summary

  • Collecting 100% of the souls with Bob (the demon) is now possible!
  • Resolved clipping issues in the levels “Stilted Pond” and “Toad Hall.”
  • Gamepads, including PlayStation, Xbox, and Super Nintendo-style controllers, are now generally supported*. See the notes below for additional information.
  • Updated the Purgatory Purgers Manual to include gamepad button mappings

Special thanks to @ABitNosthalgic for suggesting that we make it possible to collect 100% of the souls with one character or another!

Gamepad/Controller Support Notes

*Most PC-compatible controllers with a Direction Pad (D-Pad), Start and Select buttons, and four face buttons should work. The game has been tested on the following devices:

  • Logitech F310
  • X-Box Elite Series 2 Wireless
  • Megafire 412-NO5 (generic PlayStation 2 Style Controller)
  • 8BitDo SN30 Pro (SNES-style controller)

@ABitNosthalgic reported that the Suily brand NES-style controllers did not work for him. While I haven’t tested this myself, the reviews seem to suggest that problems, particularly with the D-Pad, aren’t that uncommon.

Purgatory Purgers: Version 1.4 Released!

Update Summary

  • Resolved a bug (warning, spoilers!) that would destroy objects unintentionally when two blocks collided
  • Added a spawn/respawn animation and sound effect
  • Reworked the Passphrase mechanic (used to continue to a previously visited level) to display the Passphrase on the pause screen under the main menu as well as the Game Over screen.
  • Updated the Purgatory Purgers Game Manual to better describe the Continue/Passphrase mechanic and other menu features.

Special thanks to @ABitNosthalgic for catching the bug and Jason D for passphrase feedback!


Purgatory Purgers: Buggery

Warning: Spoilers Ahead!

This post discloses the locations of some of the secret rooms found within Purgatory Purgers. If you’d rather discover these surprises for yourself while playing the game, you may want to avoid reading further!

A Fresh Perspective

Players are often your best resource for identifying possible bugs, exploits, and missed opportunities (read: feature requests). The week Purgatory was released, I received a lot of feedback and, with it, fresh eyes to point out my mistakes.

I addressed what I could and tabled the rest, save for one elusive bug I could never pin down but appeared so infrequently that I couldn’t get a bead on it. Occasionally, an object or group of objects (e.g., a gem block, ethereal coins, etc.) would go missing from a room, and I couldn’t explain why nor duplicate the behavior. Unable to identify the culprit, coupled with the sporadic nature of the bug, I decided to leave well enough alone…

Recently, a new YouTube channel, “Back to the Past Gaming,” started a playthrough series for Purgatory Purgers. While watching ABitNosthaligic‘s playthrough of the fourth level of Purgatory Purgers, “Stilted Pond,” I was surprised to see that the secret room he discovered was empty:

He suggested it might have been an oversight, and while it’s certainly possible that I’d forgotten to populate the room, the problem was (unfortunately) not that simple… And so, after a 3-month hiatus, I decided to tear back into the code to under, once and for all, why this was happening!

First, Check the Obvious

Looking at the room layout in the GameMaker IDE, I could see the objects had been placed:

So why were they missing during his playthrough? I fired up the game, went straight to the offending level, and made a beeline for the secret room. Upon entering, there were the Ethereal Coins right where I expected them to be:

To try to duplicate the [unwanted] behavior, I did a normal playthrough, and lo behold, the coins were missing for me, too! Progress, at last! But why? What exactly was happening to the coins? Were they failing to render? Were they being destroyed?

So, to begin my troubleshooting, I added the following code to the “obj_oneup” object’s Draw GUI Event:

// Am I here?
draw_self();
draw_text(20,20,"I'm still here!")

Whenever you use custom draw code (e.g., draw_text), you must precede it with “draw_self(),” or the sprite won’t be drawn. The purpose of the draw_text message is to print the string “I’m still here!” in the upper left-hand corner to let me know that at least one instance of the object still exists on the map. Simply put, these two lines of code tell me that the object is both visible and present.

I saved my work, then launched the game, and upon entering the first level, I could see the message right where I expected it:

After collecting the Ethereal Coins, the message disappeared as expected. So, I continued playing until I reached the offending level (Stilted Pond), and after some experimentation, I was finally able to observe what was happening…

Next, Eliminate the Impossible

“When you have eliminated the impossible, whatever remains, however improbable, must be the truth.”
– Sherlock Holmes, The Sign of Four

Whenever I pushed one block into another block, all of the Ethereal Coins in the current room were instantly destroyed. This was true, regardless of level, but I couldn’t yet understand why…

The way I coded movement for blocks, enemies, and the player in Purgatory Purgers was a modified version of my grid movement system, explained here and here. In short, here’s what happens when you “push” a block:

  1. An instance of an invisible 16x16px target object is created 32 pixels ahead.
  2. The block moves toward the target object.
  3. Upon collision, the target object is destroyed, and the block’s movement speed is set to zero, stopping it.

Because we’re using an Instance Variable, it has to be declared in the Create Event, e.g.:

block_target=0;

This variable would later be defined in the Step Event whenever the block was moved, something to the effect of,

block_target=instance_create_layer(x-bdist,y,"Instances",obj_block_target);

In the example above, “block_target” is the variable that refers to the Instance ID of the specific instance of the obj_block_target object we’re dealing with and nothing else! So when obj_block collides with the instance of obj_block_target that it created, i.e., “block_target,” only that instance should be destroyed, but somehow, the obj_oneup was being [mis]associated with “block_target.”

Block movement was one of the first features I coded, and later implementations used the place_meeting function in the End Step Event. So, simply recording it to do that fixed the issue.

I still don’t fully understand this, and after hours of troubleshooting, I am relieved that this was resolved. I have since posted the fix to itch.io as version 1.4.

Purgatory Purgers: Simple Music Control

Background

In past projects, I controlled music using the room creation code, e.g.:

audio_stop_all();
audio_play_sound(snd_music1,100,true);

This would stop all previously playing audio and start the new music track, looping it until the next room was created.

Functionally, this works fine, but I wanted a more centralized way of handling this so that if I wanted to make a change, I didn’t have to do it N number of places, equal to the number of rooms I created.

How It Works

I created an object called “obj_sound” and placed it in the first room, then I flagged it as ‘Persistent’ so that it would carry forward from room to room.

I added a Room Start event with the following code:

if room==rm_level1 {
audio_play_sound(snd_lvl1,100,true);
}

if room==rm_level2 {
audio_play_sound(snd_lvl2,100,true);
}

At the start of the room, it checks to see if the name of the room matches “rm_level1” (the name of the first room/level), and if it does, it plays the sound “snd_lvl1” at a priority of “100”, and sets looping to “true.”

Once that was working, we needed to be able to stop the previous music track before loading the next one. This can be done using a Room End event:

audio_stop_all();

This stops all audio before the next room is loaded, preventing tracks from playing over each other.

Conclusions

There are other ways this could be handled, however…

  • It works for what I need it to do (starts a looping music track that’s definable by room name).
  • It’s centrally controlled.
  • It does this in the simplest way I know of, and more importantly, I understand it!

Beaster’s Dungeon Revisited: Part II

Continued from Part I...

With Eric gone, I eventually re-coded everything, but never could work out how to implement the trap mechanic, so I shelved it and there it sat…until now…

###

I was talking with a friend who was admiring some CGA-16 color palette pixel art, which lead me to showing him the artwork I’d done for Beaster’s Dungeon. He asked if I had any intention of picking the project back up, to which I replied that I might, albeit with a reduced scope. I explained the difficulties I encountered with the trap mechanic, specifically, getting the cursor to snap to a grid.

This lead to a discussion of where I got stuck, and in order to illustrate this, I fired up GMS and started creating a prototype to illustrate the problem. I reached out to my friend Jason (who did the programming for ‘Milk Smugglers’) for suggestions, and he linked a forum post containing the floor/ceiling functions.

In that post was another mysterious function called, move_snap. Here’s what I did for the prototype:

o_cursor Object

///step event

//set coordinates of the cursor to the mouse's x,y position:
x = mouse_x;
y = mouse_y;

//snap the object to nearest grid coordinate 
move_snap (16,16);

Why is this important? Because it allows for precise placement of objects in a map comprised of 16×16 pixel tiles (or any predefined ‘snap’). Around this, additional rules and checks could be incorporated to ensure traps could only be placed where they were meant to be!

At long last, I was finally able to implement the trap mechanic! The only thing left to complete the prototype was enemy path finding… This turned out to be far more complicated than any of the other mechanics combined.

Stay tuned for Part III!

The Fourth Level

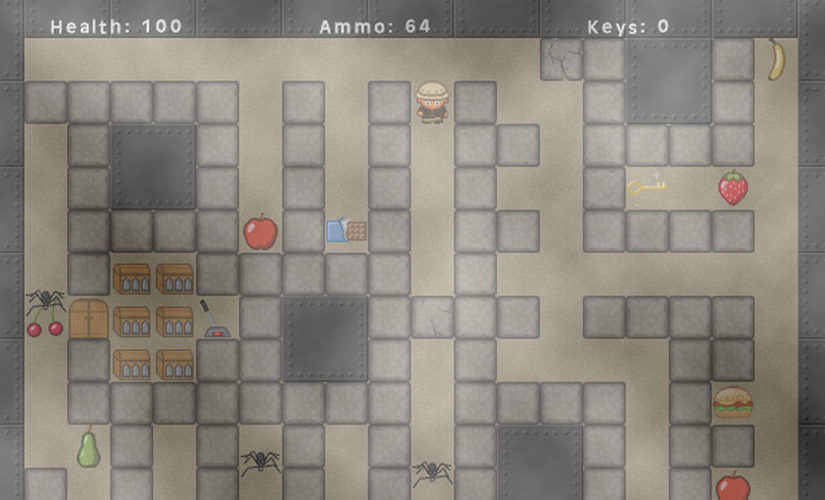
As mentioned in a previous post, Level 4 of the GPC was not a lesson, but rather a series of challenges meant to reinforce what was taught in Level’s 2 and 3. This time, I elected to create a new game rather than modify an existing one.

I settled on a top down shooter/adventure game and added features and flourishes as I went along. I used my earlier conceived true grid movement code, but this time, I used a switch statement instead of a series of if statements (or at least fewer of them):

switch (keyboard_key)
 {
  case vk_left:
  case ord("A"):
     sprite_index=spr_player_walk_left;
     if moving=0 {
       moving=1
       instance_destroy(obj_target) 
       target=instance_create(x-64,y,obj_target)
       move_towards_point(target.x,target.y,4) 
      }
      break; 
 case vk_right:
 case ord("D"):
    sprite_index=spr_player_walk_right;
    if moving=0 {
      moving=1
      instance_destroy(obj_target) 
      target=instance_create(x+64,y,obj_target)
      move_towards_point(target.x,target.y,4) 
     } 
     break;
 case vk_up:
 case ord("W"):
    sprite_index=spr_player_walk_up;
    if moving=0 {
      moving=1
      instance_destroy(obj_target) 
      target=instance_create(x,y-64,obj_target)
      move_towards_point(target.x,target.y,4) 
    } 
    break;
 case vk_down:
 case ord("S"):
    sprite_index=spr_player_walk_down;
    if moving=0 {
      moving=1
      instance_destroy(obj_target) 
      target=instance_create(x,y+64,obj_target)
      move_towards_point(target.x,target.y,4) 
     } 
     break; 
 }

While trying to figure out line of sight, I came a new function:

collision_line(x,y,obj_player.x,obj_player.y,obj_barrier,1,0)

That was my first time using the collision_line, which I don’t think is covered at all in the GPC, though it might be included in his how-to’s somewhere…I came across it after watching a tutorial video by “GM Wolf” on YouTube:

This would have solved a lot of issues for me…for instance, in a previous project, I had an idea to create a trap comprised of two moving blocks which collided into and bounced off of each other. While everything worked fine, it would occasionally cause the block to get stuck in a wall. This happened because it’s movement caused it to overlap before it detected the collision, thereby getting stuck inside the wall, unable to go anywhere.

I solved this before using the place_meeting function, but was never introduced to the End Step Event, which  would have been the right way to do it. Nevertheless, I can think of other uses for collision_line and am glad I learned of it!

All in all, I spent about 2 days (most of the weekend) working on this little mini-game, and here are some of the features I included:

  • Destructible walls that advance in damage by manipulating the image_index
  • Enemies that can navigate mazes (using John Janeka’s code from Level 12)
  • Line of Sight for enemies with projectiles
  • Health, ammunition and keys global variables that persistent between rooms
  • Lock and key mechanism
  • A switch that reveals the exit when touched
  • Randomized muzzle flare and smoke when firing bullets
  • Randomized impact splatters when an enemy is hit
  • Different sounds for each impact
  • Randomized health power up sprites to add variety using a single object
  • Exits that allow you to advance to the next room
  • Capped health at 100%

What I not did include were:

  • Fail condition/game over when you run out of hitpoints
  • Start screen
  • Game Over screen

All in all, it’s a neat little game though unfinished, and good practice for more serious projects to come!

A Challenge Within a Challenge!

I’m up to Level 08, Lesson 03, and was working my way through the challenge that followed.

In playing through the game as-is, there a couple of notable bugs above and beyond what the challenge required:

  1. The collision event for the potion was missing altogether – easy fix
    givePlayerHealth(25)
    with other {
         instance_destroy()
    }


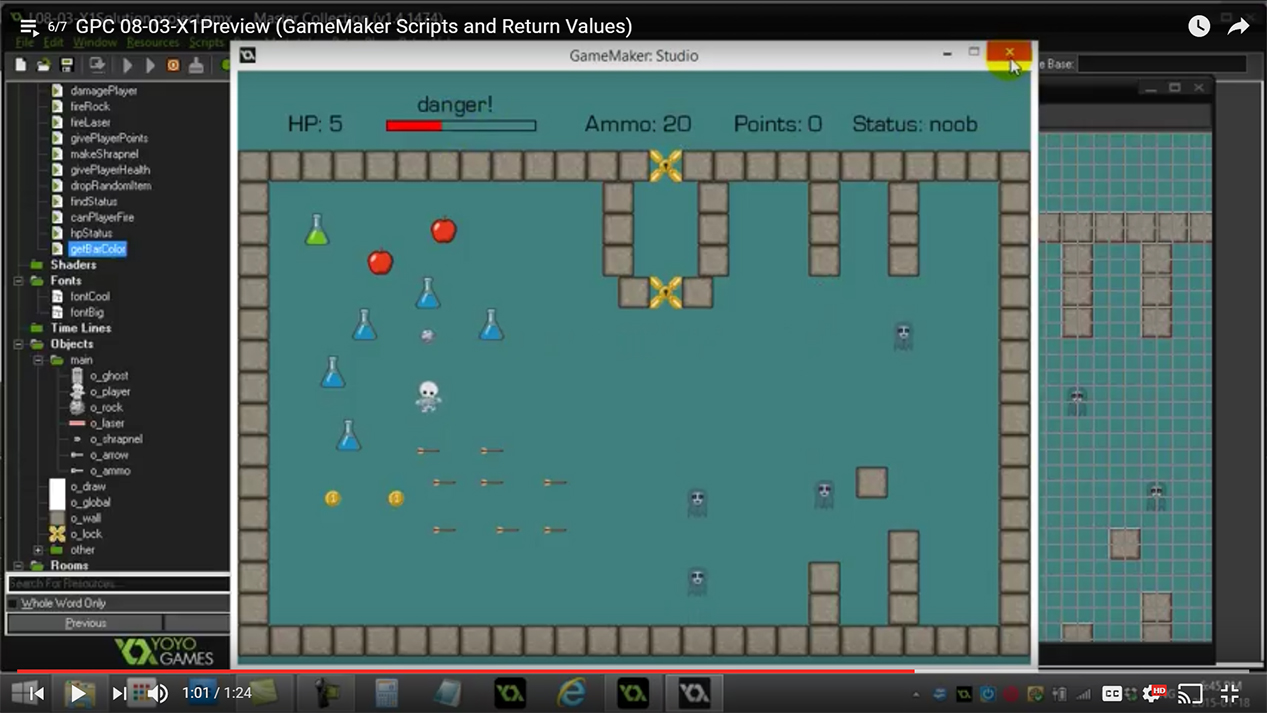
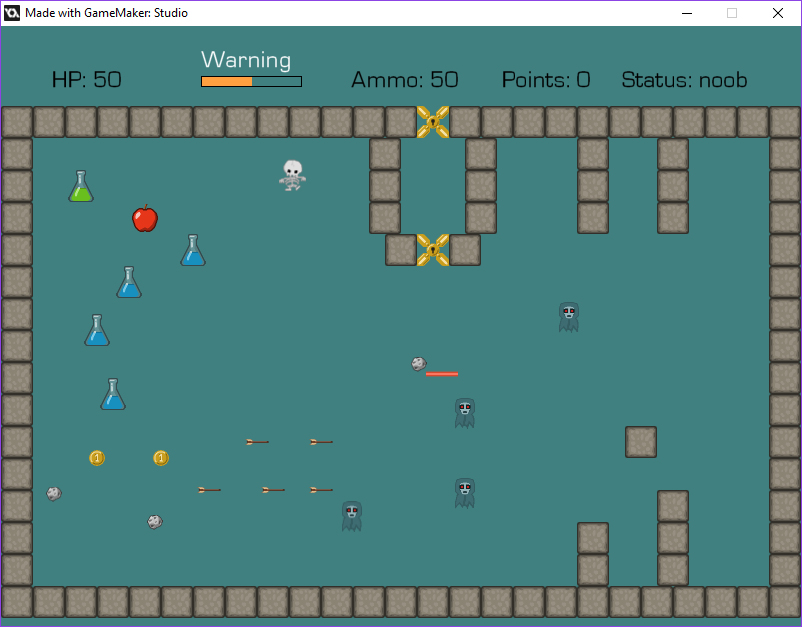
  2. The “health bar” didn’t accurately reflect the current hitpoints! Take a good look at the screen capture from his preview video below:


Look closely and you can clearly see “HP: 5” yet the health bar is nearly 1/3rd full! That doesn’t look right… so what’s wrong with it?

This one was a bit more tricky because neither draw_rectangle nor var have been covered yet…granted, the challenge was to change the color of the rectangle based on the # of hp, not to create a hitpoint bar from scratch – even so, it bothered me that it was broken and I wanted to see if I could troubleshoot and fix it…here’s the original code:

var healthBarWidth=100
var maxHealth=100
draw_set_color (c_white)
draw_rectangle(150,50,200+hp/maxHealth*healthBarWidth, 60, false)
draw_set_color(c_black)
draw_rectangle(150,50,200+healthBarWidth, 60, true)

The syntax for the draw_rectangle function is as follows:

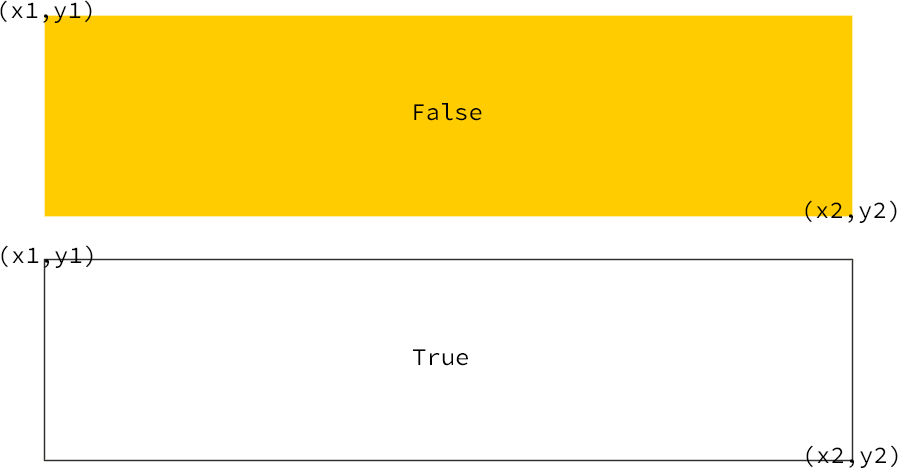
draw_rectangle(x1, y1, x2, y2, true or false) where

x1=the x location of the upper left-hand corner of your rectangle
y1=the y location of the upper left-hand corner of your rectangle
x2=the x location of the lower right-hand corner of your rectangle
y2=the y location of the lower right-hand corner of your rectangle
true=filled with whatever your draw_set_color is
false=empty (transparent) with a 1 pixel border

Confused? Well here’s an illustration I made to visualize it better:

Now lets apply that to the code above. Working through his arithmetic for the filled (false) rectangle, here’s what you get for the x2 values if you substitute the variables for their numbers:

200+0/100*100=200 (0 hp)
200+100/100*100=300
(100 hp)

Expressed in code, it would look like this:

draw_rectangle(150,50,200,60,false)//0 hp
draw_rectangle(150,50,300,60,false)//100 hp

…and output like this (assuming you include the border rectangle):


The left edge (x1) starts at 150 pixels in, and the right edge ends at 300 pixels, giving you an overall length of 150 pixels (300-150=150) along the x axis.

When the player has 0 hp, the left edge is not 150, but 200, leaving you with a 50 pixel (1/3rd) wide rectangle, which is exactly what you see in the screenshot above.

So I dug into the code and came up with the simplest solution. This was the result:

Notice that it says “HP: 50” and the bar is exactly half way!

So how did I fix it?

Simple – move the left edge over by 50 pixels, giving the overall length of both rectangles to be 100 pixels rather than 150, removing the 50 pixel lead:

//health bar draw code - the first rectangle draws the filled color
//the second rectangle draws the border
draw_set_color (getBarColor())
draw_rectangle(200,50,200+hp,60,false)
draw_set_color(c_black)
draw_rectangle(200,50,300,60,true)

It’s no accident that my code is absent the healthBarWidth and maxHealth variables – since my healthbar is 100 pixels in length, the simplest solution was to shorten the bar. The reason those are included is size the fill rectangle proportionately to the amount of hp you have remaining so that you can name the hp bar longer or shorter depending on your needs.

But you can’t use the code from the original project file as-is…

First, you’d need to set minimum left-edge of x2 to match x1 for your filled rectangle. So instead of:

 draw_rectangle(150,50,200+hp/maxHealth*healthBarWidth, 60, false)

You’d replace 200+hp… with 150+hp…:

draw_rectangle(150,50,150+hp/maxHealth*healthBarWidth, 60, false)

Secondly, you’d need to change maxHealth proportionate to the total amount of your hp (100) with respect to the overall length of your rectangle (150). This would give you 100/150 or 2/3rds (66.6% repeating).

Since hp is evenly divisible by the length of the health bar, this presents a problem as putting in var maxHealth=66 is pretty close, but not a pixel perfect fit inside the border rectangle (it’s about 4 or 5 pixels off).

Nevertheless, if I just had to make a health bar bigger or smaller than 100 pixels, I’d try to use something that divides evenly, hide it using depth and alpha channels, or leave off the border altogether. There may be more elegant ways to solve it, but it’s nearly 2am here and I think I’ve learned what I wanted to from this exercise 😐 .