Development Progress Update, Week 1

Summary

Game prototype is 60% complete!

I’ve begun coding the basic features of game, starting player control. This is the most important piece as the majority of the time spent in-game will be centered on movement and exploration.

I’ve coded it to utilize both Keyboard and Gamepad support (should I elect to port this to Xbox Live, PlayStation 3 & 4). The next piece will be getting the trap mechanic working, followed by Enemy AI (which are my goals for next week).

What I’ve Completed This Week

Coding

  • Basic platform physics (gravity, collision, one-way platforms)
  • Player movement: left-right, variable jump height, drop-down*
    • Keyboard support (WASD, [space])
    • Gamepad support (analog stick and d-pad) – Tested on a Logitech F310
  • Sound Engine:
    • Walking sound effects play and change based on surfaces
    • Landing sound effects play and change based on surfaces hit
    • Sound effects use random variable pitch to break up monotony
  • Basic inventory array
    • Keeps track of what spells you have
    • Allows you to toggle betwen spells

Assets

  • Sound effects and music:
    • Jumping
    • Landing on normal surfaces
    • Landing on wet surfaces
    • Walking on normal surfaces
    • Walking on wet surfaces
    • Collecting currency
    • Collecting resources
    • Collecting spells/secrets
    • Collecting bonus items
    • Detriments
    • Lob
    • Two kinds of projectiles
    • Damage
    • Title screen BGM (Background Music)
    • First level BGM
  • Player sprite animations:
    • movement (left,right)
    • Idle
    • Jumping
    • Falling
  • Resource sprite animations:
    • Arcanum (currency)
    • Iron Nodule (resource)

Miscellaneous

  • Converted all .WAV and .MP3 files to .OGG (faster and smaller)
  • Registered the DBA (fictitious name) of my business with the state
  • Send an inquiry to the SSL provider to request a Code-Signing Certificate (required the business to be registered)
  • Updated the vtoadgames.com website to use SSL
  • Acquired GMS Professional (v1.4)  and the HMTL5 Module**

*I’d like to modify this to use a combination of the Jump button and down, but haven’t gotten that working yet

**It doesn’t work out of the box, and I have no idea what I have to do differently to ensure that my games will work when ported to HTML5. Submitted a support request 5 days ago, awaiting feedback.

What I’m Working on Next Week

Coding

  • Wrap up player movement (combination keys to jump down)
  • Complete trap placement mechanic
    • Movement of the trap ahead of the player
    • Spawn cursor corners, spaced to fit any size trap object
    • Spawn/placement sound effects
    • Placement coding with checks to verify place is empty (no stacking/placement inside walls etc.)
  • Begin work on enemy AI

Assets

  • Background textures artwork
  • Scenery/flavor object artwork
  • Continue work on BGM 2, 3 and 4
  • Other SFX as needed

Miscellaneous

  • Follow up on Code Signing Certificate
  • Follow up on HTML5 export module issues

State of the Toad, February 2017

UPDATE 2/09/2017: After about a week of back and forth with YYG support, I was able to get the HTML5 module working. It turns out that GMS v1.4 had several bugs preventing most HTML5 games from running properly when using certain functions.

Eventually, I was instructed to download the “Early Access” build (v1.9.525) which resolved this issue. There were a few more code optimizations I needed to make, but the game-breaking bugs were gone.

The Good

With a helping hand from an old and dear friend of mine, I was finally able to make the some important steps forward. Some of you may notice that www.vtoadgames.com now supports SSL!

I’m also in the process of obtaining a Code Signing Certificate so that Windows Exports (.exe files) won’t display a Smartscreen warning that the publisher (yours truly) is unknown – I should have that today if everything is in order.

Additionally, I’ve also purchased GMS Professional and the HTML5 export module as I feel pretty comfortable with GML  at this point.

The Bad

YoYo Games, creators of GameMaker Studio (GMS),  have elected to go the way GameSalad and discontinue offering a free ‘standard’ edition of their product once GameMaker Studio 2 (currently in beta) is launched.

While those who already obtained a free Standard Edition license for 1.4x will get to keep it, no one else will be able to get one going forward. A similar thing happened with GameSalad, which went to a subscription model after discontinuing it’s free version.

Cui Bono?

Surely not YoYo Games…The reason GameMaker Studio was so appealing to many Students and Hobbyists was it’s accessibility – they said it themselves:

We want to make game creation accessible to everyone. We think that once people jump in and start creating a game, they’ll see firsthand how easy it is with GameMaker: Studio. – James Foreman, April 11, 2016. GameMaker Studio: Standard Goes Free FAQ

While most users would be content with the Standard version, some might decide they have a knack for it and take the plunge. The only thing that cutting out the free version does is bar entry for those who aren’t prepared to spend $150 to satisfy their curiosity. I know, I was one of them. Had I not had the opportunity to learn GML before buying the Professional Edition, I probably would not have.

With that said, if you still on the fence, pick up 1.4 Standard for free while you still can!

The Ugly

Please see the update above.

I purchased the HTML5 Export Module with the reasonable expectation that a program which performed flawlessly as a Windows target and compiled .EXE file would work fine when ported to HTML5. I was wrong…

Just about everything failed from the particle effects, collision events and everything in between, making the game unplayable.  I submitted a ticket to YYG, but I’ll probably have to go back through the code and optimize it to get it to work. In any case, it was a good learning experience…

###

Welp, back to finishing up the last Level of the GPC!

More Missing Pieces… :(

Level 15 begins with an introduction:

“You have learned how to store numbers and text using variables, lists, maps, and grids.  In this level you will learn one final way to store values – Arrays.”
– Level 15 Intro, www.gameprogrammingcourse.com

Variables? Check.

Lists? Check.

Maps? Nope. This would have covered key, value pairs (i.e. Health Potions: 5) . There are about 19 functions that are associated with type of data structure, so it would have been nice to know.

Grids? This isn’t what we talked about in Level 12, but rather 2-dimensional arrays (like a table) for holding strings or real numbers. There are over 3 dozen functions associated with these, and like Maps, they were never mentioned in the previous Levels.

Meanwhile, back at the YouTube Channel…

The playlist for Level 15 was entitled, “Arrays and Matrices,” and while Arrays are covered, Matrices are not. There are 3 videos broken up into parts A, B and C, but C isn’t referenced on the website.

The corresponding project files consist of an empty project (L15_01_.gmx), a starter project for Part A, skipped B and went straight to an all-in-one project, L15_01_ABC.gmx…at least all of the challenge-related files were there this time!


###

So what gives? Well, between hundreds of YouTube videos, a website, GameMaker projects, resource files and his lesson plans, I could see where things might get out of sync…

Nevertheless, as my GPC course comes to a close, I feel that a complete review will be in order. SPOILER ALERT: It’s still the best set of GML lessons out there!


Another Missing Piece…

The title of this post is used in ambivalent mode; it both introduced a missing component that made a simple inventory system possible (Level 13, lessons 2-4) and was missing a project file (14-01-X3-Start.gmk), preventing me getting a crack at the last challenge of Level 14…

I checked the resources folder (there was no sub-folder for Level 14), double checked the projects folder, no dice… 🙁

Off to bed now, and tomorrow, I’ll tackle Arrays!


Losing Steam, Second Wind

I just finished Level 12 out of 17 of the GPC. The momentum I built up going into Level 5 has been slowing to a crawl as I stumbled over structural incongruitiesweak examples, bugs, and project file configuration issues.

The Groove (or Rhythm or Flow…)

I am most productive when I find my ‘groove’. This happens when I’ve overcome my learning curve, have developed a pattern of work,  then get into a rhythm where I can knock out task after task by reusing the same steps.

Jimmy Diresta explains that first time you try something is the most difficult; you ‘go to school’ on the first one, and get progressively better and better – by time you finish, you’re an expert.

Matthew Inman made an incredible post on this subject, describing the agony and joy of creation…a few non sequiturs aside, he eventually gets to the meat of issue – how great and wonderful things can result from sweating over tasks that are often tedious and frustrating in and of themselves.

My problem is that I’m a perfectionist. If I encounter something that isn’t working to my satisfaction, I can’t ignore it – I have to ‘fix’ it. Maybe this is a characteristic of a good programmer, but it’s utterly frustrating when I’m working on it, and enormously satisfying when I get something to work properly…

The trouble, it seems, is that the content is getting thinner and thinner,  and the issues referenced above that are breaking my ‘flow’ are getting more and more numerous. At a guess, I’d say that these last few videos were produced at a busier time than the others, and as a result, he simply didn’t have the time required to carefully plan and produce them as well as he’d like.

Whatever the reason, I have to remind myself that no matter how annoyed I get with this course, it’s still free of charge, and of far superior quality to any other GML ‘tutorials’ on YouTube. More importantly, distractions, bugs and problem solving (especially when the problem is more complex than it first appeared) are all part of programming – so I’d best get used to them 🙂 .

That said, on with the lessons…

###

Levels 9-11 (Doesn’t that look ominous?)

Level 9 was more or less a rehash of Level 7, focusing on instance IDs, along with another ‘cheat sheet’ from the resource folder. The two share a lot of parallels, and might be better off merged into one big lesson rather than two disjointed ones. There was even a loop snuck into one of the project files to create more enemies, but that wasn’t covered as part of the lesson.

Level 10 was one of the shortest lessons so far, and anyone who attempted to include a sound as suggested in Challenge 10-01 part C will discover that they’ll need to enable the New Audio Engine (Global Game Settings > General > Use New Audio Engine) before they’ll hear anything.

Level 11 was a letdown. I was really looking forward to Lists, but the only output method covered was the number of total items in the list (e.g. the ds_list_size function). The examples in the lessons didn’t really fit my concept of ‘inventory’ – that is, being able to output all the values in the list, or how many of each unique value there were (e.g. 2 Burgers, 2 Apples etc.). I suspect that this will be covered later in Level 13 (Loops).

###

This brings us up to…

Level 12: Grid Game Concepts

Grid games can cover everything from board games (checkers, chess etc.) to turn-based and real-time strategy games to classic video games like Namco’s Pac-Man.

In all cases, movement in a grid game is fixed rather than free form. GPC 12-01-A covers movement, and attempts to tackle the issue of getting hung on on corners due to the collision geometry.

The Lesson’s Solution:

Make the sprites equally sized (32×32 pixels in this case) and use a collision mask of 32×32 to ensure that they stay within the confines of the maze corridors. That’s a good start.

Next, he introduces how to manually code keyboard and collision events inside a Step event like so:

if keyboard_check(vk_right)=true and place_meeting(x+4,y,o_block)=false {
 x=x+4
 }
 
if keyboard_check(vk_left)=true and place_meeting(x-4,y,o_block)=false {
 x=x-4 
 }

if keyboard_check(vk_up)=true and place_meeting(x,y-4,o_block)=false {
 y=y-4 
 }

if keyboard_check(vk_down)=true and place_meeting(x,y+4,o_block)=false {
 y=y+4 
 }

What the code is actually doing is checking to see if the player object will collide with a wall object (o_block), and if not (false), advance the player 4 pixels in the direction given.

Why this is an unsatisfactory approach:

Since are moving the player 4 pixels at a time, you have to manually tap back and forth until you are perfectly aligned or you will still get hung up on corners. This isn’t much of a problem when moving around 90 degree turns, becomes an issue when trying to get through ‘four-way’ and ‘T’ intersections.

How to fix it using only what we’ve covered so far up though Level 12:

When I set out to tackle this, the logic went something like so…

  1. Find a location 32 pixels (one character or tile length) ahead of whatever direction I was going
  2. Move to that location
  3. Stop moving when you reach it

I tried using the move_towards_point function using a variable (e.g. target=o_player.x+32) in conjunction with distance_to_point but found that it target would always be 32 pixels further ahead, so it would never close the gap and would move in that direction infinitely. The solution would have to be something relative to, but external from the player object.

That’s when it hit me; why not use another object? So here’s what I did (coded in the o_player object)…

Press D-Key Event:

//create a new object as a waypoint for the player to move towards
//move towards the target's coordinates at a speed of '4'
target=instance_create(x+60, y, o_target)
move_towards_point (target.x,target.y,4)

Collision with o_target Event:

//Destroy the o_target object on collision
with other {
instance_destroy()
}

//Stop the player
speed=0

Some of you may be looking at that code and scratching your heads – why 60 pixels? Well after lots of trial and error, I worked out that in order to move 32 pixels from where you were, you’d have to include the width/height of the player object (+32 pixels), giving you a total of 64.

When I tried 64, I found that I was stopping just short of where I needed to be, and worked out that the collision wasn’t actually detected when the edges of the two object met, but when the player object had overlapped it by the designated speed (4 pixels). So, 64-4=60, which places you at exactly 32 pixels over every time you press the key.

Once I had that working, it was time to clean up the code and put some utility conditions in it to prevent a keystroke from changing direction before you got to your destination, an additional event to stop you when you hit a wall, and to destroy any target objects you can’t reach (i.e. behind a wall) and some additional variables to be able to control the distance (pdist) and speed (pspd).

In the Press D-Key Event:

// check to see if character is moving
if moving=0 {
//set moving to true & destroy the old target
 moving=1
 with o_target {
 instance_destroy()
 }
//move target right by 'pdist' pixels at a speed of 'pspd'
 target=instance_create(x+pdist,y,o_target)
 move_towards_point(target.x,target.y,pspd)
}

Add moving=0 to the end of the o_target and o_block collision events and that’s pretty much it! Now using the Key Press event rather than just the Keyboard event will cause you to take a single step 32 pixels in whatever direction you are heading assuming you adjust the +/- pdist variable depending on whether you are going left (x-pdist), right (x+pdist), up (y-pdist) or down (y+pdist).

So once I got everything working, I swapped the WASD Events over from Key Press back to Keyboard and viola, true grid movement!


Image Credit: Don Quixote, oil on canvas painting by Jean-Baptiste-Camille Corot, 1868.
A Challenge Within a Challenge!

I’m up to Level 08, Lesson 03, and was working my way through the challenge that followed.

In playing through the game as-is, there a couple of notable bugs above and beyond what the challenge required:

  1. The collision event for the potion was missing altogether – easy fix
    givePlayerHealth(25)
    with other {
         instance_destroy()
    }


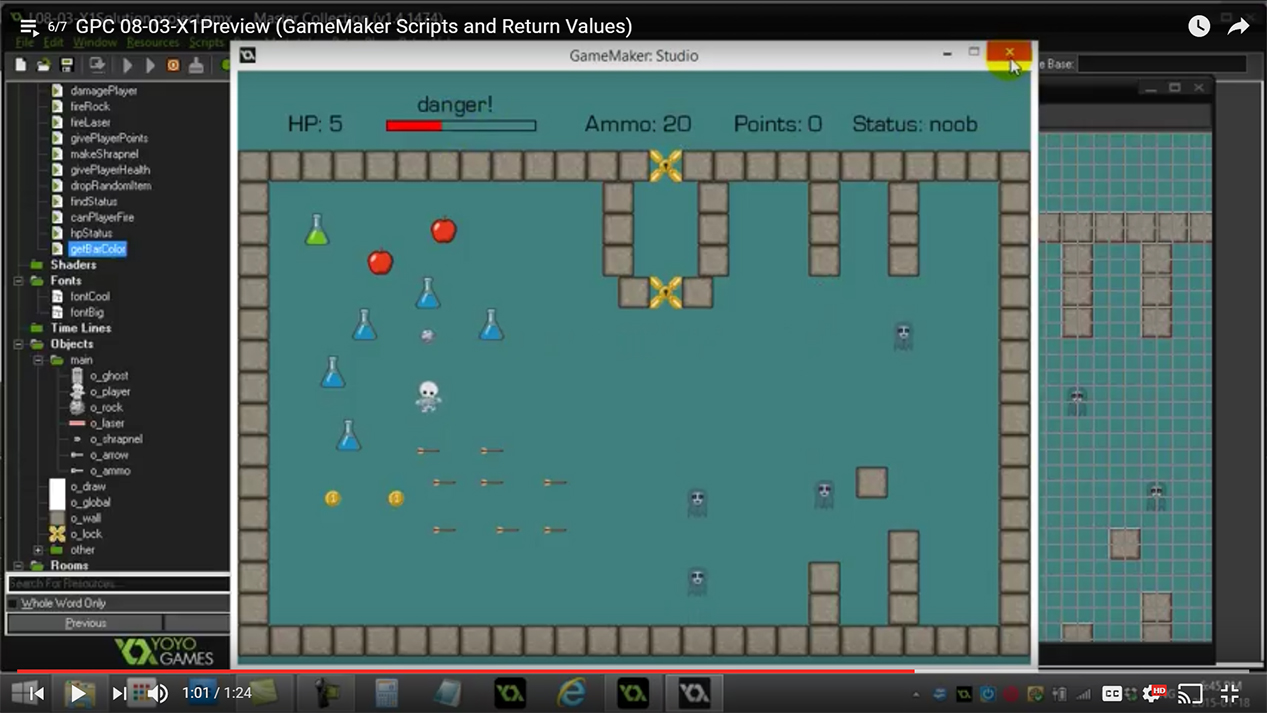
  2. The “health bar” didn’t accurately reflect the current hitpoints! Take a good look at the screen capture from his preview video below:


Look closely and you can clearly see “HP: 5” yet the health bar is nearly 1/3rd full! That doesn’t look right… so what’s wrong with it?

This one was a bit more tricky because neither draw_rectangle nor var have been covered yet…granted, the challenge was to change the color of the rectangle based on the # of hp, not to create a hitpoint bar from scratch – even so, it bothered me that it was broken and I wanted to see if I could troubleshoot and fix it…here’s the original code:

var healthBarWidth=100
var maxHealth=100
draw_set_color (c_white)
draw_rectangle(150,50,200+hp/maxHealth*healthBarWidth, 60, false)
draw_set_color(c_black)
draw_rectangle(150,50,200+healthBarWidth, 60, true)

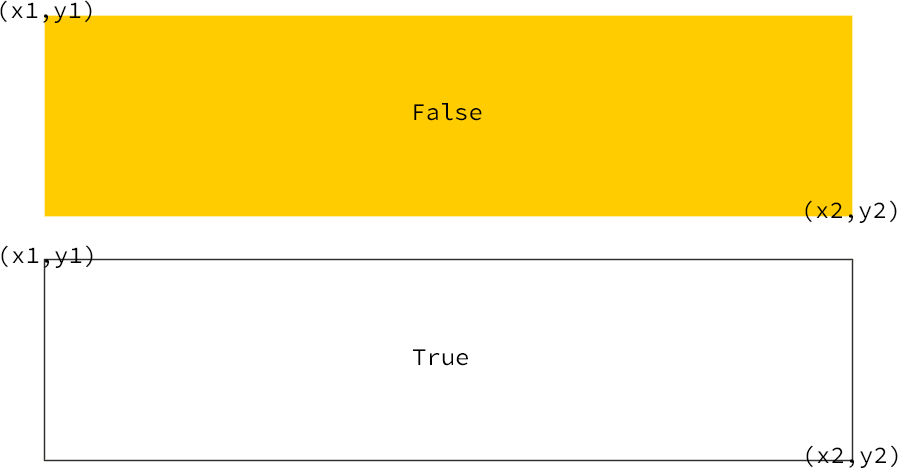
The syntax for the draw_rectangle function is as follows:

draw_rectangle(x1, y1, x2, y2, true or false) where

x1=the x location of the upper left-hand corner of your rectangle
y1=the y location of the upper left-hand corner of your rectangle
x2=the x location of the lower right-hand corner of your rectangle
y2=the y location of the lower right-hand corner of your rectangle
true=filled with whatever your draw_set_color is
false=empty (transparent) with a 1 pixel border

Confused? Well here’s an illustration I made to visualize it better:

Now lets apply that to the code above. Working through his arithmetic for the filled (false) rectangle, here’s what you get for the x2 values if you substitute the variables for their numbers:

200+0/100*100=200 (0 hp)
200+100/100*100=300
(100 hp)

Expressed in code, it would look like this:

draw_rectangle(150,50,200,60,false)//0 hp
draw_rectangle(150,50,300,60,false)//100 hp

…and output like this (assuming you include the border rectangle):


The left edge (x1) starts at 150 pixels in, and the right edge ends at 300 pixels, giving you an overall length of 150 pixels (300-150=150) along the x axis.

When the player has 0 hp, the left edge is not 150, but 200, leaving you with a 50 pixel (1/3rd) wide rectangle, which is exactly what you see in the screenshot above.

So I dug into the code and came up with the simplest solution. This was the result:

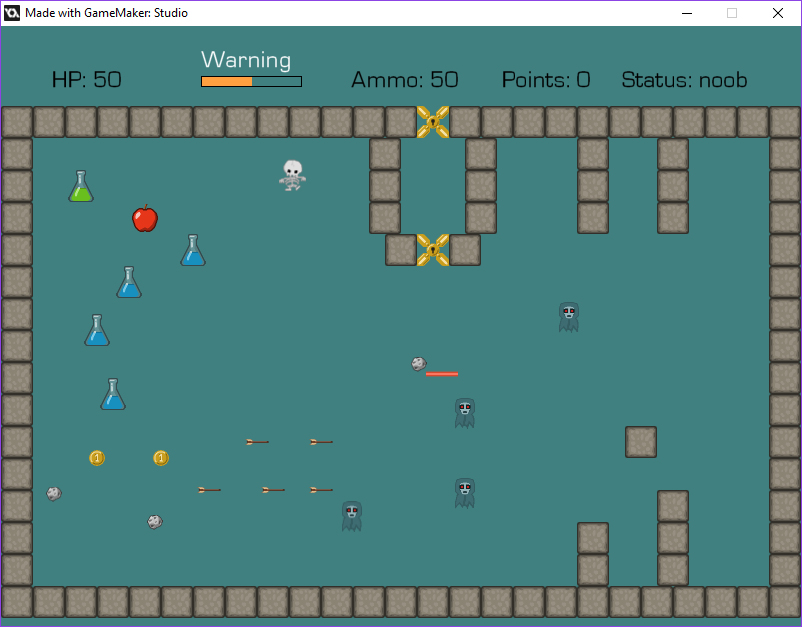
Notice that it says “HP: 50” and the bar is exactly half way!

So how did I fix it?

Simple – move the left edge over by 50 pixels, giving the overall length of both rectangles to be 100 pixels rather than 150, removing the 50 pixel lead:

//health bar draw code - the first rectangle draws the filled color
//the second rectangle draws the border
draw_set_color (getBarColor())
draw_rectangle(200,50,200+hp,60,false)
draw_set_color(c_black)
draw_rectangle(200,50,300,60,true)

It’s no accident that my code is absent the healthBarWidth and maxHealth variables – since my healthbar is 100 pixels in length, the simplest solution was to shorten the bar. The reason those are included is size the fill rectangle proportionately to the amount of hp you have remaining so that you can name the hp bar longer or shorter depending on your needs.

But you can’t use the code from the original project file as-is…

First, you’d need to set minimum left-edge of x2 to match x1 for your filled rectangle. So instead of:

 draw_rectangle(150,50,200+hp/maxHealth*healthBarWidth, 60, false)

You’d replace 200+hp… with 150+hp…:

draw_rectangle(150,50,150+hp/maxHealth*healthBarWidth, 60, false)

Secondly, you’d need to change maxHealth proportionate to the total amount of your hp (100) with respect to the overall length of your rectangle (150). This would give you 100/150 or 2/3rds (66.6% repeating).

Since hp is evenly divisible by the length of the health bar, this presents a problem as putting in var maxHealth=66 is pretty close, but not a pixel perfect fit inside the border rectangle (it’s about 4 or 5 pixels off).

Nevertheless, if I just had to make a health bar bigger or smaller than 100 pixels, I’d try to use something that divides evenly, hide it using depth and alpha channels, or leave off the border altogether. There may be more elegant ways to solve it, but it’s nearly 2am here and I think I’ve learned what I wanted to from this exercise 😐 .

Into the Deep End…

I’ve just finished Levels 06 and 07 of the GPC. Not much to say about the first lessons within Level 06 – they introduced GMS’ built-in image editor – while adequate for what it is, there many better tools available.

Moving on, the one good take-away from Level 06 was learning that image animations don’t start from the first frame by default – instead, they pick up wherever you are within each step.

So if you trigger an action that calls for an animation change (e.g. transitioning from idle to movement), the second animation (movement) will NOT begin on frame 0 by default, instead, it will pick up whether the animation should have been with respect to the current step!

As such, it’s useful to lead with image_index=0 to ensure that the animations start where they are supposed to.

###

Level 07 was short, and lacked the continuity established in the previous lessons. Functions were thrown about in rapid succession without stopping to really explain what they did, instead, an exercise in, “RTM,” though not in so many words 🙂 .

Aside, January 11, 2017: I concede that there are hundreds, if not thousands of built-in GML functions, and not all of them could be covered in even a ~120 hour course. Moreover, some may be too obscure to be useful for most students, and the intent was to get the user familiar with the help file and looking up function syntax when needed.

Fair enough – so why kick up a fuss about it now? Well, to this point (with the exception of Level 04), the course followed a very effective formula:

Introduce a new concept, usually built upon a solid foundation of core skills developed throughout the course. In order for the concept to be useful, it has to be framed in a context that’s meaningful to the student. Absent that, the exercise becomes meaningless and rote; disconnected from other concepts and quickly forgotten.

My recommendation would be to change the name of Level 07 to “Vector Functions and Collision Checking” – I would remove “scripts” because that isn’t really covered until Level 08, and only hinted at in Level 07.

While Level 07 defines what Functions/Methods and Arguments/Parameters are, we’ve been using them since Level 02, and could continue using them blissfully ignorant of what they are called, that is until Level 08 where it really becomes necessary to understand them.

Take that out, and what you are left with are numerous examples, all concerning either Vector or Collision Checking functions (i.e. point_direction, position_empty, point_in_circle, instance_furthest/nearest…), and use examples of games where these are useful or necessary (e.g. tower defense, homing missiles etc.).

Level 08 is more promising thus far, but looking ahead, the good stuff is going to be found in Levels 11-15.

Time!

Happy New Year, and Happy Birthday, Eric!

Today I worked through Level 05 of the GPC. Level 03 introduced the irandom_range function, and provided a few examples of how I could throttle when actions occured – remember that in GML, action happens according to game speed (30 by default, or 30 steps/second).

This time, instead of leaving something up to random chance in hopes that it falls on the correct number or number range, we learned how to guarantee that the action occurred at a specified interval. This happened one of two ways:

  1. Using a counter – declare an instance variable in the create event for an object and set a value:
    //"counter" is the name of the variable, 
    //you could call it anything you wanted...
    //we set it to 0 so that it could count up 
    //in the STEP EVENT later
    
     counter=0

    Then create a step event (an event that cycles x# of iterations, 1 for every point you’ve set the game speed to):

    //add + 1 to the counter every time the step runs, 
    // 30 times per second by default
    
    counter=counter+1
    
    //when the counter reaches 150, or 5 seconds, 
    //do something
    
    if counter >=150 {
    ...code whatever you want to happen here...
     }


  2. Using Alarms – a built-in counter you can use. Each object can have up to 12 different alarms in it. They work like this:From another event’s code, enter:
    //where 0 is the alarm # (0-11) and 90 is the 
    //# of steps to wait (3 seconds)
    
     alarm[0]=90

    When the alarm #0 goes off, you can execute a piece of code by adding an Alarm Event for that specific alarm #:

    //e.g. create an explosion in a random location 
    //on the screen
    
     effect_create_above (ef_explosion,irandom_range (100,600),irandom_range (100,600),0,c_orange)
    
    //makes the alarm reset to 3 seconds
    // comment out of if you want it to
    //only happen once.
    
    alarm[0]=90

###

Level 05, Lesson 3: Getting Out of Sync

I’d like to preface this by acknowledging two points:

a. It’s FREE…I didn’t have to pay for ANY of this, yet all of it represents his own time, effort and money (i.e. hosting fees for his website, cost of recording equipment and software and so on).

b. John Janetka is a teacher first and foremost – the GPC website, his YouTube channel and all the content therein are done in his spare time, and shared with me, you and everyone else who’s interested because he can and wants to, and with a ‘best-effort’ LoS.

Up to this point, I’d worked out that I needed to go to the website first, read the lesson, watch the video(s), then go back to the website to complete the challenges.

This pattern held true until you get to Level 05, Lesson 03.  The first thing he asks you to do in Part A is to read the notes on “L05-03-Reading01.pdf”. There isn’t a link to it on the website, or anywhere!

Then he asks you to watch the video 05-03-A to review said notes, but again, there is no such video on his YouTube channel!

Further down, he asks you to go through the questions in L05-03-ConceptQuestions01.pdf, which, like the notes, aren’t linked on the page or anywhere else…

So where are they? Well, after doing some digging, I found the word document versions buried in the Lv05 resource folder that was  included in the zip file from his resources page (the link labeled “Course Resources For All Levels”).

While I could have sworn that he’d touched on &&, || and != somewhere in one of his previous videos, they aren’t covered in any of the Level 05 videos up GPC-05-03-X1Preview. Not that it matters much as the lesson notes do a pretty good job explaining what they each do and when to use them.

By and large, the questions did a good job of reinforcing the lesson up to Part C, where the answers didn’t really follow the format he specified in his instructions…

SPOILER ALERT: Part C Questions and Answers

The question is phrased as follows:

Condition Is it ‘always true’ or ‘always false’?
if x>20 || x < 10
if points<20 || points>10
if life>=100 && life>50
if life>=100 && life<=0
if (points>10) && (points<20)

My answers were:

Condition Is it ‘always true’ or ‘always false’?
if x>20 || x < 10  Neither
if points<20 || points>10  Always True
if life>=100 && life>50 Neither
if life>=100 && life<=0  Always False
if (points>10) && (points<20)  Neither

His answers were:

Condition Is it ‘always true’ or ‘always false’ ?
if x>20 || x < 10 not always true
if points<20 || points>10 always true since one of the conditions must be true
if life>=100 && life>50 not always true  (ex. life is 25)
if life>=100 && life<=0 not always true  (ex. life is 50)
if (points>10) && (points<20) not always true

“Not always true” implies that it is sometimes false, when if fact, in some cases (e.g. if life>=100 && life<=0) it is ALWAYS False.

To check my answers, I wrote a test program which used the i_random_range function to generate a number every step between 0 and 200 (all of the examples above fall in that range).  From there, I ran each condition separately and had it display the result (true, false or both) each cycle, proving them correct.

I’ve provided it here, feel free to use it if you’d like.

…and yes, I probably spent waaaay more time on this than I reasonably should have, but it’s all good practice, right?


Later still in the same lesson, he tosses in some functions not previously covered (e.g. room_exists, room_goto_next etc.). I hope these will be covered in more depth later as this was the first time we’d played around with a project that had more than one screen.

Welp, on to the rest of the lesson! Stay tuned for more…


Image Credit: Don’t Hug Me, I’m Scared 2

Staying the Course[work]

In my last post, I began working my way through the free video lessons on www.gameprogrammingcourse.com and it’s associated YouTube channel.

It’s important to note that the YouTube channel is supplementary to the website, not the other way around; as such, if you arrive at the YouTube channel first (as I did) you might find yourself scratching your head when you get to the playlists, particularly where to start

If you’re looking for Level 01, that’s on his website here. There isn’t a video for this as you’re just downloading and installing GMS, the videos begin at Level 02.

###

It’s hard to believe that it’s only been 2 days since I started these courses, and I just finished Level 04, which wasn’t a lesson series, but rather a series of challenges designed to utilize all the skills I’d acquired in Levels 02 and 03.

Random Solutions

One of the problems we’d be wrestling with is game speed and it’s effect on action timing. Suppose you plant a brick wall in front a horde of advancing peasants.

Event > Collision > Obj_Peasant > Obj_BrickWall

//subtracts 1 hitpoint from the brick wall upon collision
with other {
hp=hp-1
}

Assuming you’ve given the Obj_BrickWall an instance variable called “hp” (i.e. hitpoints) and assigned a numeric value to it (e.g. 100), it would take one peasant about 3.2 seconds or so to break it down as he’s colliding with it 30 times a second, dealing 1 damage each time.

My solution to this was simple, but lacking – give the wall more hitpoints, say 1000 for instance. This isn’t a very elegant way to handle this, but it worked, and it took a peasant about 32 seconds or so to break down the wall, which is what I was looking for.

Then I completed Level 03, and in the process of doing so, learned about irandom_range (#,#). What this does is allow you to replace any integer with randomized range of numbers. For example, you could have the peasant do a savings throw (much like a tabletop RPG) to determine whether or not he landed a successful blow. That would look something like this:

//Utilizes a random number to determine whether or not a hit is scored,
//subtracts 1 hitpoint from the brick wall upon successful roll.


savingsthrow=irandom_range(0,100)

If savingsthrow=1 {
with other {

hp=hp-1
}
}

As such, the peasant has ~30 chances a second to hit the wall, dealing 1 point of damage on every successful hit. Towards the end of Level 03, and a few times in Level 04, this method was used as a makeshift timer of sorts to throttle the speed of an event by adjusting the range (i.e. bigger range = more time, smaller range = less time).

Looking ahead toward Level 05, I suspect that this will be replaced with a far more precise way of handling timing.

Stepping Stones and a Clear Path Forward

Building on an Unstable Foundation

As we draw closer to a working prototype, it’s become increasingly more apparent that there are some fundamentally flawed issues with the way we’re going about implementation.

Eric is new to both programming in general (save for some college level coursework a few years ago), and GML. All in all, he’s got about 4 or 5 weeks worth of experience in total, but no formal training. As such, he doesn’t have a solid foundation of knowledge to build on, forcing him to seek out tutorials (usually YouTube videos) which give him ideas as to how a thing can be done.

The most popular videos are more akin to “Let’s Plays” with little (if any) structure, and even fewer explanations as to why the developer elected to go about doing things a certain way.

This forced Eric to look at what the other developer did, attempt reproduce it, then reverse engineer it without understanding what each piece’s purpose – trying different arrangements and configurations until it worked (or at least appeared to).

What troubled me was that sometimes I’d ask for a seemingly trivial feature only to find that he was unable to work out how to program it, and compromised with an implementation that wasn’t up to spec.

For example, instead of using keys 1-6 to toggle a different weapon type, and Ctrl to fire,  he mapped weapon type 1 to key 1 because from a logic standpoint, he had no idea how that would work, let alone how to frame the problem so that he could look it up.

Another example was the breakable wall from my prototype specifications in the last post. What I asked for was for wall, when placed, to take damage when it collided with the enemy, and update it’s animation frames to show progressively more damage before being destroyed.

Because he didn’t understand how variables worked, the wall was killing the enemy rather than the other way around – my suspicion was that he didn’t use the “with other” construct to indicate that it was the wall taking damage, not the enemy as they both had an instance variable called “hp” (i.e. hitpoints).

After a few more hours of working on it, he came back and this time the walls were taking damage, but being destroyed after only a second or two. This was because he was using the image_index property to advance the frames of damage to the wall sprite, destroying the object when it reached the end of the animation, foregoing hitpoints altogether.

Since the room speed was set to 30 (i.e. 30 cycles/second), the enemy was colliding with the wall 30 times a second, causing the wall to cycle through each frame of its sprite sheet within a fraction of a second. While this “appeared” to work, it in fact did not follow my design specifications (no hitpoint system) and was therefore not fit for purpose.

I suggested how this could be solved in pseudo code, but he insisted he tried that and it didn’t work – again, probably because of which object he was calling the variables from, but I didn’t know that either at the time.

So where could we go from here?

You Don’t Know What You Don’t Know…

The root of the issue was that while I understood the basic logic I wanted to use, I didn’t have the syntax for it, and neither did Eric. We needed to take a step back and learn the basics before trying to implement big, hairy, complicated features.

So again, I took to YouTube – we’d watched several of the Let’s Learn GameMaker: Studio channel’s videos, lots good information covering what was available and what options there were for each feature, but there was no practical application of those lessons; at at the end of the lesson, there was no example of a typical use case for that feature in your game

A Clear Path Forward

Just when I was about to give up, I managed to stumble upon another channel aptly named, Gamemaker Game Programming Course.  The channel is a bit confusing (the playlists in particular) until you work out that it’s actually just a video repository for his website:

www.gameprogrammingcourse.com

Start there, download the resource packs and project files, then start with the playlist labeled: Level 02 [ GameMaker Basics Sprites Objects Events ].

The site and videos were created by computer programming teacher named John Janetka for his high school’s computer science program. The quality of the content and structure of the lessons are the best I’ve come across on YouTube thus far.

By the end of Level 02, I was able to solve both of the programming issues Eric was struggling with above, and created two games in the process. Simple as they were, the experience was valuable.

I’d asked Eric to place his programming efforts on hold to go through this course with me. I asked him to try not to think of this as a step backward, but rather rather a stepping stone forward toward better, more stable code. He agreed, and will continue to check in every day or so to share what we’ve learned.

###

Image Credit: “Martyn B

Disclaimer: I have no affiliation with any of the websites, applications or YouTube channels referenced above.